Introduction
The Difuse Project is a next-generation networking and communication solution that empowers small and medium-sized businesses to stay connected, secure, and productive. With its powerful and versatile features, Difuse provides businesses with the tools they need to succeed in today's fast-paced, digital world.
Connectivity
One of the key benefits of Difuse is its gigabit WAN/LAN connections, which allow businesses to transfer data quickly and reliably. This means that businesses can process large files, download software updates, and stream high-quality video content without experiencing any lag or downtime. Additionally, the two 2.5 Gbps SFP WAN ports provide businesses with more options for connecting to the internet, giving them greater flexibility and redundancy.
Difuse also offers 4G connectivity, which is particularly useful for businesses that need to stay connected while on the go. Whether you're traveling to a client site or working remotely, the built-in 4G modem ensures that you can stay connected to the internet, no matter where you are. This can be particularly useful for businesses that rely on cloud-based software and services, as it allows them to access their data and applications from anywhere.
In addition to its wired connectivity options, Difuse also offers WiFi 6 support, which provides businesses with the latest and most secure wireless technology available. With WiFi 6, businesses can enjoy faster speeds, greater bandwidth, and better security, ensuring that their wireless network is always running smoothly and securely.
Services
Another key feature of Difuse is its WireGuard VPN support, which provides businesses with a secure and reliable way to connect to their local network from anywhere in the world. Whether you're traveling abroad or working from home, the WireGuard VPN ensures that your data is always encrypted and protected from prying eyes. Additionally, the policy-based routing feature allows businesses to control how their data is routed, giving them greater control over their network.
Difuse also comes pre-installed with IPFS, a decentralized file storage system that allows businesses to share files with other devices on the local and wide-area network. This means that businesses can collaborate more easily, share files more quickly, and improve their overall productivity.
The Difuse Project also includes Asterisk, a powerful open-source PBX (private branch exchange) system that enables businesses to manage their phone systems more efficiently.
With Asterisk, businesses can set up their own phone system and take advantage of advanced features like call routing, voicemail, conference calling, and more. The custom GUI (graphical user interface) has been designed specifically for ease of use, making it easy for businesses to configure and manage their phone system without requiring extensive technical knowledge.
By incorporating Asterisk into the Difuse device, businesses can enjoy a complete networking and communication solution that provides them with all the tools they need to stay connected, productive, and efficient. Whether it's managing their phone system or routing data across their network, Difuse provides businesses with the flexibility and control they need to succeed in today's digital world.
Finally, the Difuse device includes a suite of firewall and routing tools, which provide businesses with the tools they need to secure their network and control how their data is routed. With the latest NFTables and associated routing tools, businesses can configure their device to meet their specific needs, ensuring that their network is always running smoothly and securely.
Overall, the Difuse Project is a comprehensive networking and communication solution that provides small and medium-sized businesses with the tools they need to succeed in today's digital world. With its powerful features and versatile connectivity options, Difuse is the ideal choice for businesses that need to stay connected, productive, and secure.
Dashboards
Dashboards are a powerful tool for visualizing and monitoring the performance of your network and communication systems. With dashboards, you can easily track key metrics, detect issues and troubleshoot problems before they become critical.
At Difuse, we understand the importance of having real-time visibility into the performance of your network and communication systems. That's why we have developed three distinct dashboards - one for the router, one for telephony, and one for netdata - each tailored to provide you with unique insights into different aspects of your system.
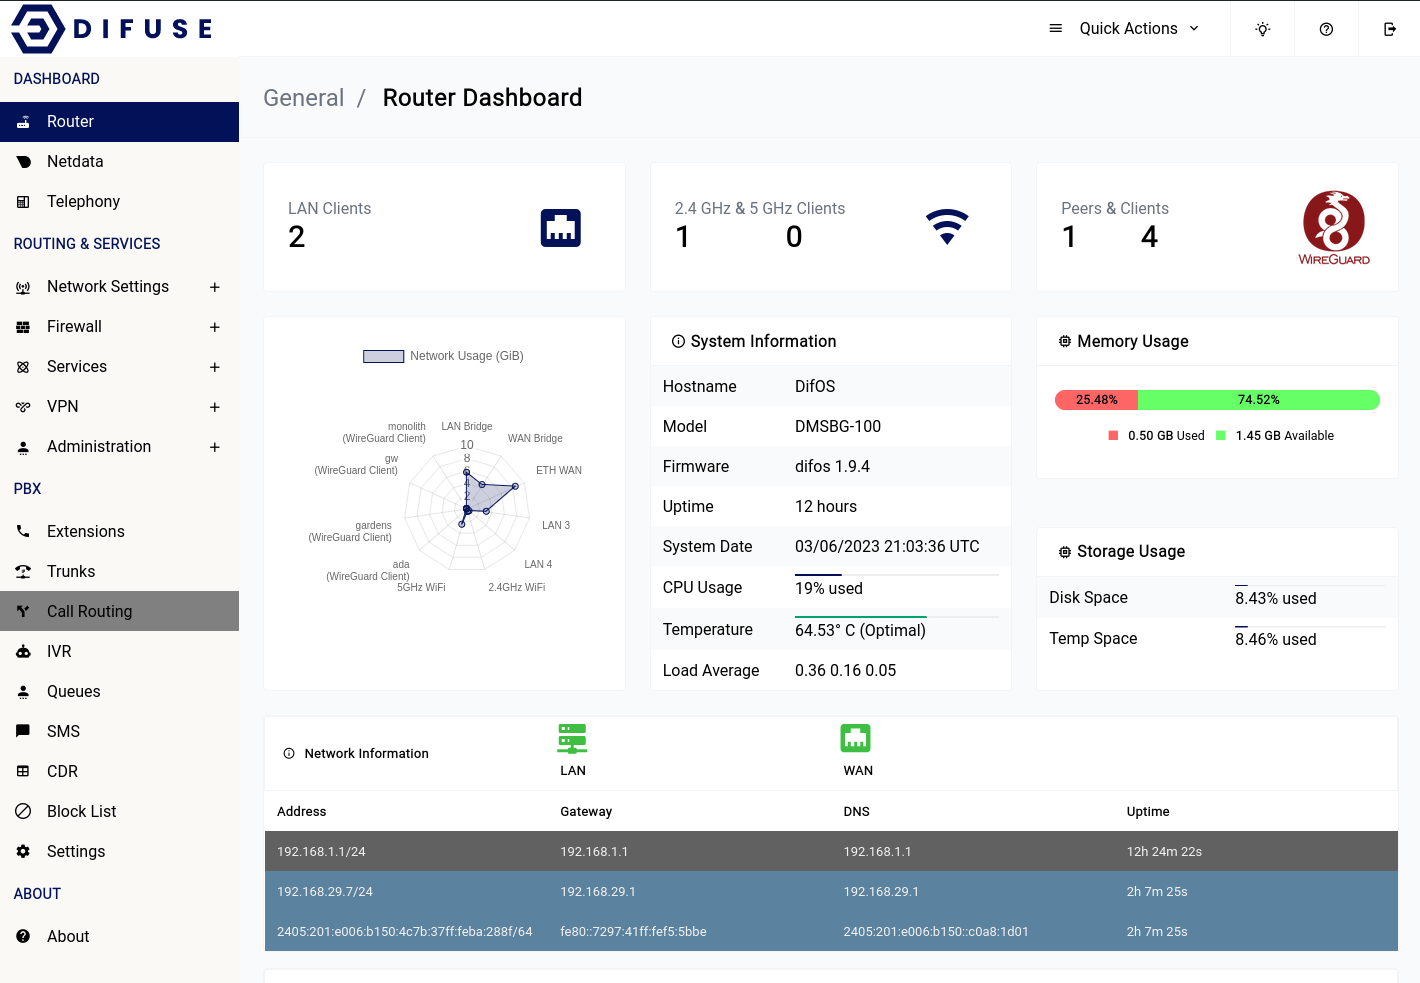
Dashboard - Router
The Router dashboard provides a comprehensive bird's eye view of your network infrastructure. From device load to VPN status, WiFi details to IP addressing, the Router dashboard gives you all the relevant information you need to quickly assess the health and performance of your device and network.
At Difuse, we understand the importance of having a clear and concise overview of your network infrastructure. That's why our Router dashboard is designed to provide you with all the critical information you need in a single, easy-to-use interface.
The Router dashboard displays key metrics such as the number of wired LAN clients, WiFi client details (including how many are connected to 2.4 GHz vs. 5 GHz), and the current IP addresses configured on the system.
Located in the top-right corner of the page, the "Quick Actions" menu provides easy access to frequently used tasks, such as restarting-reloading the asterisk instance as well as a reboot button.
Please keep in mind that it will take a couple of minutes for the router to be active after a reboot depending on the services that you have enabled/are in use.
Dashboard -Netdata
Netdata monitoring is a robust and versatile tool that offers a multitude of benefits to system administrators, developers, and IT professionals. Its real-time performance monitoring capability provides immediate insight into system performance and resource usage, enabling early detection of bottlenecks and potential issues before they escalate into bigger problems. Additionally, Netdata's capability to store historical data offers the ability to analyze trends and identify long-term performance issues, which is crucial for effective capacity planning and performance optimization.
Another significant advantage of Netdata is its high level of extensibility, which allows it to be customized to monitor a wide range of systems and applications. This versatility makes it a valuable tool that can be adapted to meet the unique needs of different organizations and use cases.
Being an open-source tool, Netdata has a vibrant and active community of developers and users. This means that users can leverage the expertise of the community, access a variety of plugins and integrations, and benefit from ongoing support and development.
Overall, Netdata monitoring is a powerful and reliable tool for anyone looking to monitor and optimize system performance, making it an essential tool for IT professionals and we have integrated directly into the Difuse GUI for ease of use.
Dsahboard - Telephony
Telephony menu gives out all relevant infomation about the telephony service in the system.
All the PJSIP endpoints that are available on the system will be available in the SIP endpoints section.
If you have a VoIP provider that needs to know what version of asterisk you’re running to setup on their end you can copy the version from the PBX Information table below as shown.
Network Settings
Difuse offers a host of Network Settings to configure your network interfaces, routes, DHCP client options etc. In this page you can see a few of the terms used in the Network Settings and their definitions.
LAN
The LAN (Local Area Network) is the network that your router is connected to. This is the network that your devices will connect to and be assigned an IP address from.
In Difuse you can configure DHCP on the LAN interface to automatically assign IPv4 addresses to devices that connect to your router and if needed you can assign static IPs to some or if not all the devices on your network.
As far as IPv6 on the LAN interface goes, you can configure a static IPv6 address or you can use the SLAAC (Stateless Address Autoconfiguration) method to automatically assign IPv6 addresses to devices on your network or use other options that is available to you in the IPv6 tab of the LAN interface.
WiFi
The WiFi interface is the wireless interface on your router. You can configure the WiFi interface to broadcast a WiFi network and configure the SSID, password, channel, bandwidth etc.
WAN
The WAN (Wide Area Network) is the network that your router is connected to. This is the network that your router will connect to the internet through. We offer primarily 3 main options for both IPv4 and IPv6 on the WAN interface, they are:
- DHCP (both v4 and v6)
- Static IP
- PPPoE
You can select the appropriate option for your network and configure it accordingly.
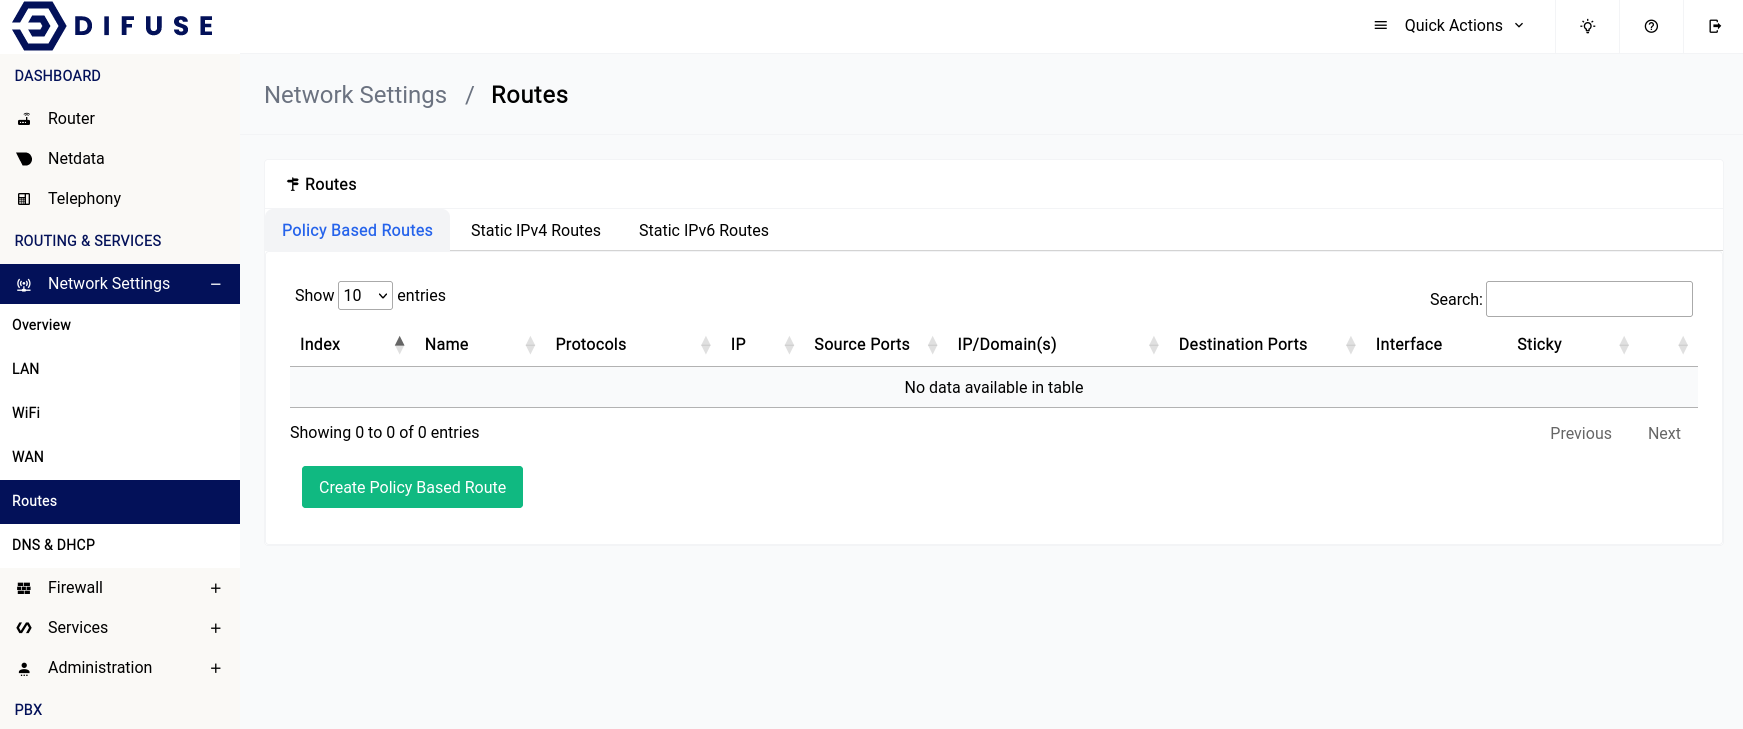
Routes
Routes are used to tell your router where to send traffic to. You can add routes to your router to tell it where to send traffic to for a specific network. There are primarily 3 types of routes that you can add to your router:
- Policy Based Routes
- Static IPv4 Routes
- Static IPv6 Routes
DNS & DHCP
DNS (Domain Name System) is used to resolve domain names to IP addresses. You can configure the DNS servers that your router uses to resolve domain names. You can also configure the DHCP server on your router to assign DNS servers to devices that connect to your router.
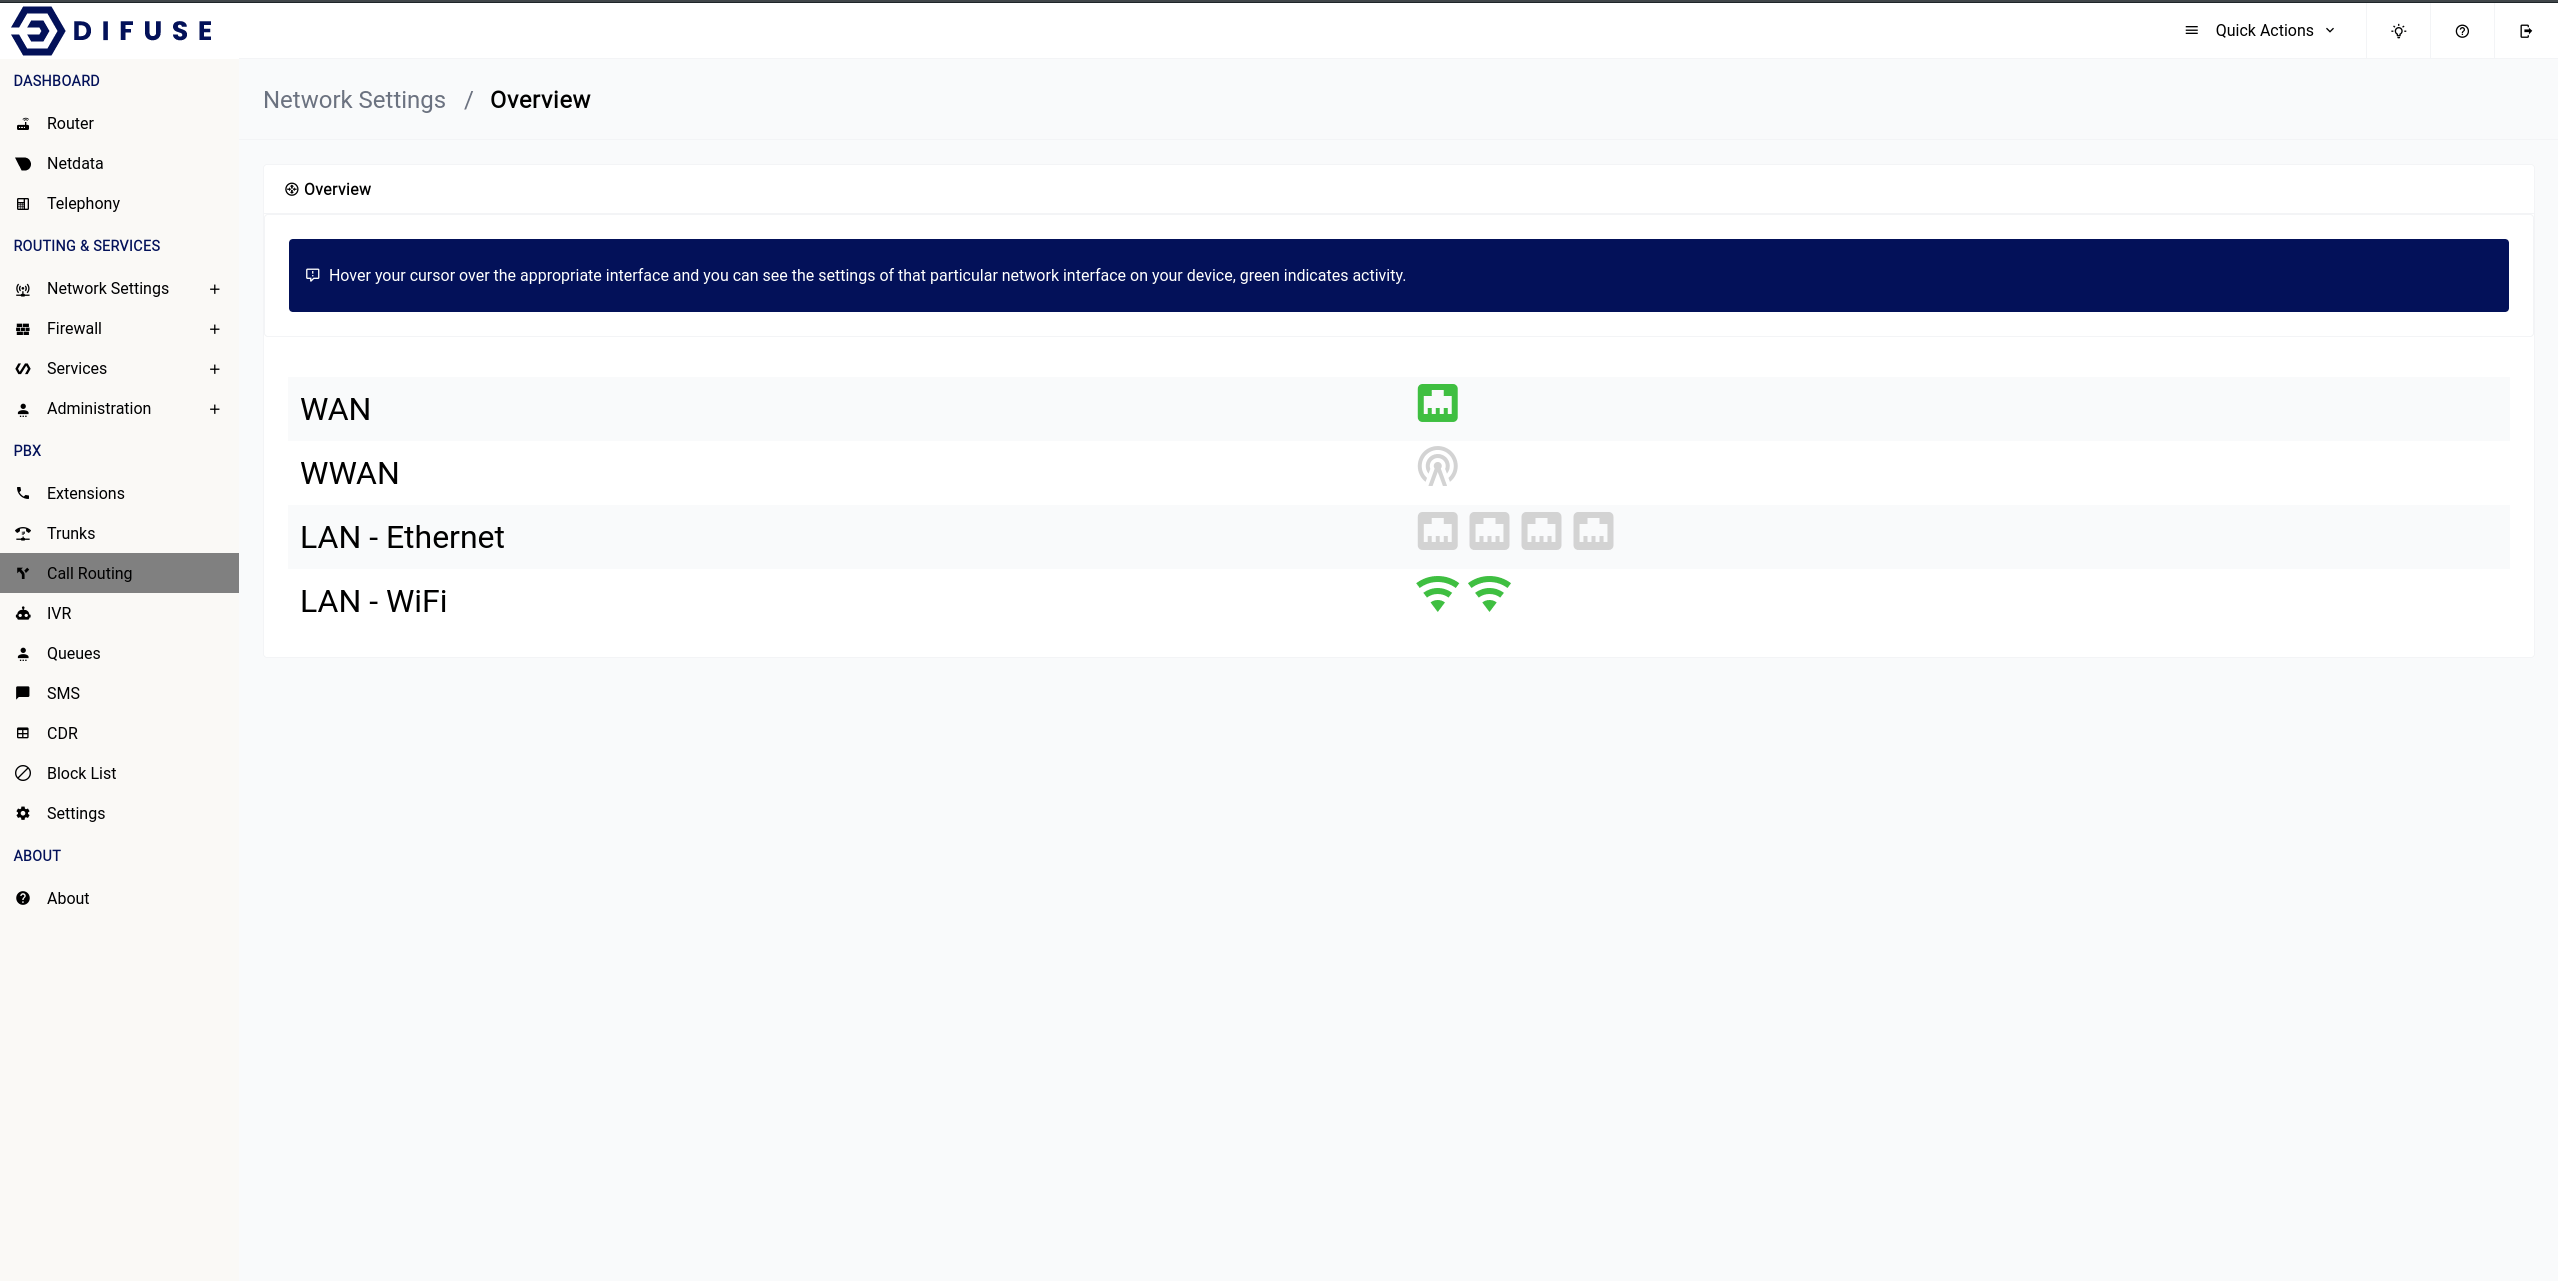
Network Settings - Overview
The overview page is just to showcase recent activity on each available interface as well as give some critical information like their IP address and MAC address on hover of the interface icon.
Network Settings - LAN
LAN stands for Local Area Network. This is the network that your router is connected to. This is the network that your devices will connect to and be assigned an IP address from.
LAN configuration can be found in the Network Settings tab under the LAN section.
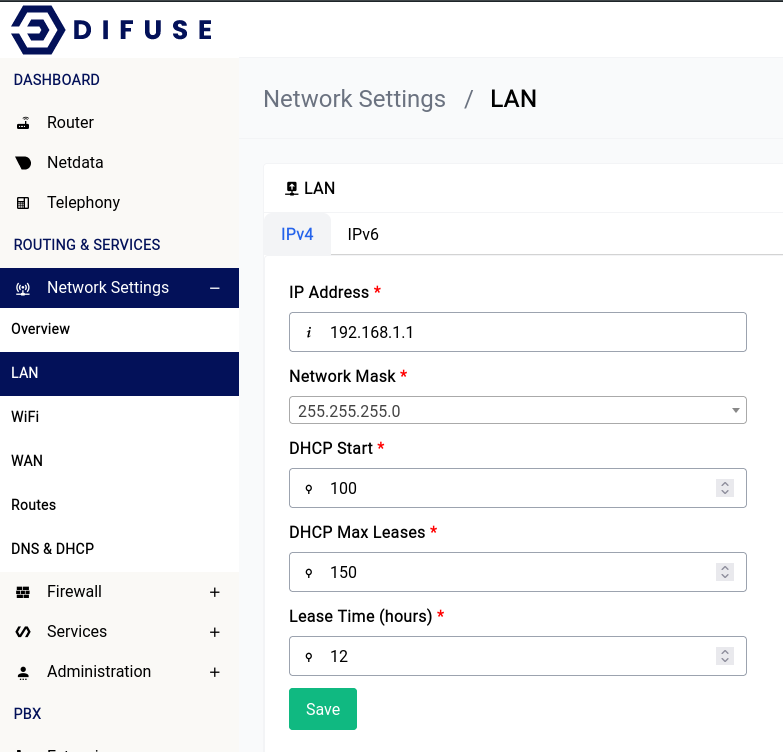
Network Settings - LAN - IPv4 Configuration
Setting up a local network requires careful consideration of the IP addresses to be used. Using private IP addresses from the reserved address space, such as 10.0.0.0/8, 172.16.0.0/12, and 192.168.0.0/16, is recommended to avoid issues with overlapping addresses on the internet.
To further optimize your network, it is recommended to use smaller broadcast domains. This means breaking down the network into smaller groups of IP addresses, rather than using a larger network with millions of addresses. For example, using a network with 254 IP addresses like 10.10.10.0/24 is better than using a network with over 16 million addresses like 10.0.0.0/8. This can help to prevent future conflicts with other remote networks in case you need to link them with a VPN.
To explore the network interface configuration options, head to the Network Settings - LAN under the Routing & Services section.
There are other options such as the ones for the DHCP server that runs underneath which can also be specified in the same form.
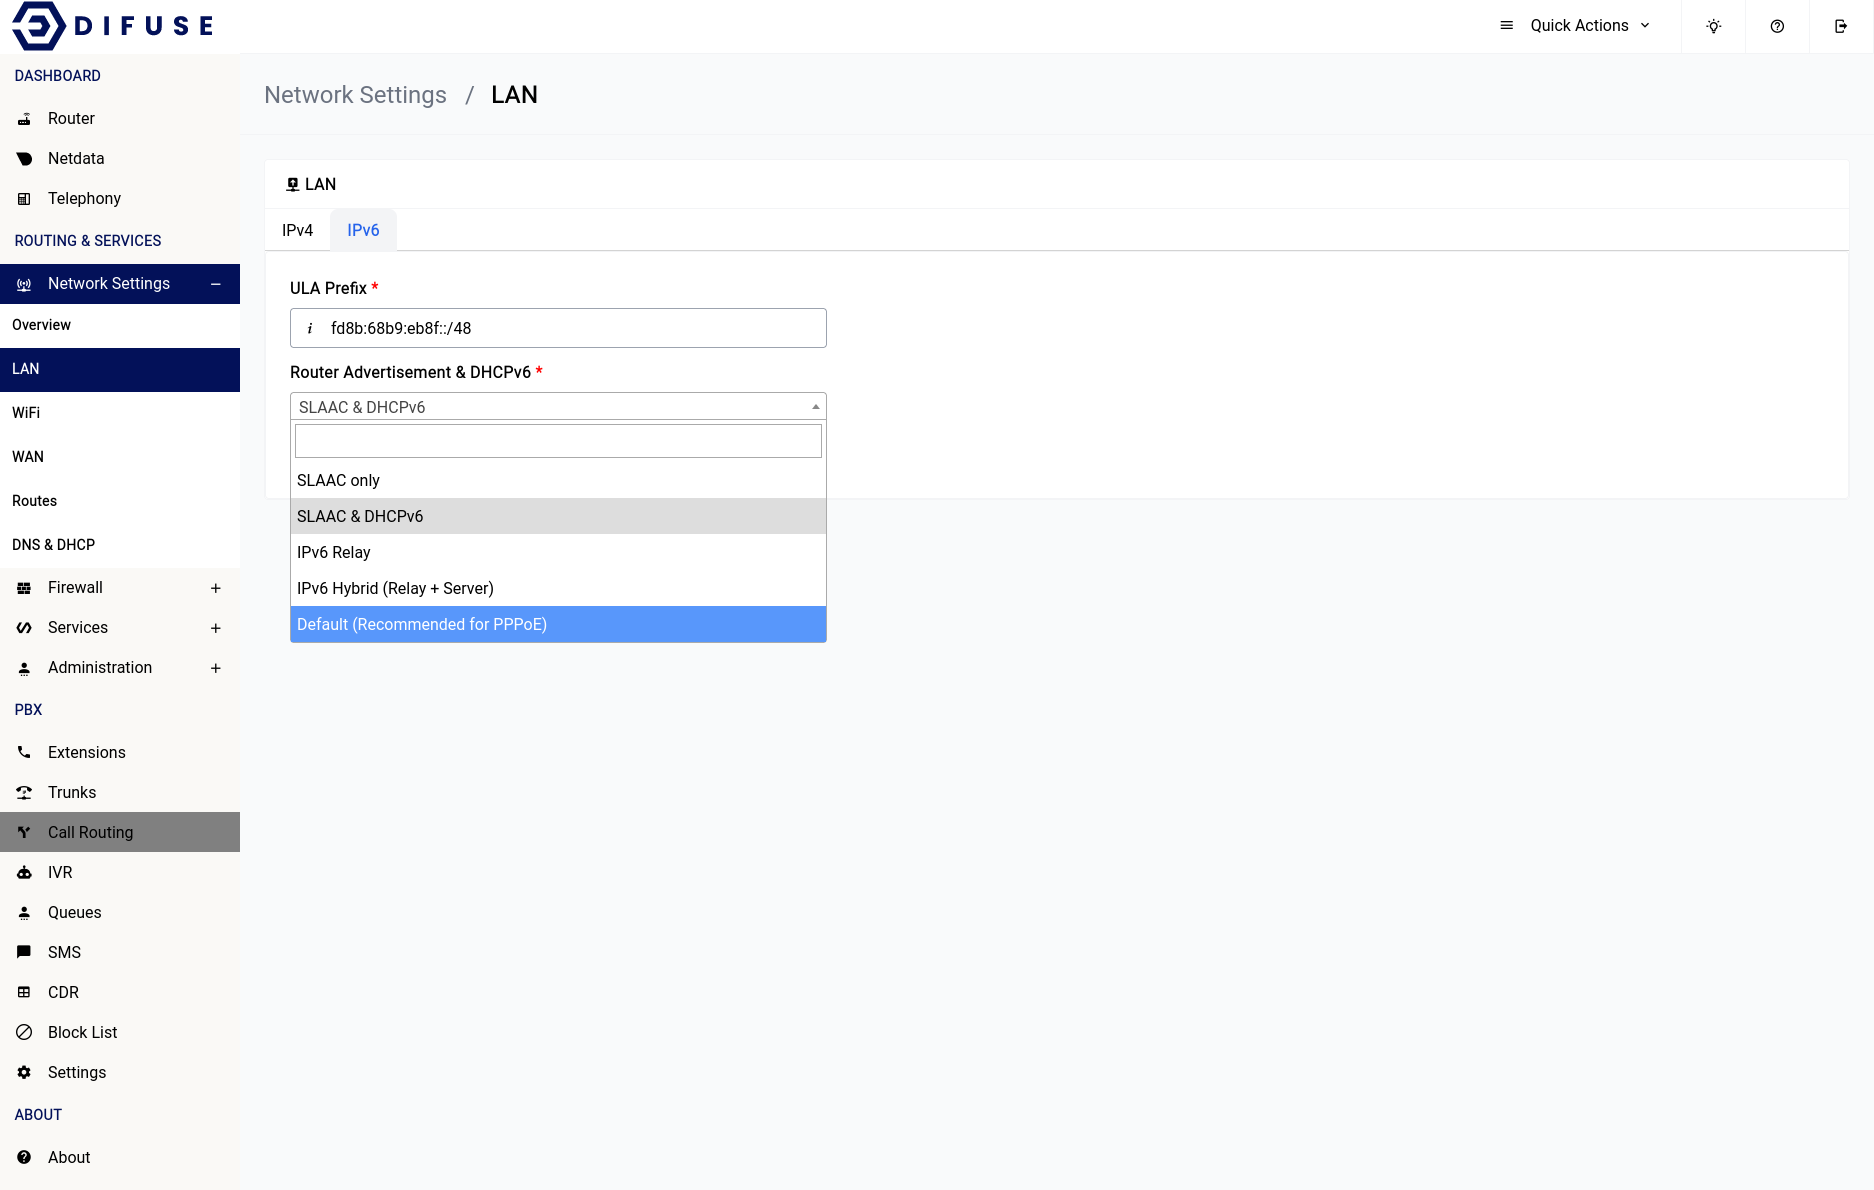
Network Settings - LAN - IPv6 Configuration
If you navigate to the IPv6 tab you can see there are only 2 options one is the ULA Prefix and the other is the Router Advertisement (RA) and DHCPv6 options.
For most setups the ULA prefix can remain unchanged as it’s randomly generated and is assigned with the right prefix length, only change it if you know what you’re doing. ULA addresses are simply addresses that are routable within the scope of private networks, it’s not globally routable.
Coming to the DHCPv6 options it can be crucial to the setup of IPv6 on your device depending upon your setup layout.
SLAAC only
Stateless Address Autoconfiguration (SLAAC) is a method for automatically configuring IPv6 addresses on a network without the need for a DHCPv6 server. In this method, devices generate their own IPv6 addresses based on the network prefix advertised by the router.
SLAAC & DHCPv6
This method uses both SLAAC and DHCPv6 to assign IPv6 addresses to devices on a network. SLAAC is used to generate the interface identifier portion of the IPv6 address, while DHCPv6 is used to provide additional information such as DNS server addresses and network time settings.
IPv6 Relay
This method forwards IPv6 packets between different network segments. In this context, an IPv6 relay is used to forward DHCPv6 requests and replies between the requesting device and a DHCPv6 server on another network segment.
IPv6 Hybrid (Relay + Server)
This method combines the use of SLAAC, DHCPv6, and an IPv6 relay to assign IPv6 addresses to devices on a network. The IPv6 relay is used to forward DHCPv6 requests and replies between the requesting device and a DHCPv6 server on another network segment, while SLAAC is used to generate the interface identifier portion of the IPv6 address.
If the device is connected as a DHCP client to another router you need to select either IPv6 Relay or IPv6 Hybrid for proper functioning of IPv6
Default (Recommended for PPPoE)
This option is the recommended method for assigning IPv6 addresses to devices on a network that uses PPPoE to establish a connection to the internet. This method involves using SLAAC to generate an IPv6 address for the device, based on the /64 (other other) prefix assigned to the PPPoE connection by the ISP's network. Additionally, the device obtains additional network configuration information such as DNS server addresses using stateless DHCPv6. This method does not require the use of a DHCPv6 server to provide IPv6 addresses to devices, and is commonly used in PPPoE-based networks.
Network Settings - WiFi
WiFi stands for Wireless Fidelity. This is the wireless interface on your router. You can configure the WiFi interface to broadcast a WiFi network and configure the SSID, password, channel, bandwidth etc.
WiFi configuration can be found in the Network Settings tab under the WiFi section.
Network Settings - WiFi - Clients
This page shows the list of clients connected to the router via WiFi.
When you first come across the page, you will notice a table of all connected devices, you can click on the blue icon to set an identifier for a specific MAC address. This will help you identify the device in the future.
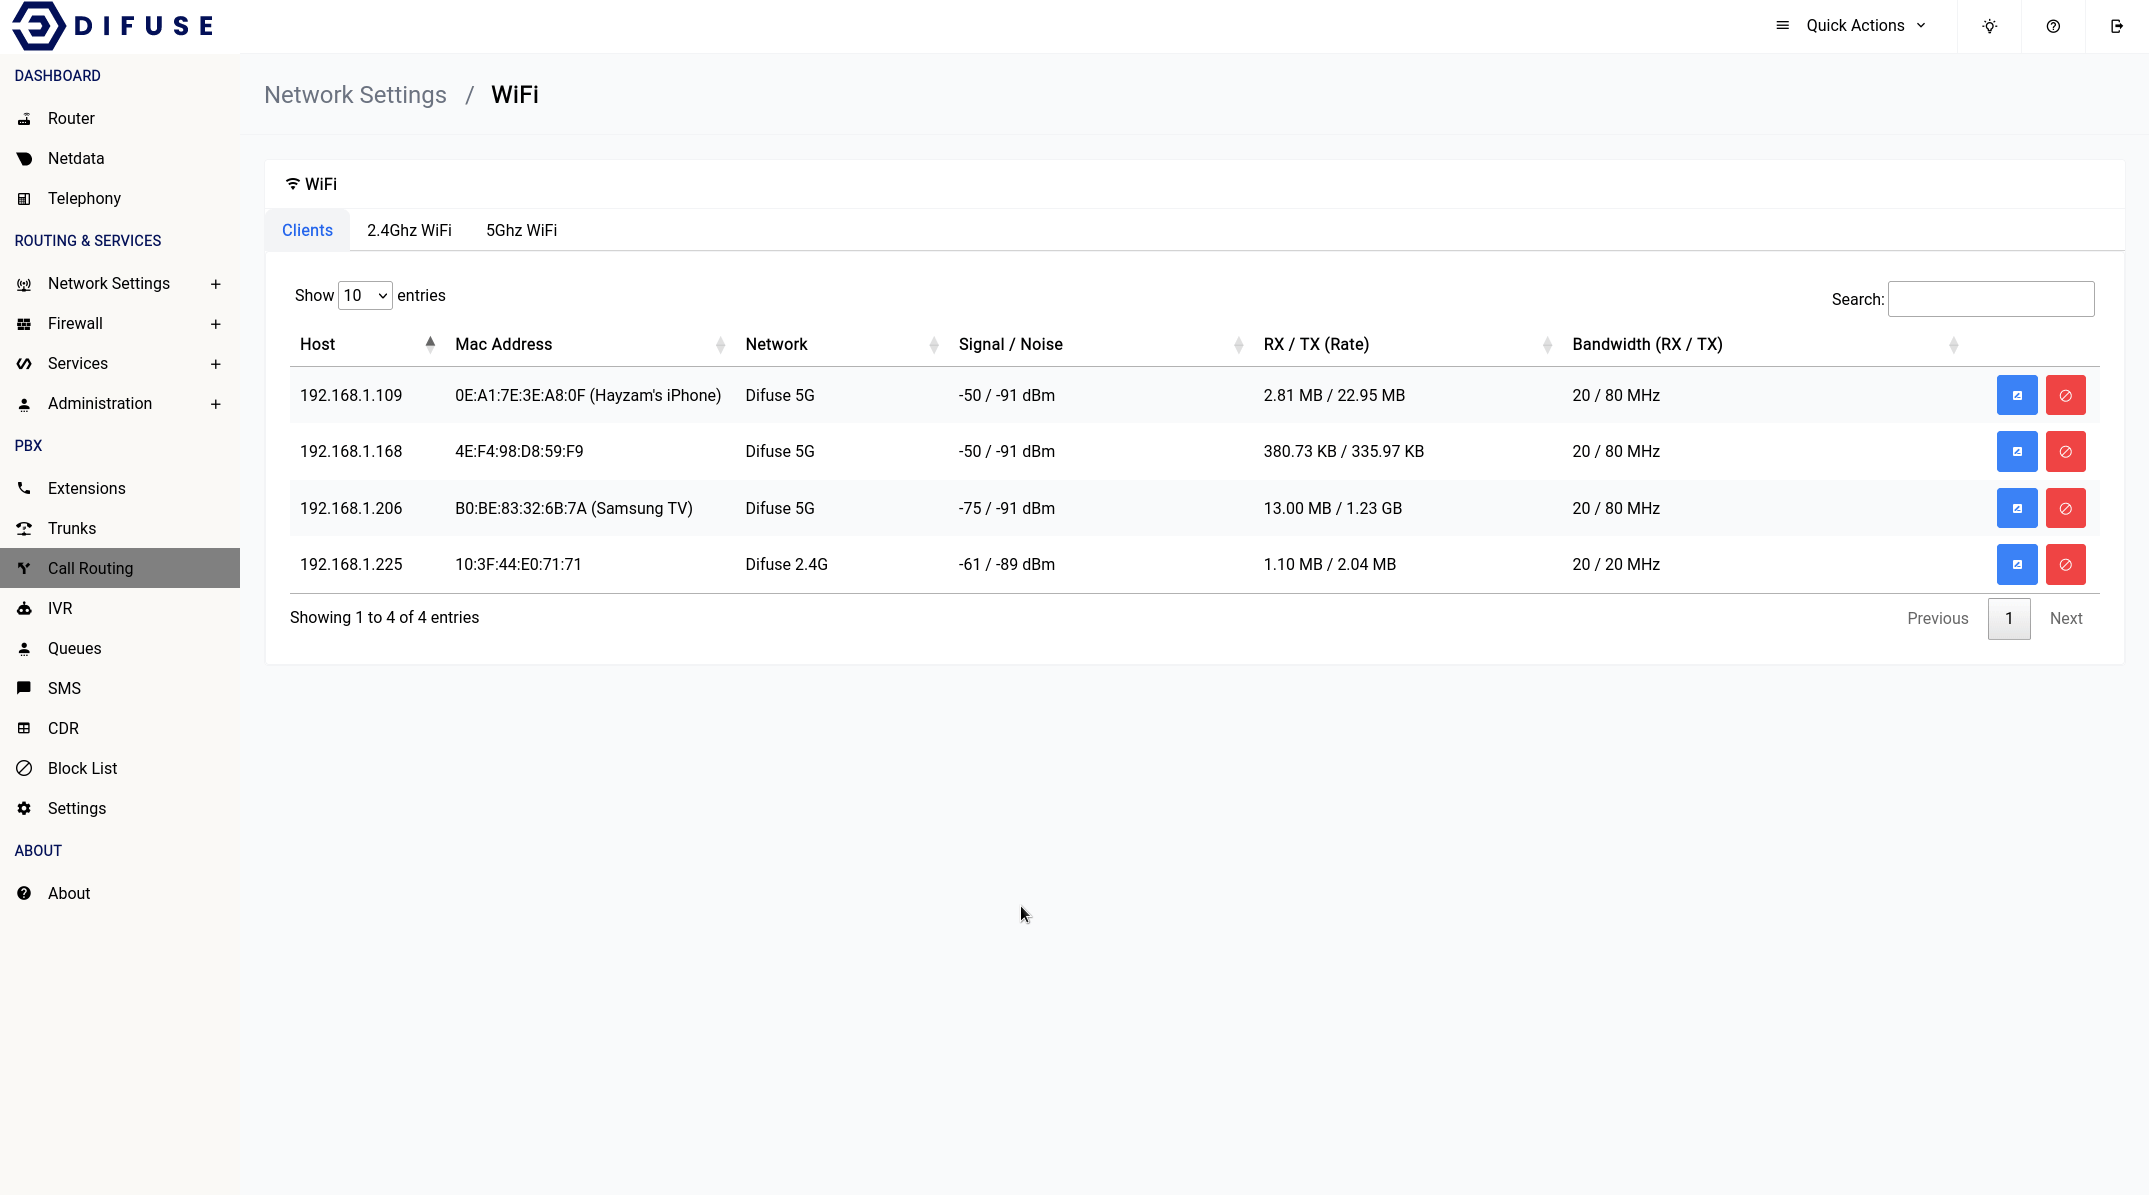
You can use the red block button to kick a client off the WiFi network for a specified time period.
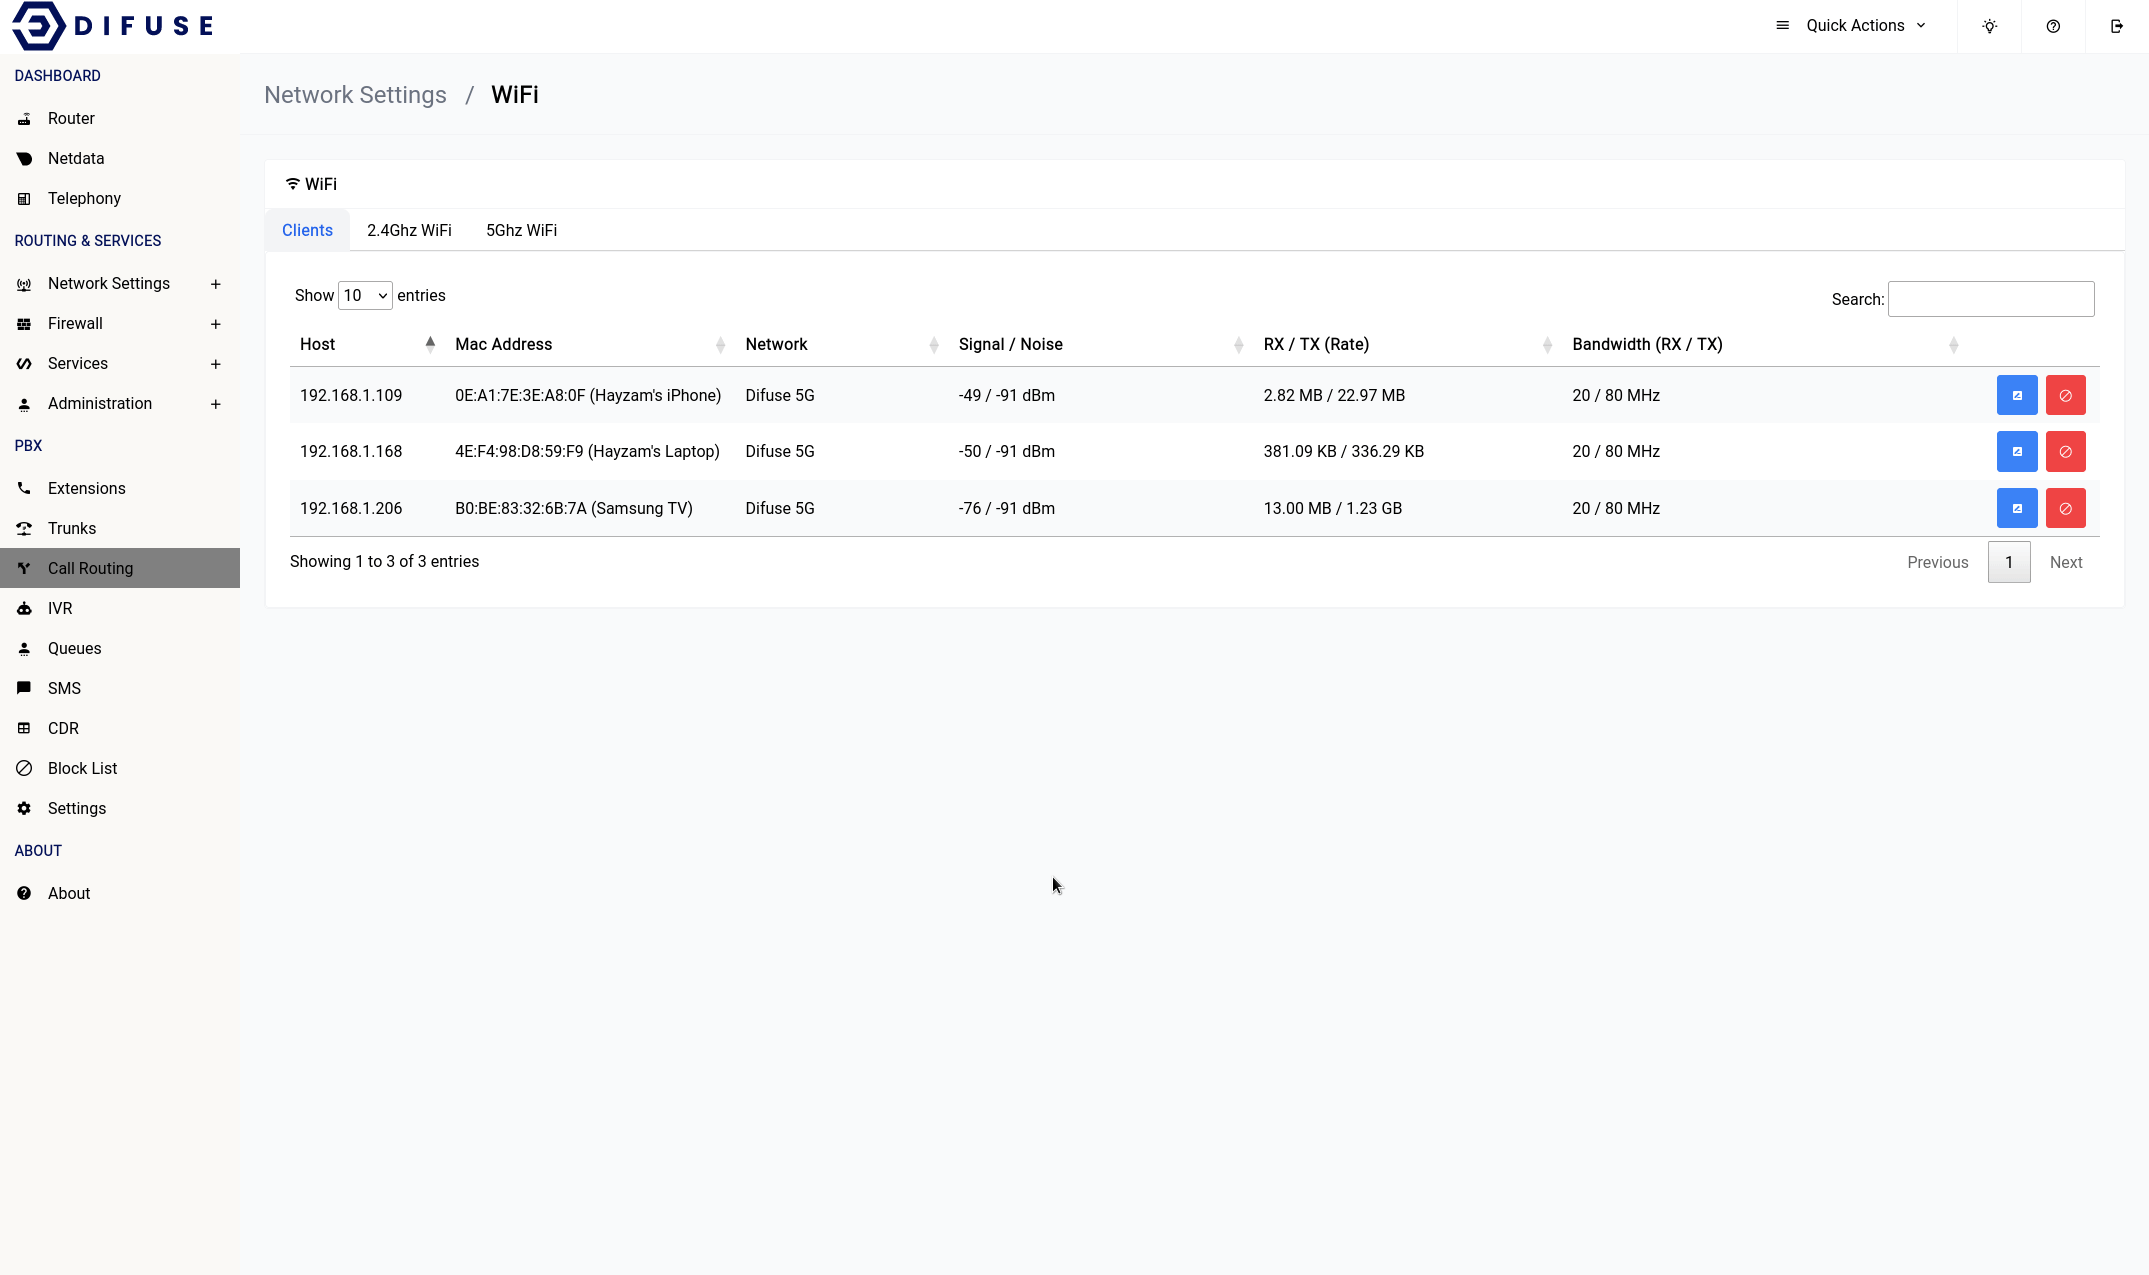
It’s also a good idea to keep an eye on which device is using which WiFi band since some very old devices perform poorly on the 5Ghz.
Network Settings - WiFi - 2.4Ghz

Any changes to the 2.4GHz WiFi setting will require a save first then an apply for it to take effect.
Now let's go ever each of the settings and explain what they do.
Enable
This option allows you to enable or disable the 2.4GHz WiFi interface.
SSID
This is the name of the WiFi network that will be broadcasted by the router. You can change it to whatever you want.
Encryption Type
We highly recommend that you use WPA3-PSK for the encryption type as it is the most secure. If you have older devices that don’t support WPA3 then you can use WPA2-PSK instead. WPA-PSK is not recommended as it is not secure.
If you want you can also select mixed mode which will allow devices that support WPA3 to connect using WPA3 and devices that don’t support WPA3 to connect using WPA2.
Country
You should pick the country that you’re in for the country section, never choose the “00-World”. That option would force the system to apply all restrictions on the WiFi bands leaving only very few operational frequency ranges which is not optimal.
Operating Frequency
It’s advisable to leave them at what they are but if you want to increase the range of your device’s WiFi signal you should choose the lower option of the two that are available (in the width section). The channel is automatically set to “auto” this would let the system use a channel that is the least crowded.
Allowing legacy rates
802.11b rates should only ever be enabled if you have badly behaving clients that don’t play along with the WiFi network as it significantly reduces the airtime efficiency among other things.
Network Settings - WiFi - 5Ghz
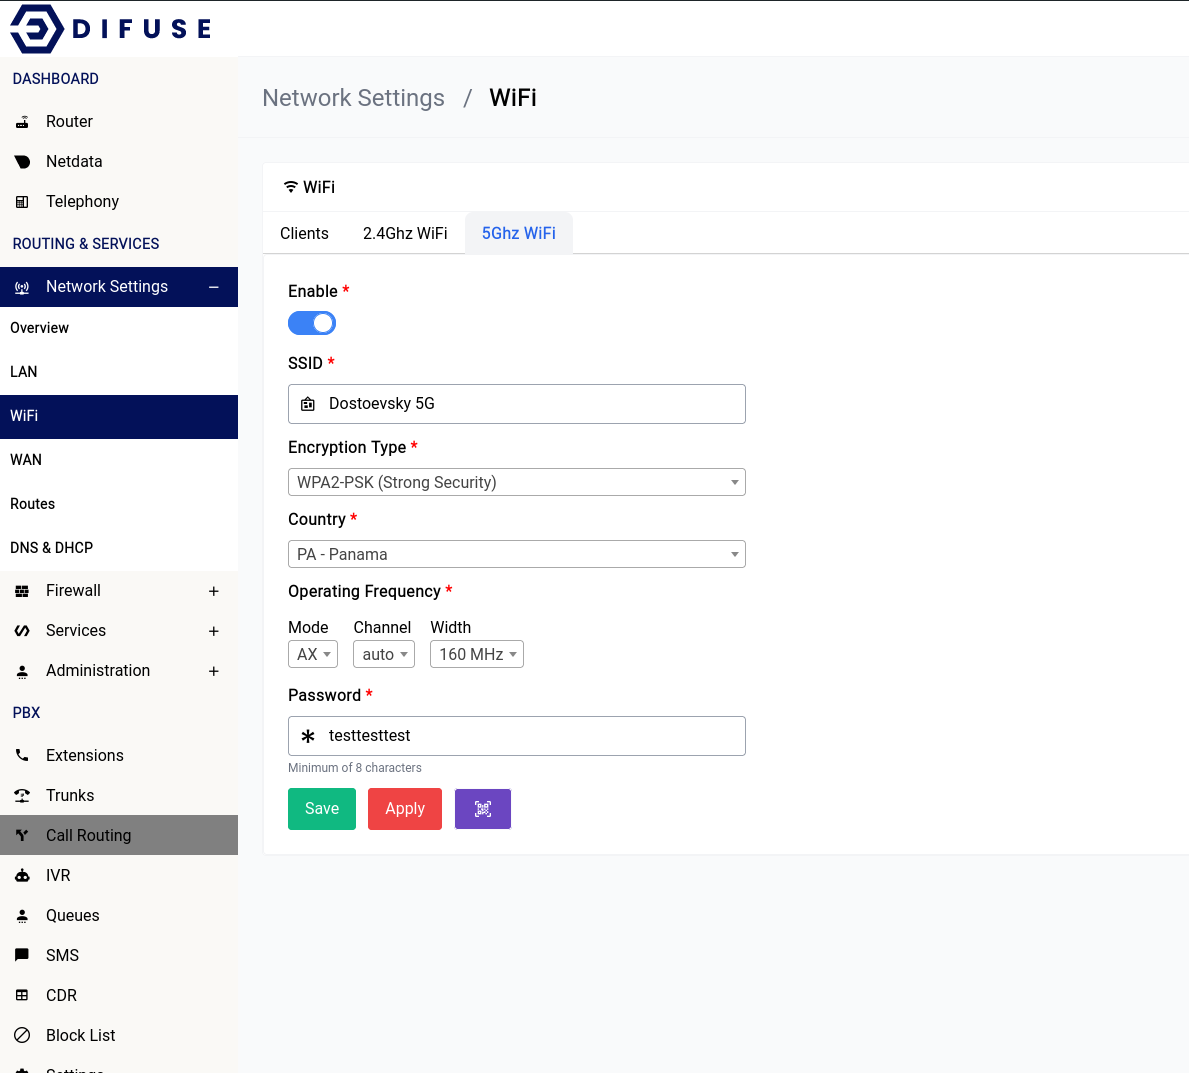
Any changes to the 5GHz WiFi setting will require a save first then an apply for it to take effect.
Now let's go ever each of the settings and explain what they do.
Enable
This option allows you to enable or disable the 5GHz WiFi interface.
SSID
This is the name of the WiFi network that will be broadcasted by the router. You can change it to whatever you want.
Encryption Type
We highly recommend that you use WPA3-PSK for the encryption type as it is the most secure. If you have older devices that don’t support WPA3 then you can use WPA2-PSK instead. WPA-PSK is not recommended as it is not secure.
If you want you can also select mixed mode which will allow devices that support WPA3 to connect using WPA3 and devices that don’t support WPA3 to connect using WPA2.
Country
You should pick the country that you’re in for the country section, never choose the “00-World”. That option would force the system to apply all restrictions on the WiFi bands leaving only very few operational frequency ranges which is not optimal.
Operating Frequency
It’s advisable to leave them at what they are but if you want to increase the range of your device’s WiFi signal you should choose the lower option of the two that are available (in the width section). The channel is automatically set to “auto” this would let the system use a channel that is the least crowded.
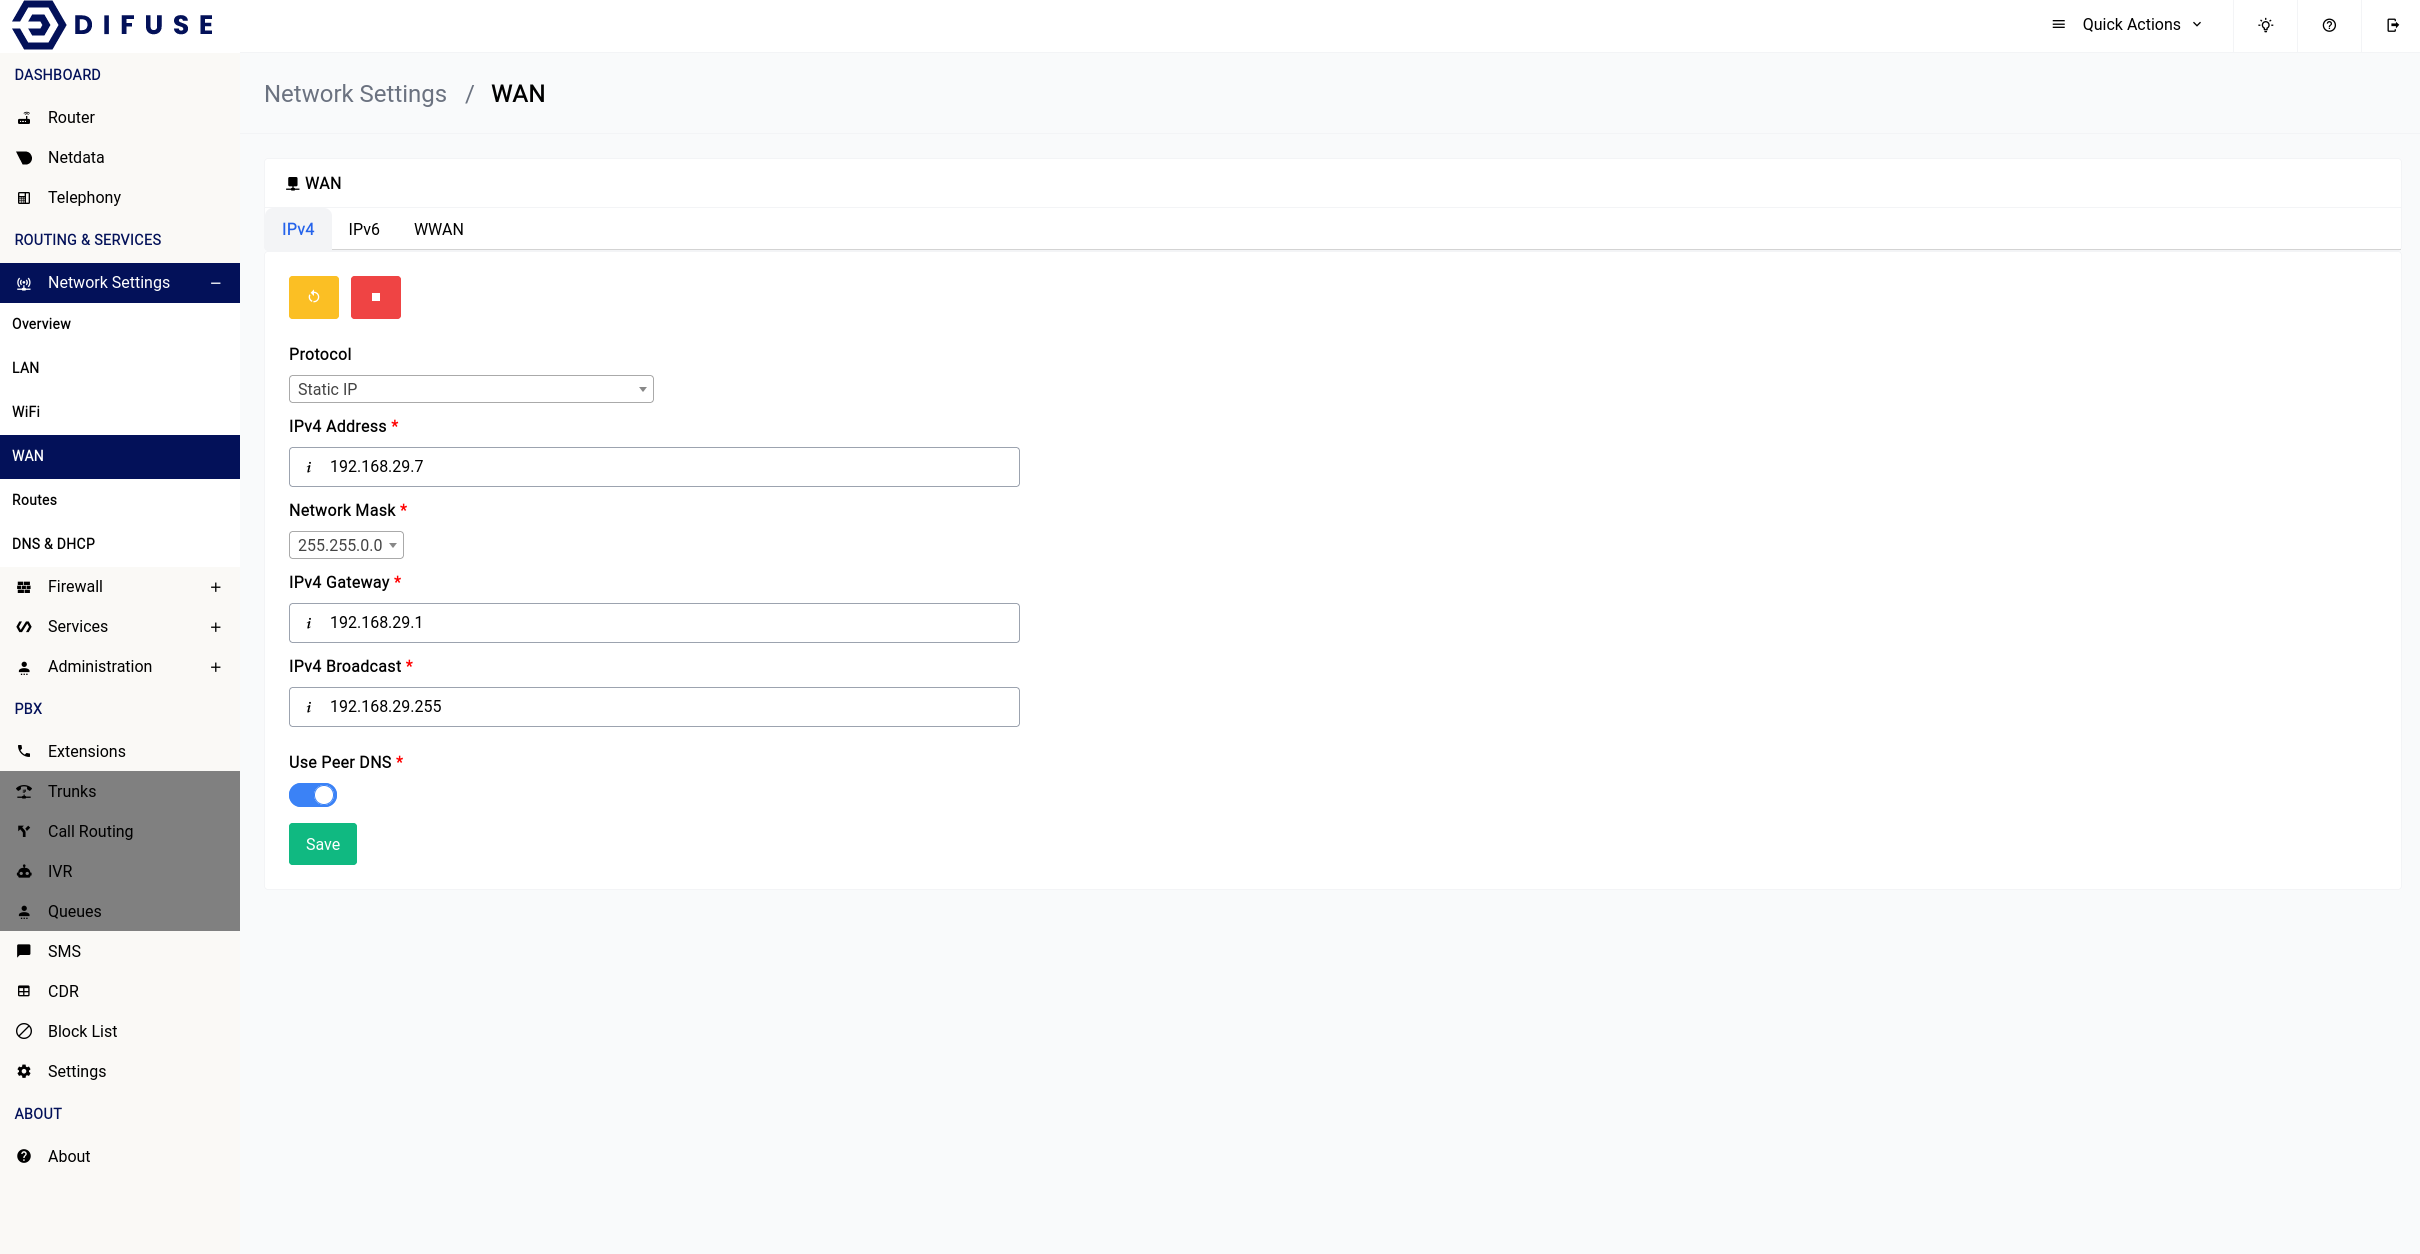
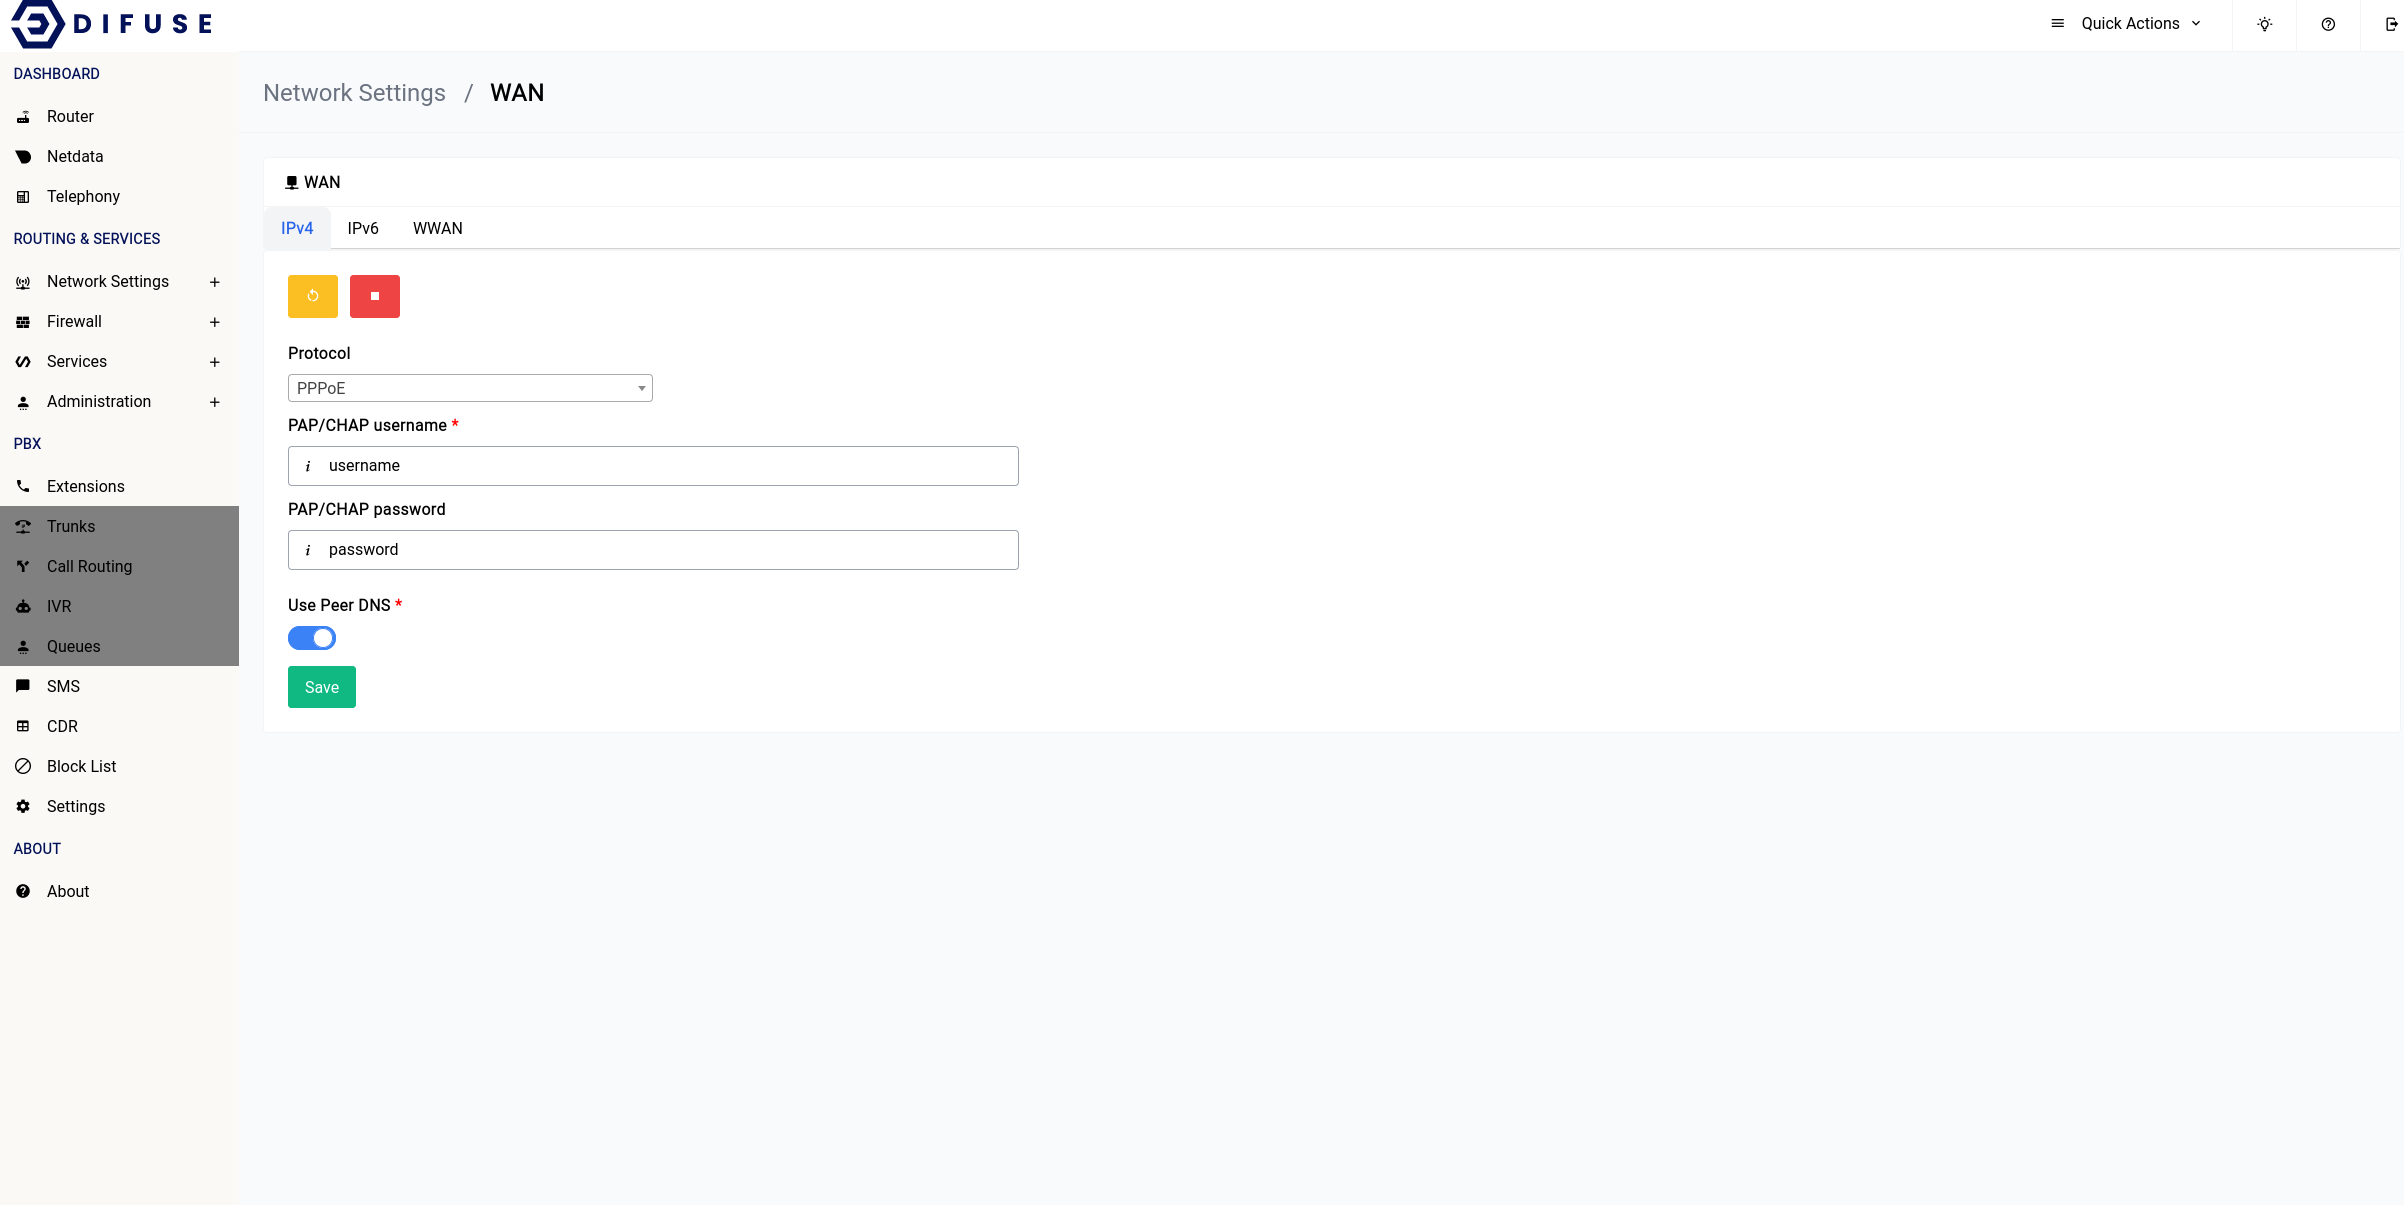
Network Settings - WAN & WWAN
WAN stands for Wide Area Network. This is the network that your router is connected to. This is the network that your router will connect to the internet through. This is the network that your router will get an IP address from.
WWAN stands for Wireless Wide Area Network. WWAN uses the internal LTE modem to connect to the internet.
Difuse supports WAN and WWAN connections. The WAN connection is the main connection to the internet, while the WWAN connection is a backup connection. The WWAN connection is only used when the WAN connection is down.
Network Settings - WAN - IPv4 Configuration
There are 3 ways each for connecting to your IPv4 WAN connection:
- DHCP
- Static IP
- PPPoE
By default your device will be setup in DHCP mode, this is something you will have to change during the initial setup.
DHCP
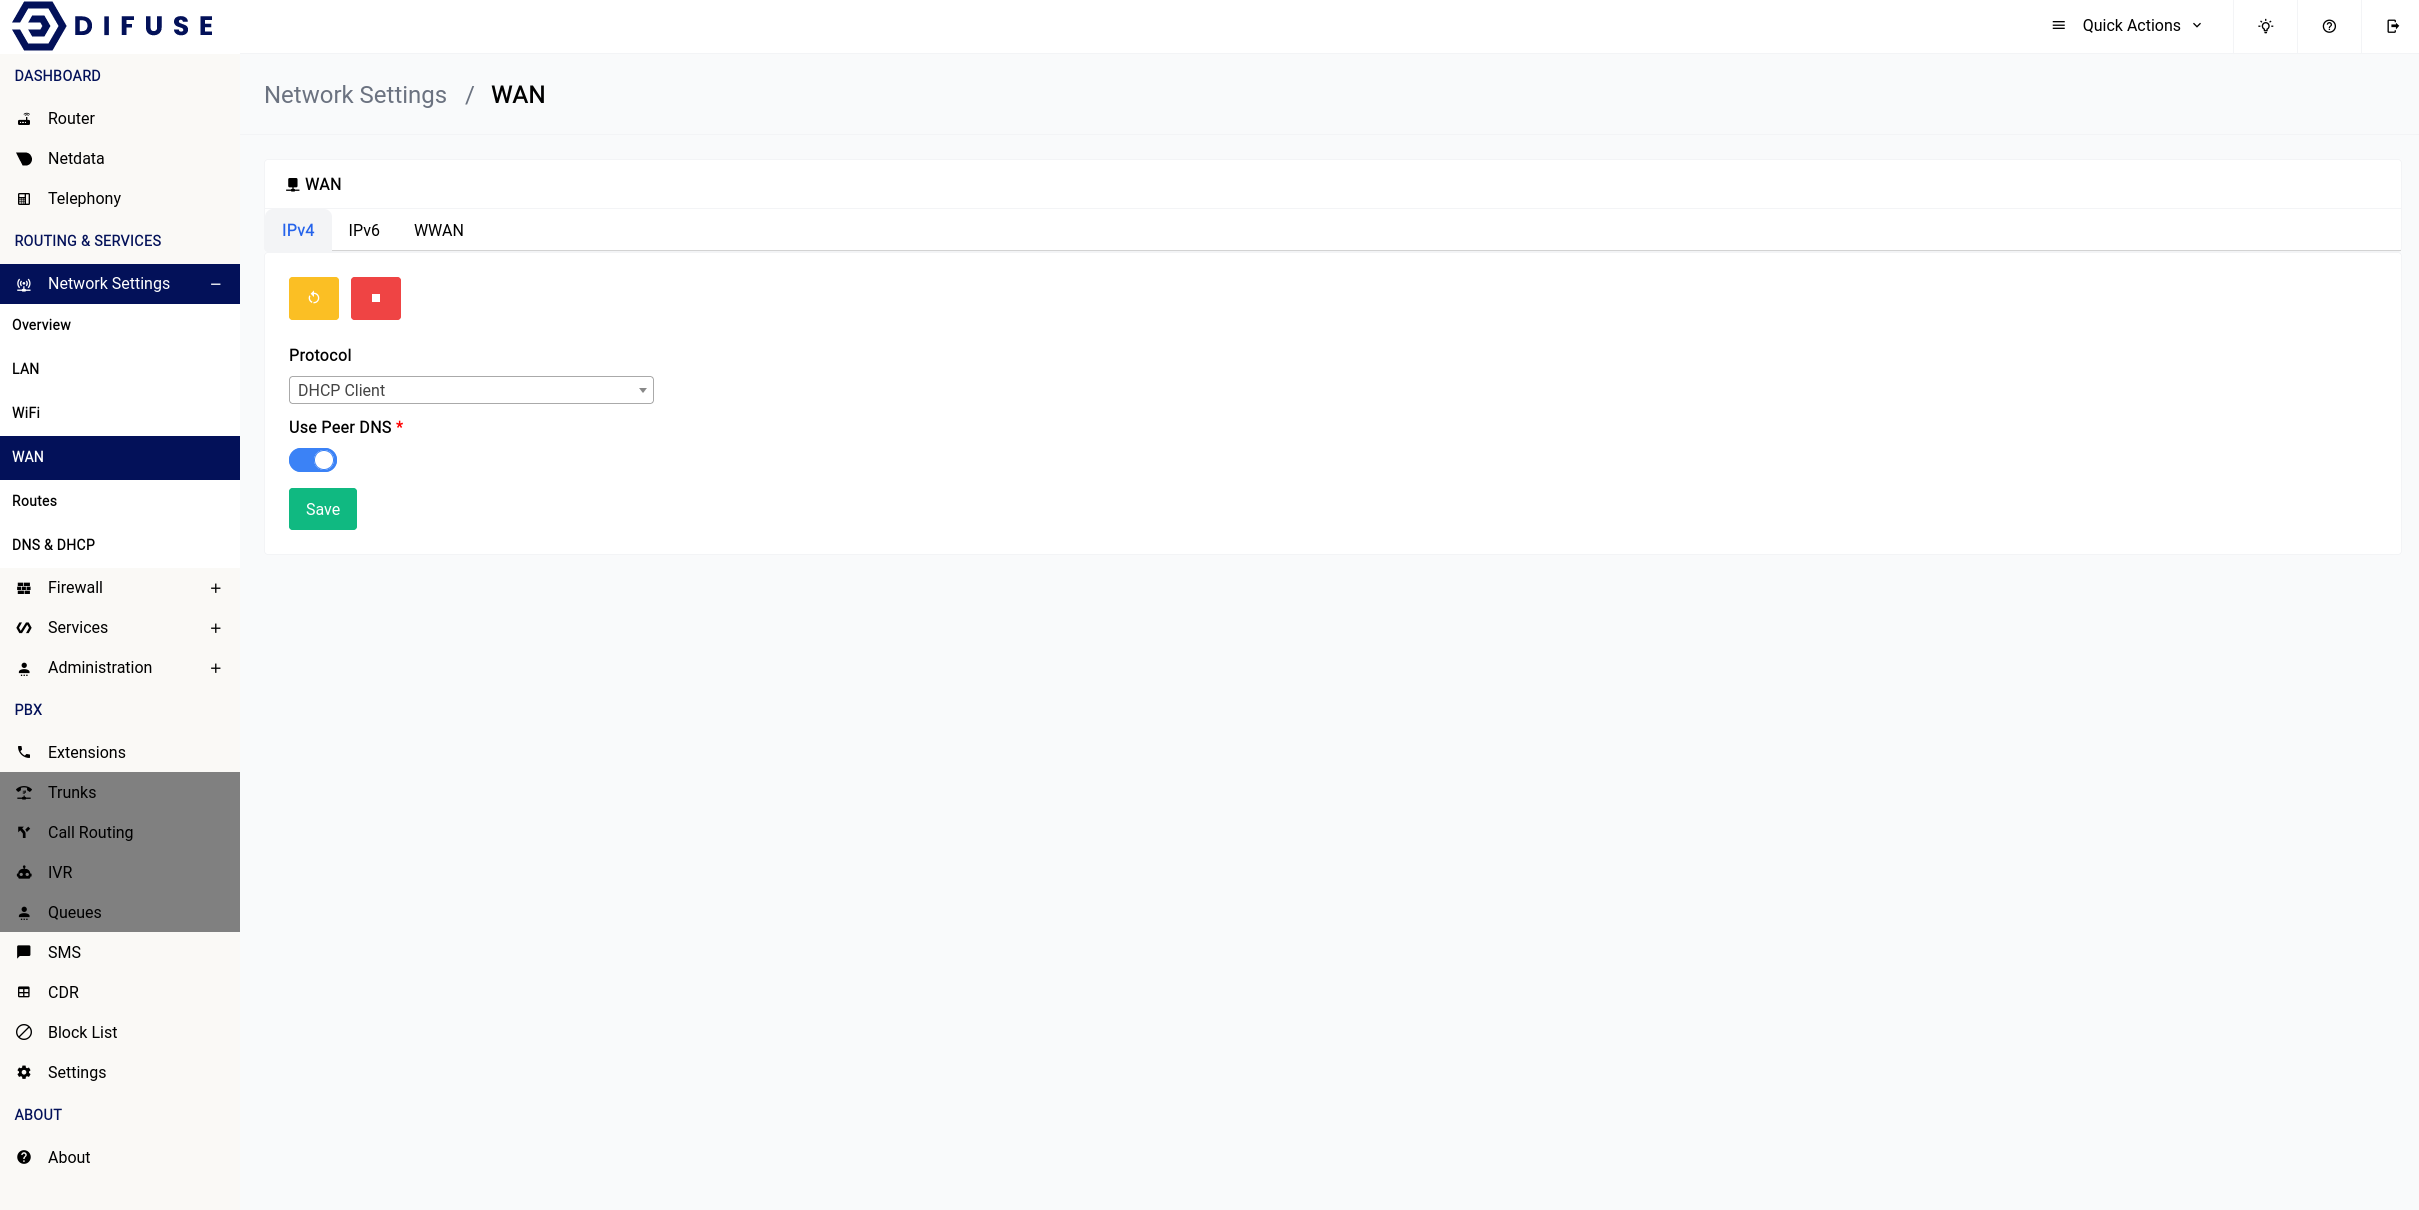
The DHCP Client is the most straight forward of the three and this is mostly used when you’re connecting your device behind another router, all you have to do is select the DHCP Client option in the protocol drop down and you’re good to go.
Static IP
If you know the IP address, gateway, broadcast address and the upstream gateway doesn't support DHCP you should pick this option.
PPPoE
For PPPoE things get a little interesting, once you enter in your details in the IPv4 section the IPv6 interface should get automatically configured using DHCPv6 and you need not do anything, this will be the case for a lot of ISP connections, but rarely you might need to do something special like configuring a Static IP.
The IPv6 interface when PPPoE is in use is an interface that is aliased to the initial WAN interface
Network Settings - WAN - IPv6 Configuration
There are 3 ways each for connecting to your IPv6 WAN connection:
- DHCP
- Static IP
- PPPoE
By default your device will be setup in DHCP mode, this is something you will have to change during the initial setup.
If you configured your IPv4 connection using PPPoE, the IPv6 interface will be automatically configured using DHCPv6.
DHCP
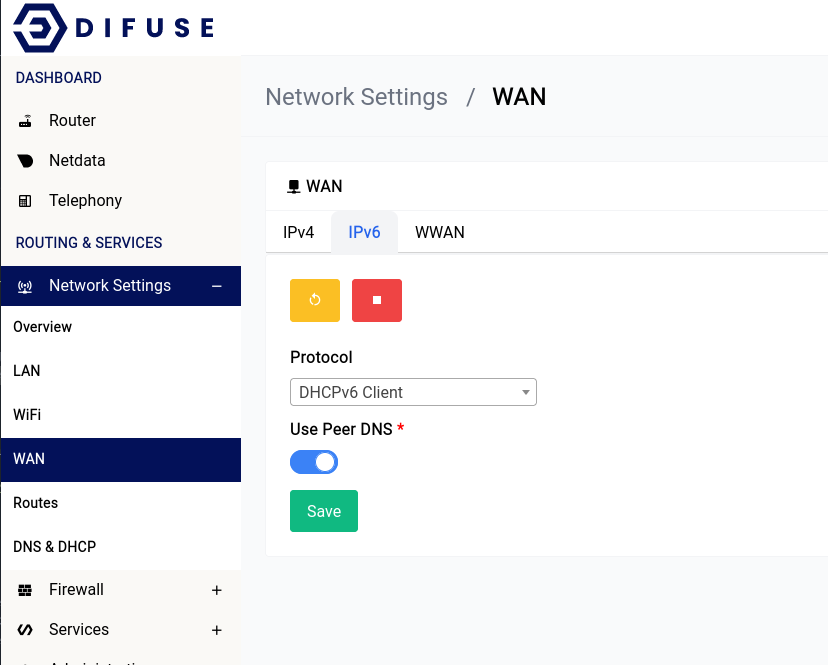
The DHCP Client is the most straight forward of the three and this is mostly used when you’re connecting your device behind another router, all you have to do is select the DHCP Client option in the protocol drop down and you’re good to go.
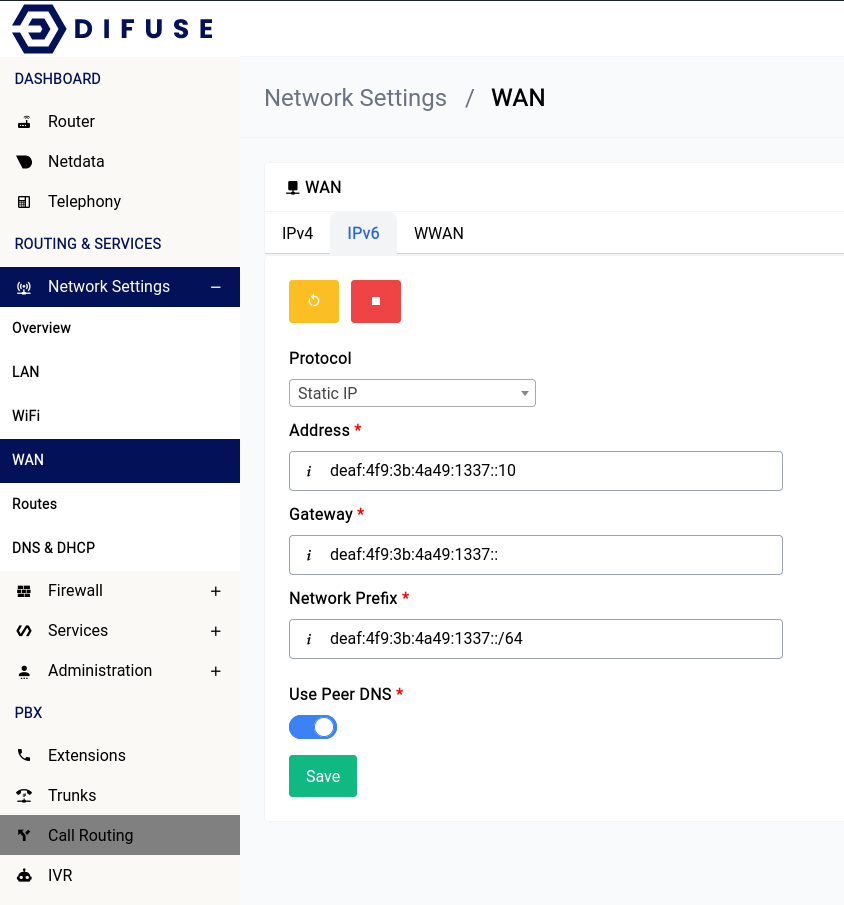
Static IP
If you know the IP address, gateway, network prefix and the upstream gateway doesn't support DHCP you should pick this option.
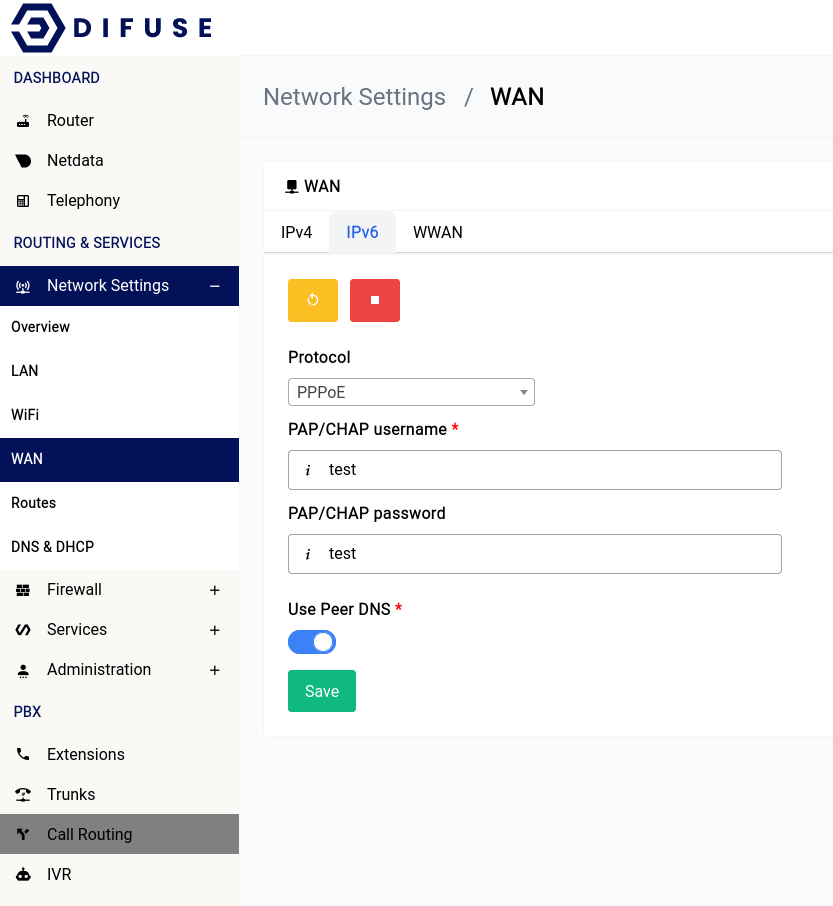
PPPoE
For PPPoE things get a little interesting, once you enter in your details in the IPv4 section the IPv6 interface should get automatically configured using DHCPv6 and you need not do anything, this will be the case for a lot of ISP connections, but rarely you might need to do something special like configuring a Static IP.
Network Settings - WWAN
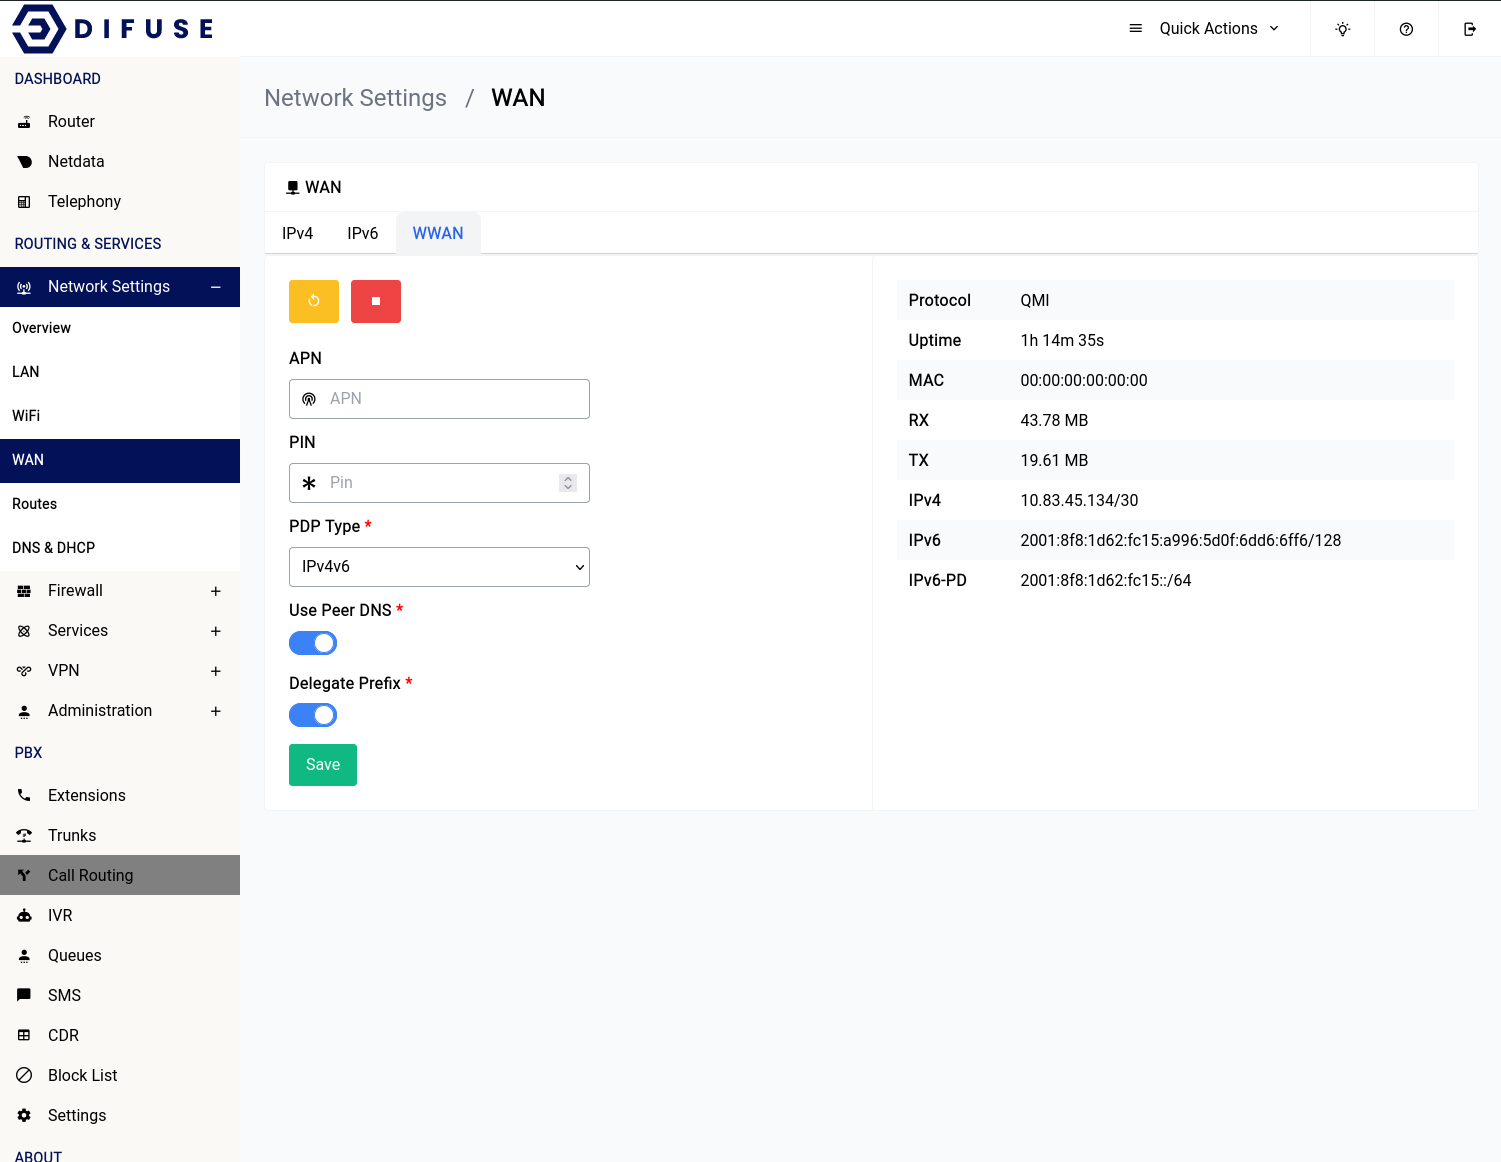
APN & PIN
The WWAN connection usually doesn’t require any sort of configuration as the setup is done automatically. If your service provider requires an APN that needs to be setup or if your SIM card that is inserted has a PIN you can specify them here.
PDP Type
If your ISP is finicky about IPv6 or you're having issues multi-homing IPv6 with your main WAN interface in any way, you can always choose IPv4 only as the PDP type. This will force the WWAN interface to only use IPv4.
IPv6 Prefix Delegation
If your ISP provides you with an IPv6 prefix delegation that you want to use on your LAN, you can enable this option, if you don't want your LAN to use IPv6, you can disable it.
Network Settings - Routes
Routes are a set of rules that determine where packets are sent. Routes are used to allow devices to communicate with each other. For example, if you have a device on the LAN network that needs to communicate with a device on the WAN network, you would need to create a route to allow the two devices to communicate. Although that is done automatically by the router, you can create custom routes to allow devices to communicate with each other.
Network Settings - Routes - Policy Based
Policy-based routing (PBR) is a technique used in computer networking to control how network traffic is routed based on specific policies or criteria.
Traditionally, network traffic is routed based on the destination address in the packet header, using a routing table to determine the appropriate path to take. However, with PBR, the routing decision is based on other factors such as the source address, protocol, port number, destination address etc.
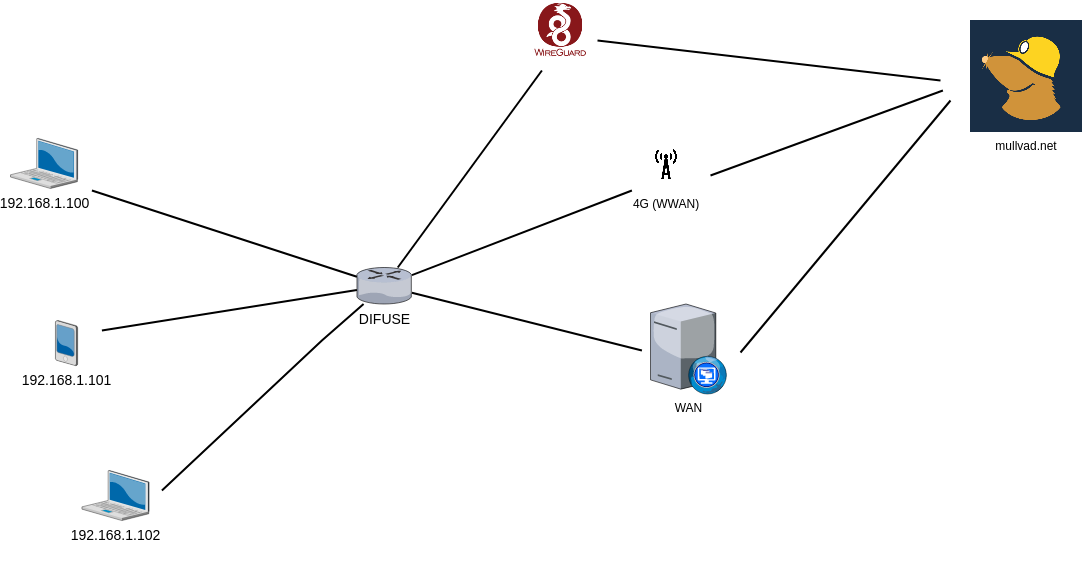
For purposes of demonstration we’re going to create 3 policy routes for 3 different devices on the LAN the above image is what our end goal should look like.
- A PC at 192.168.1.100 when trying to reach mullvad.net should go through regular WAN.
- A Mobile device at 192.168.1.101 when trying to reach mullvad.net should go through WWAN.
- Another PC at 192.168.1.102 when trying to reach mullvad.net should go through a WireGuard endpoint.
If you might’ve noticed the first policy route is not really needed, since any connections to the outside world already goes through the WAN interface.
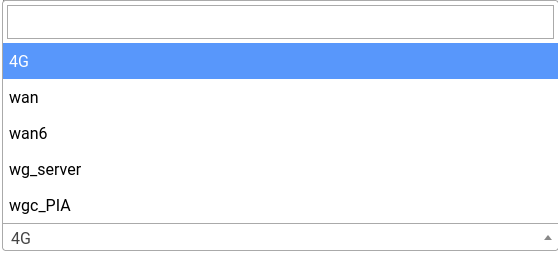
Now coming to the second policy route, that is something we will have to specifically look out for since WWAN module is always the failover interface, it will never be used as the main gateway.
This is what the rule would look like when you’re trying to add it:
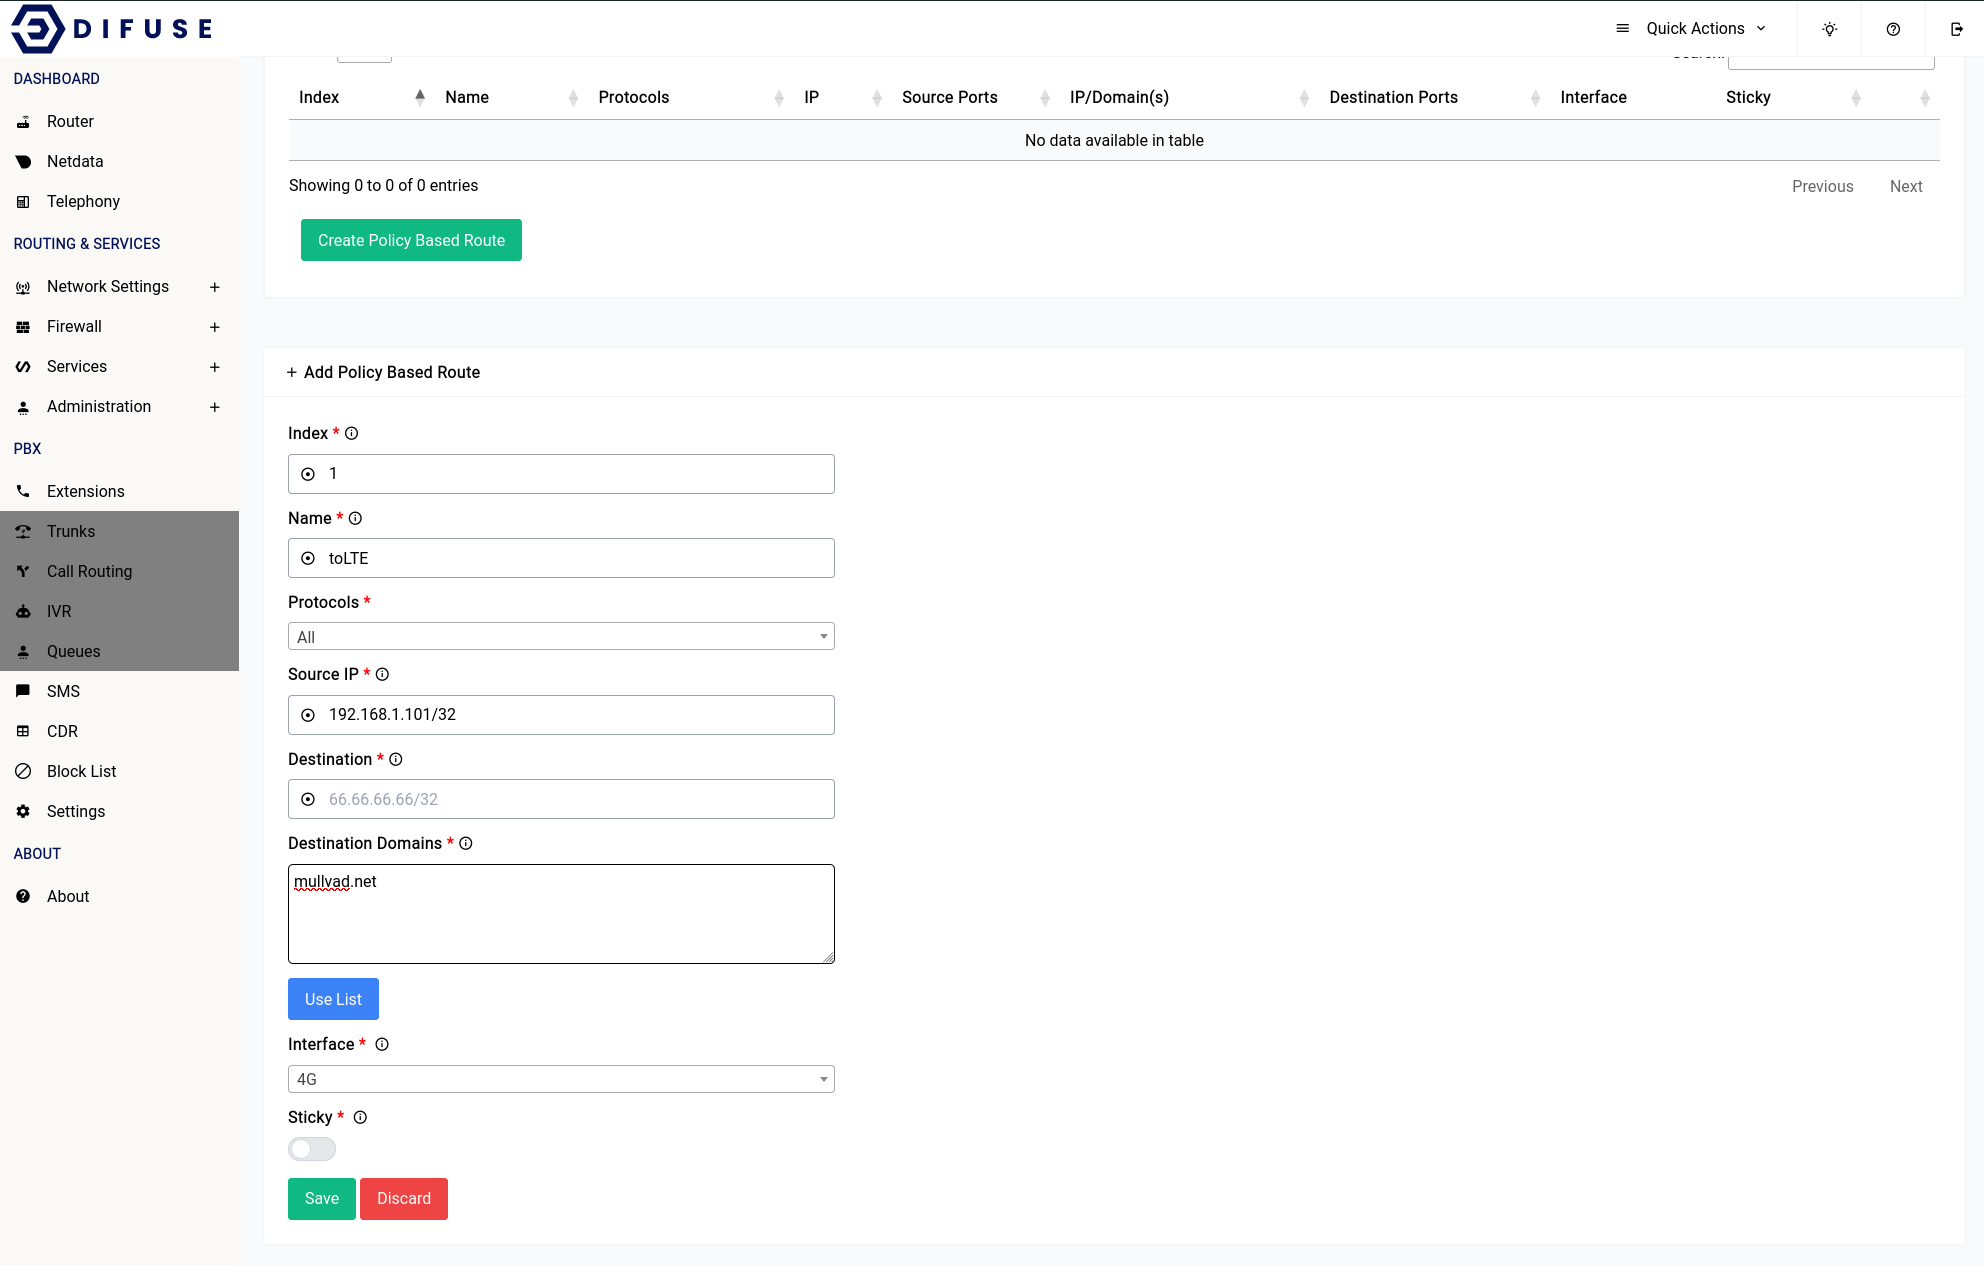
As you can see I’ve specified mullvad.net as one of my destination domains and the interface as 4G, you can specify any number of domains as you like, you need not specify each subdomain of a domain just the domain itself. For instance you do not have to give:
1.mullvad.net
2.mullvad.net
Instead just:
mullvad.net
will suffice.
If you’d like you can choose from the pre-made list that we’ve setup it has a plethora of websites that are usually routed with PBR.
If you think the list is not up to date enough you can always append your own selection of domains along with it.
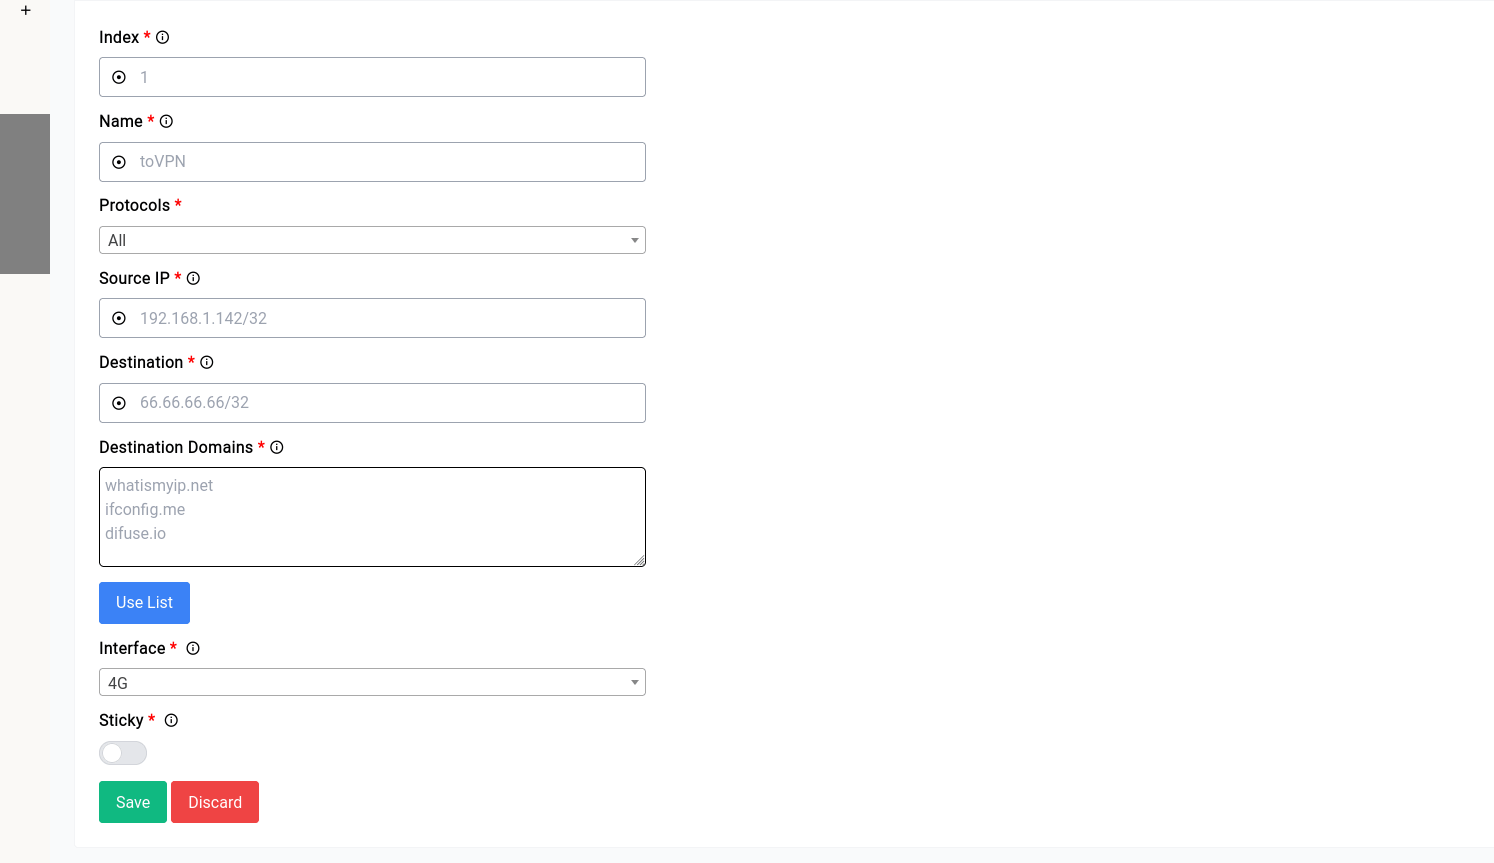
Moving onto the 3rd policy route, things are very similar to that of the second rule. Instead of choosing 4G as your interface you’d just choose the wireguard interface. Please note that the wireguard interface name might look something like wgc_Name instead of just Name.
Network Settings - Routes - Static IPv4
Static IPv4 routes are manually configured routes that are added to a router's routing table. These routes define how the router should forward traffic to specific IP addresses or network ranges.
When a packet arrives at a router, the router consults its routing table to determine how to forward the packet to its destination. If the destination matches a static route in the routing table, the router will use that route to forward the packet. If there is no matching static route, the router will use its default route to forward the packet.
Static routes are often used in situations where a network administrator wants to control how traffic is routed on a network. For example, a static route could be used to direct traffic from a specific subnet to a particular router, or to route traffic to a specific destination via a particular gateway.

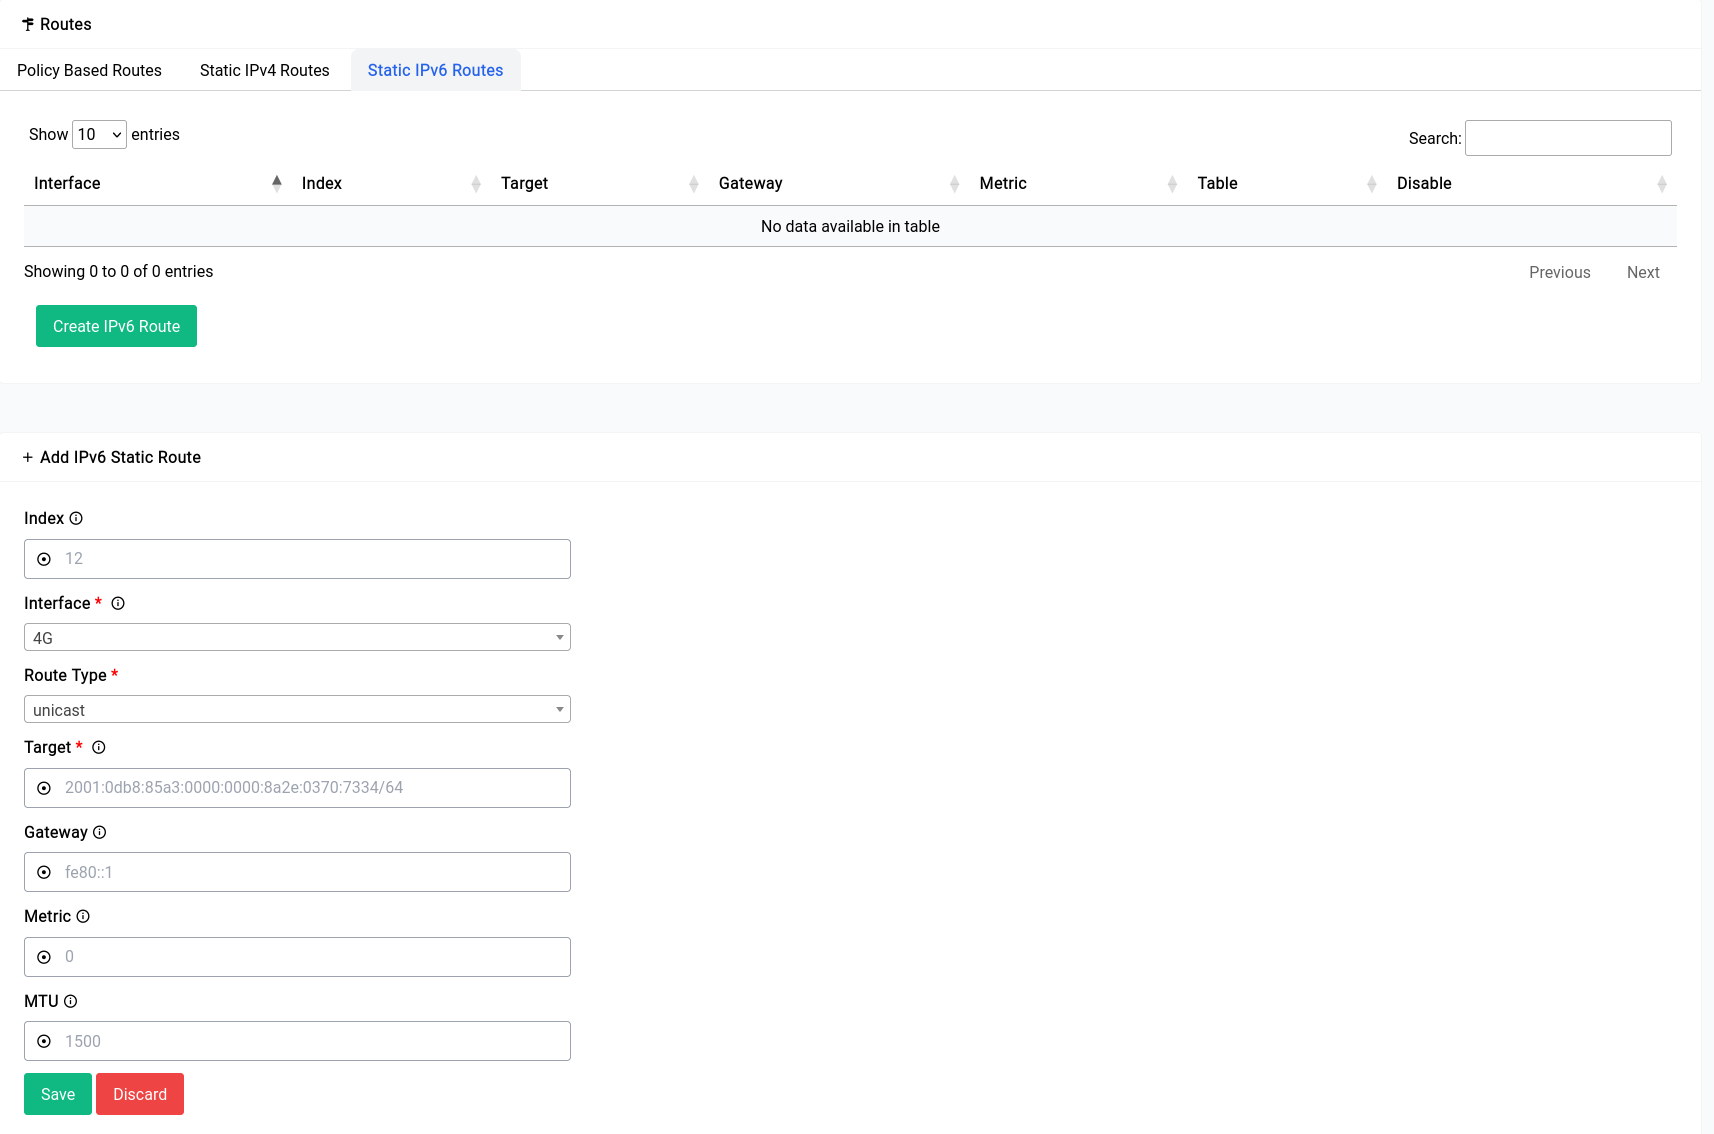
Network Settings - Routes - Static IPv6
Static IPv6 routes are manually configured routes that are added to a router's routing table. These routes define how the router should forward traffic to specific IPv6 addresses or network prefixes.
When a packet arrives at a router, the router consults its routing table to determine how to forward the packet to its destination. If the destination matches a static route in the routing table, the router will use that route to forward the packet. If there is no matching static route, the router will use its default route to forward the packet.
Static routes for IPv6 are used in situations where a network administrator wants to control how traffic is routed on a network. For example, a static route could be used to direct traffic from a specific IPv6 subnet to a particular router, or to route traffic to a specific IPv6 destination via a particular gateway.
Unlike IPv4, IPv6 has no concept of a broadcast address, so the use of static routes to direct traffic to a specific broadcast address is not possible. Instead, IPv6 uses multicast addresses to deliver packets to multiple hosts. Static routes can still be used to route traffic to specific multicast groups.
Network Settings - DNS & DHCP
Most* of the DNS & DHCP associated settings are done here in this section.
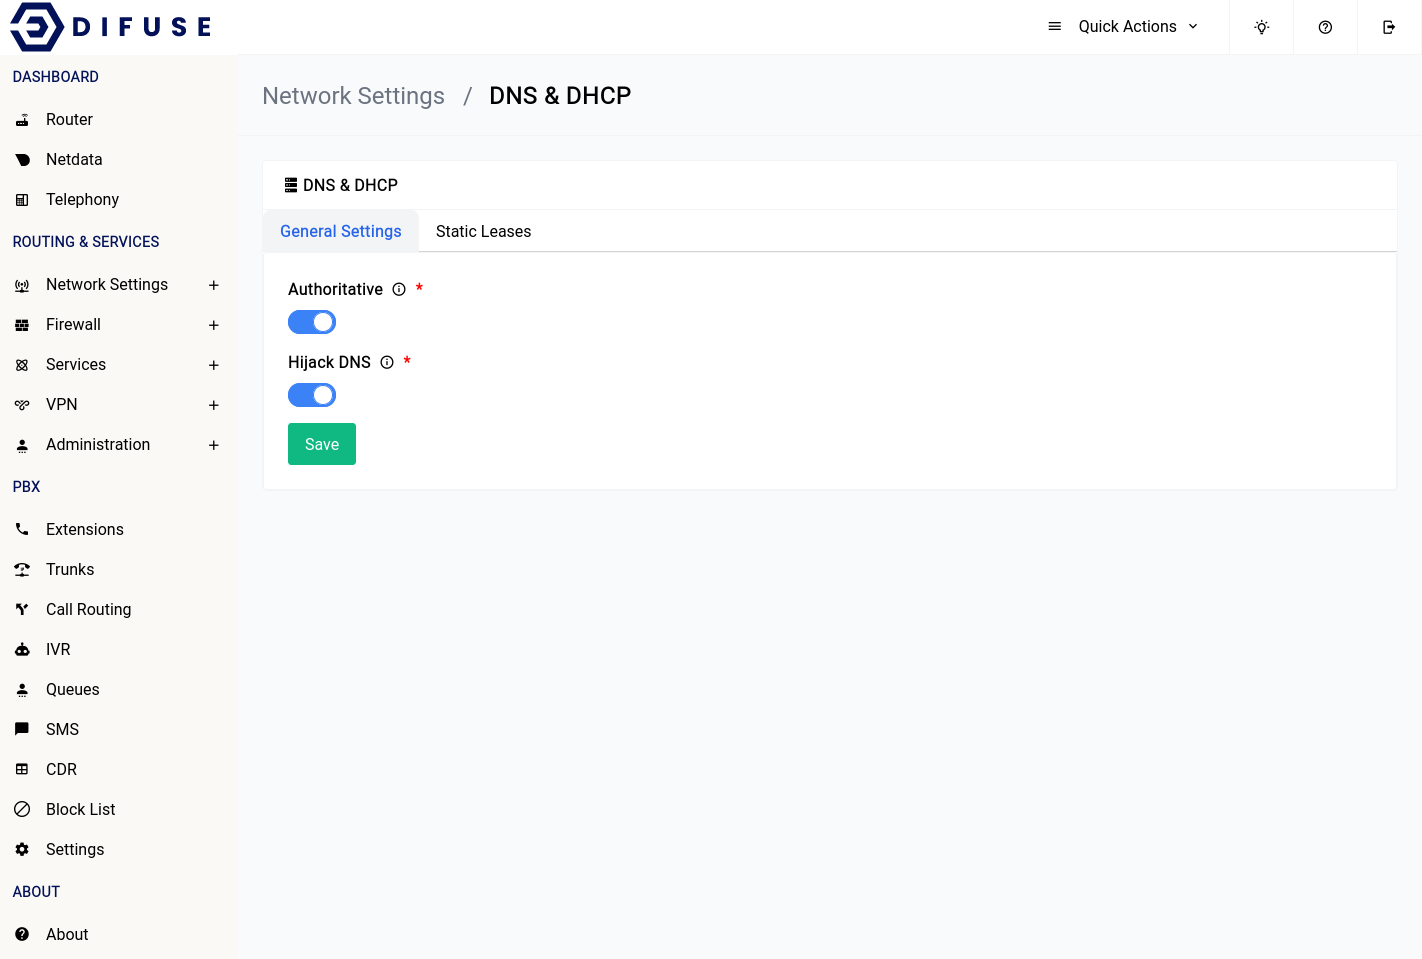
Network Settings - DNS & DHCP - General
The general page offers a few options to configure the DNS & DHCP settings, let's go over all of them:

DHCP Authority
This option will set the DHCP server running inside your device as the only one in the network, if you have another DHCP server that is running in authoritative mode you can turn this off here.
Hijack DNS
This option will hijack all DNS requests and redirect them to the device itself, this is useful if you want to force all clients on your network to use the DNS server running on difuse.
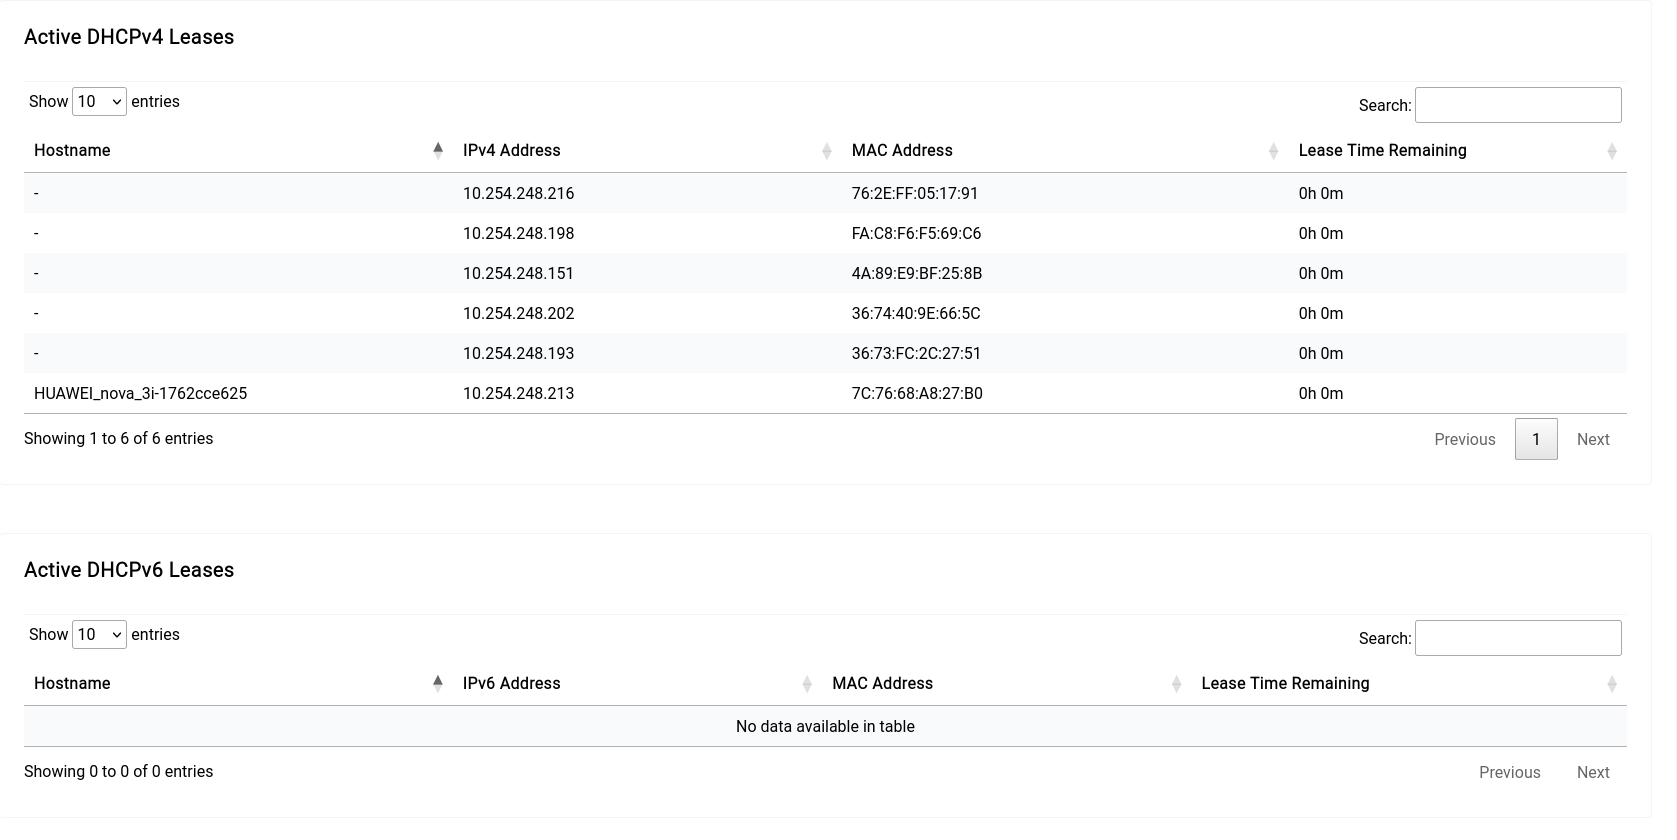
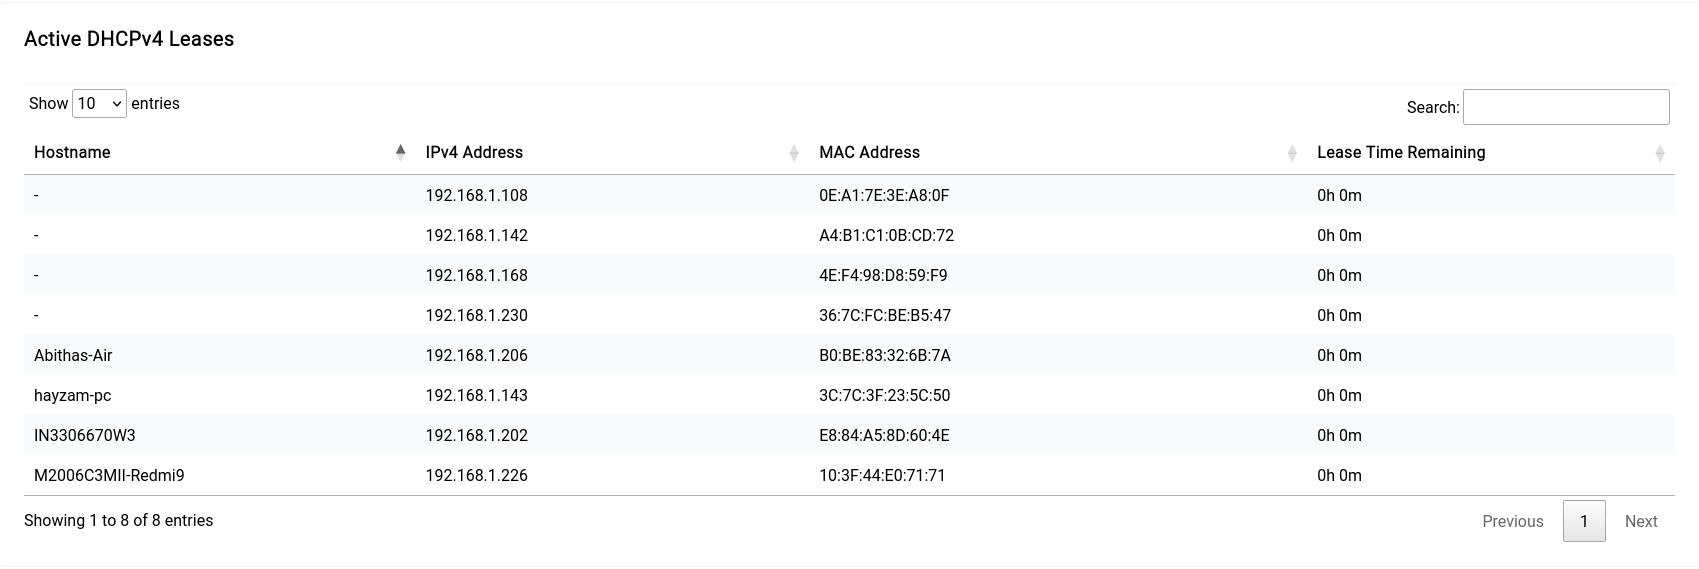
Network Settings - DNS & DHCP - Active & Static Leases
This section is where you can view all the active and static leases on your network. You can see all the active leases on the device by scrolling down to the bottom of the tab Static Leases
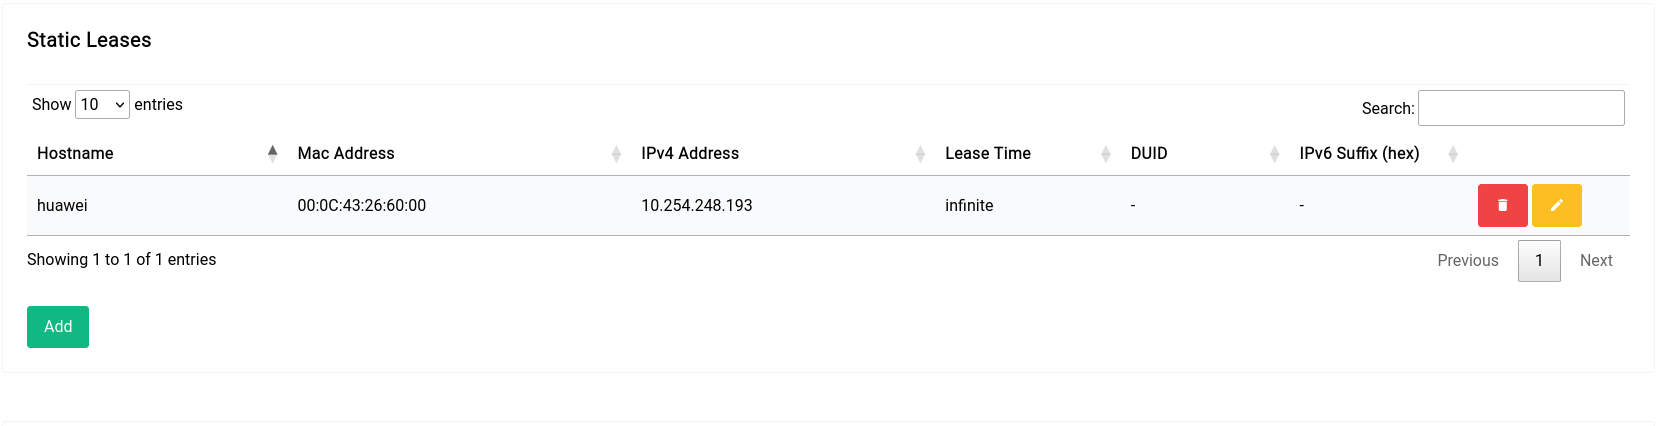
Static Leases
Creating a static lease is trivial all you need to do is click on the “Add” button and fill out the form:
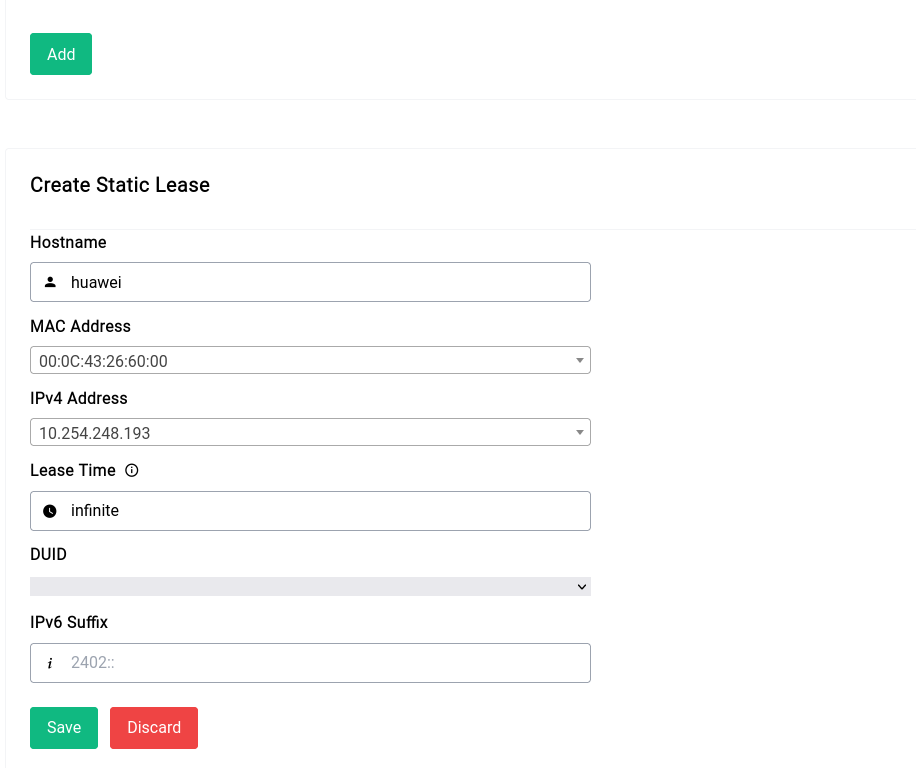
If there are no IPv6 leases that the DHCP server gives out, the DUID input will be greyed out and you don’t have to specify anything in the IPv6 suffix section.
Once you add the static lease, it’ll look like this in the table:
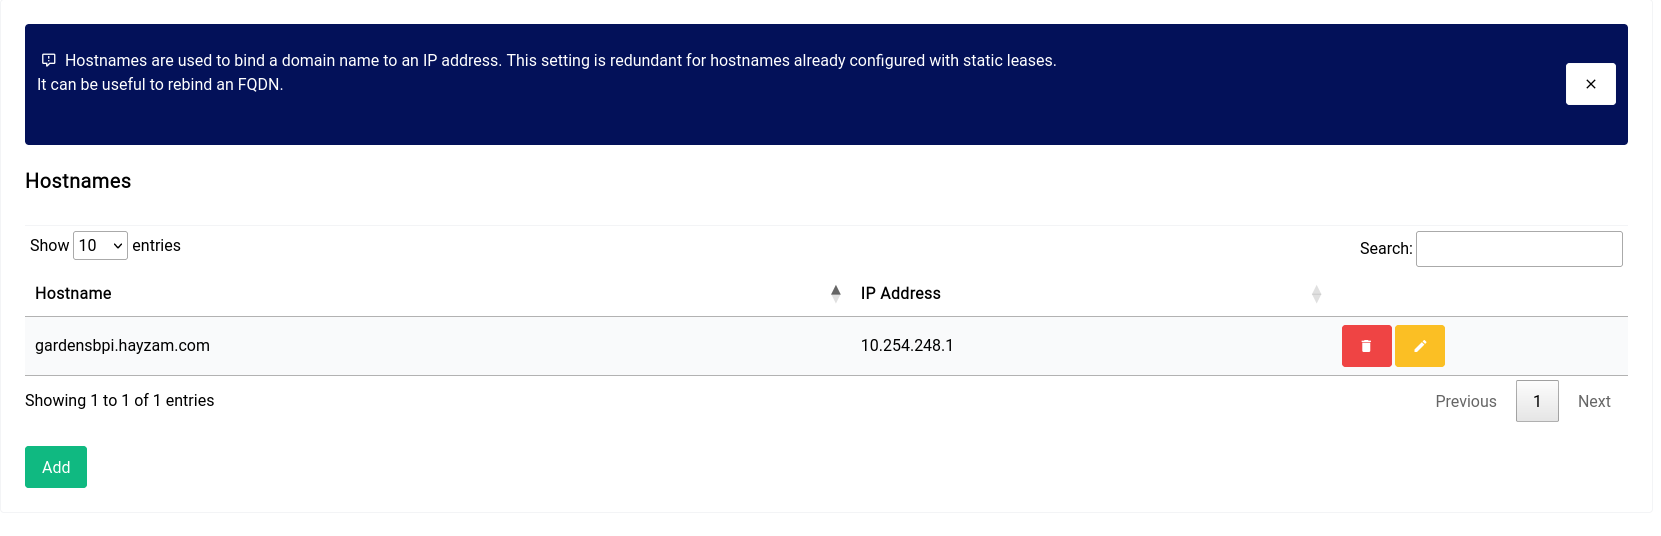
Network Settings - DNS & DHCP - Hostnames
If you want to bind a host name to an IP address manually, this is where you do it. We’ve made an example hostname to IP address binding here:
Firewall
Difuse uses NFTables to manage the firewall. NFTables is a Linux kernel subsystem that provides packet filtering, network address translation (NAT) and other packet mangling. NFTables is the successor to iptables.

By default the device is configured to allow all traffic from the LAN network to the WAN network and block all traffic from the WAN network to the LAN network. This is the most secure configuration for an office or home network. If you need to allow traffic from the WAN network to the LAN network, you can create a custom rule to allow the traffic.
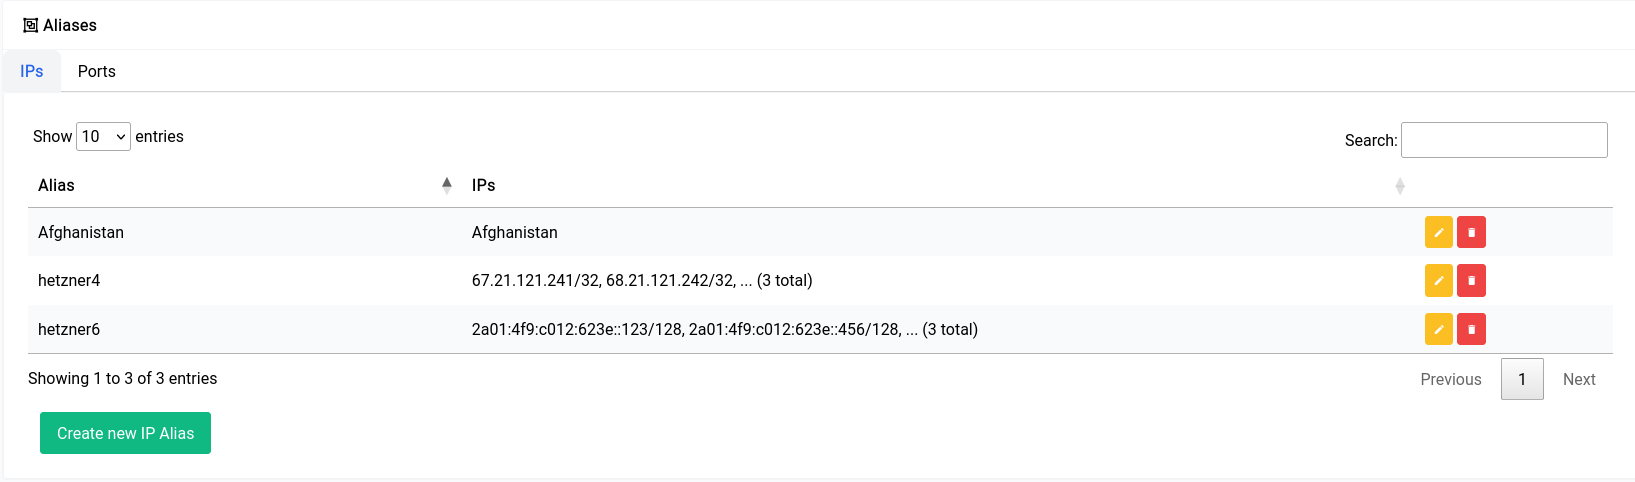
Firewall - Aliases
Aliases are a way to define a group of network objects, such as IP addresses (in CIDR notation) and ports, and give them a name that can be used in firewall rules.
IP Aliases
Let’s explore aliases through 2 examples, one where we define a manual alias and another where we take a look at automated aliases.
- Manual Aliases: This type of alias is where you specify the IP Address in CIDR notation (or ports in the case of a ports alias) yourself.
- Automated Aliases: This type of alias is where you specify a list that is present in the system and the system automatically updates the list in a timely manner.
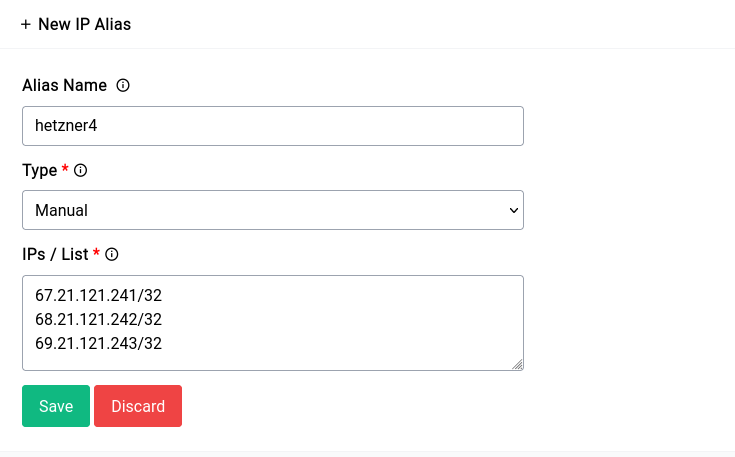
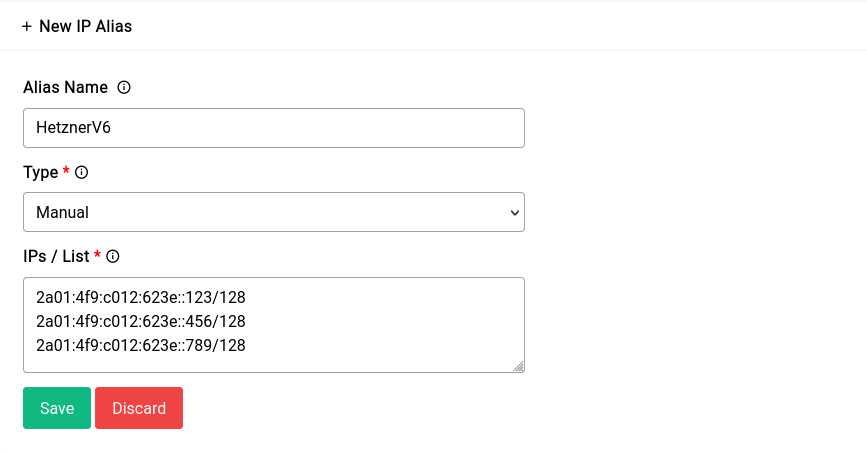
Manual Aliases
Okay now let’s explore manual aliases through an example. Imagine we have 3 VPS’s that are hosted outside the confines of our internal network. And they have the following IPv4 and IPv6 addresses respectively:
67.21.121.241/32
68.21.121.242/32
69.21.121.243/32
2a01:4f9:c012:623e::123/128
2a01:4f9:c012:623e::456/128
2a01:4f9:c012:623e::789/128
Now obviously you can create 6 different firewall rules for all 6 of these addresses or you could group these addresses into just 2 aliases and use them within 2 different rules.
You cannot have a mix of IPv4 and IPv6 addresses in an alias, they have to be separate and they must be written in CIDR notation.
Now first we go about creating our alias for the IPv4 addresses and then for the IPv6 ones.
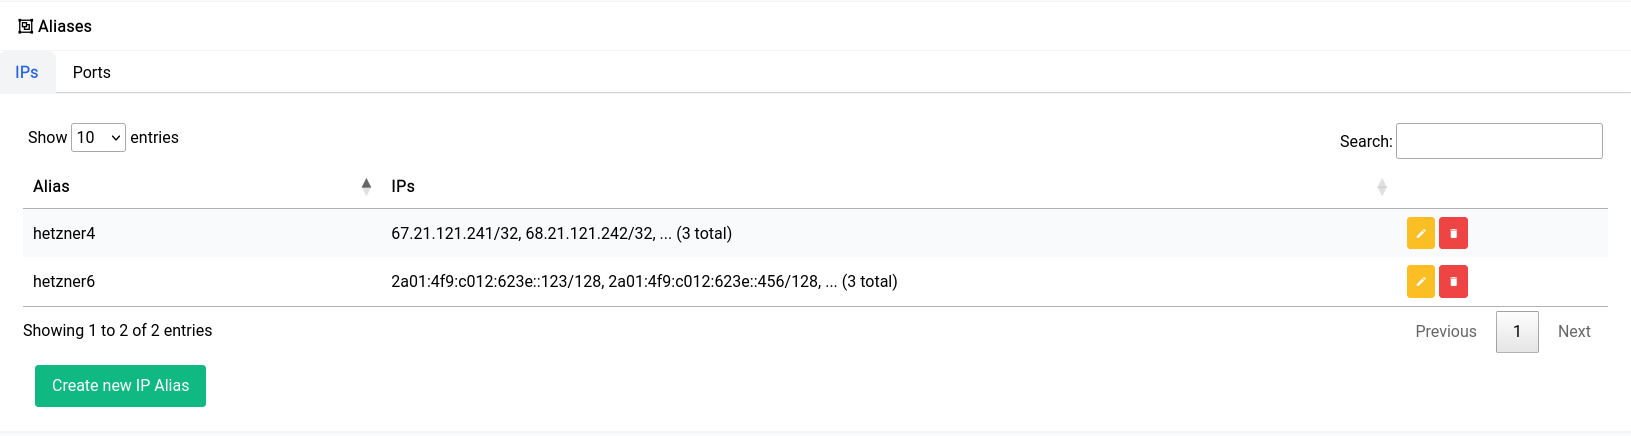
After you’ve created them they should show up in the table like this:
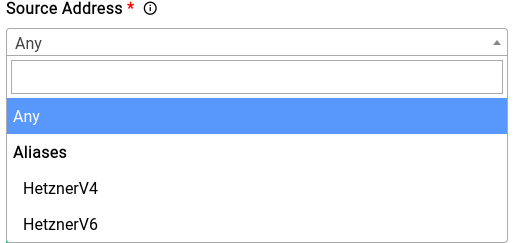
Now if you try to add or edit a rule in Traffic Rules, you should see the aliases show up in the source and destination address sections.
Automated Aliases
Now for automated aliases, underneath it works pretty much the same way manual aliases do. But instead of the user painstakingly adding each IP for a region for instance they could use a list that is pre-made that are updated in a timely manner by Difuse itself without any need for intervention.
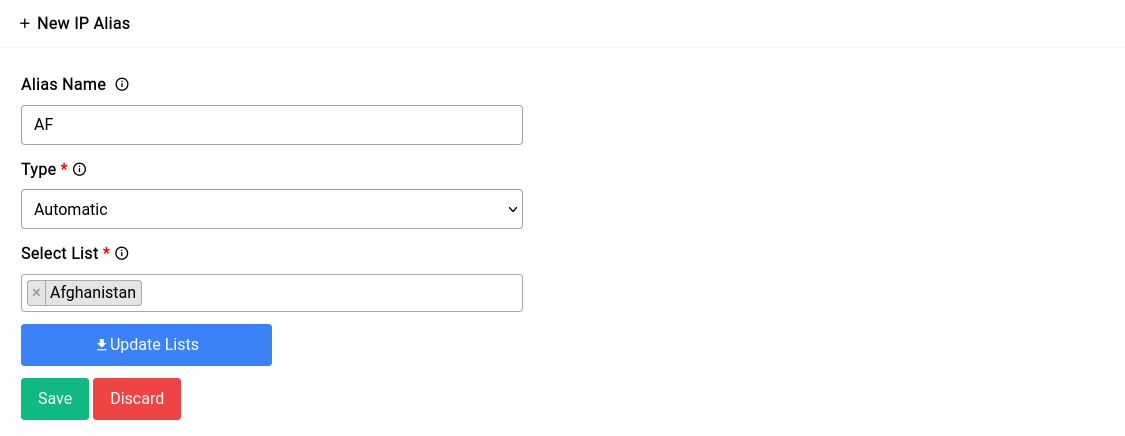
Now if we want to make a list that includes all the IPs that are associated with the country Afghanistan for instance, we could just select the type of alias as Automatic and select the list Afghanistan. You can select multiple countries as well.
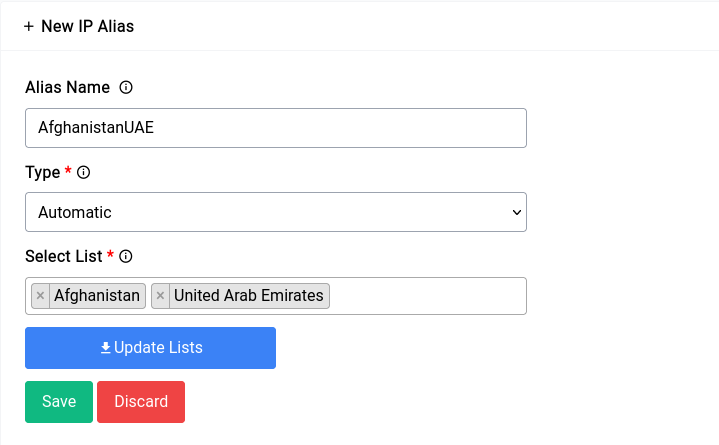
Multiple country list selection would look something like this:
You can click on the Update Lists button if you want to manually run an update on the lists that exists on the system.
Now once an alias has been created with one of the automated lists, it should look like this in the table:
They can also be used in the firewall in the same way as shown for manual aliases.
It should be clear in the particular traffic rule whether it is of the family IPv4 or the family IPv6 if you’re using an automated list. You can pick the family of a traffic rule in the form.
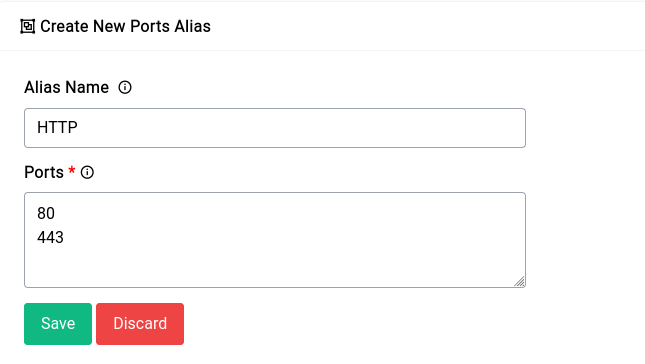
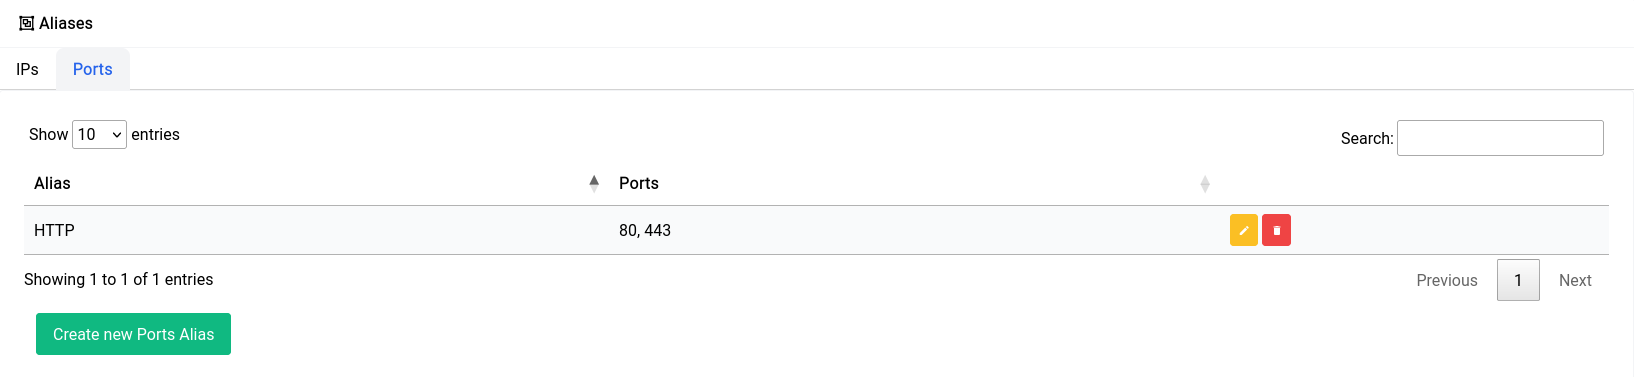
Ports Aliases
Ports Aliases also works in a similar way to that of IP Aliases. The key difference being that there isn’t a way to select an automated list.
Now for instance if you have a bunch of HTTP services that you run within your office and home you might want to enable the ports 80, 443 and maybe even 8080 for each of those IPs. You could just create an alias as shown below.
Once you create the alias it should show up in the table like this:
It’s imperative to note that you should NOT use aliases or traffic rules to block specific websites on the LAN, instead the Content Filtering & Adblock service should be used. Due to advent of services like cloudflare (which incidentally a lot of websites use) multiple hundreds or even thousands websites may share the same IP address, which makes it very hard to just block one or two websites with traffic rules.
Firewall - Port Forwarding
Port forwarding is a networking technique that allows incoming traffic to reach a specific computer or device on a private network, by forwarding traffic from a specific port on the public-facing router or gateway to a corresponding port on the private network.
In other words, port forwarding allows a device on a private network, such as a home network, to receive incoming traffic from the internet. It is often used to allow remote access to services running on a computer or device behind a router or firewall, such as web servers, FTP servers, or gaming servers.
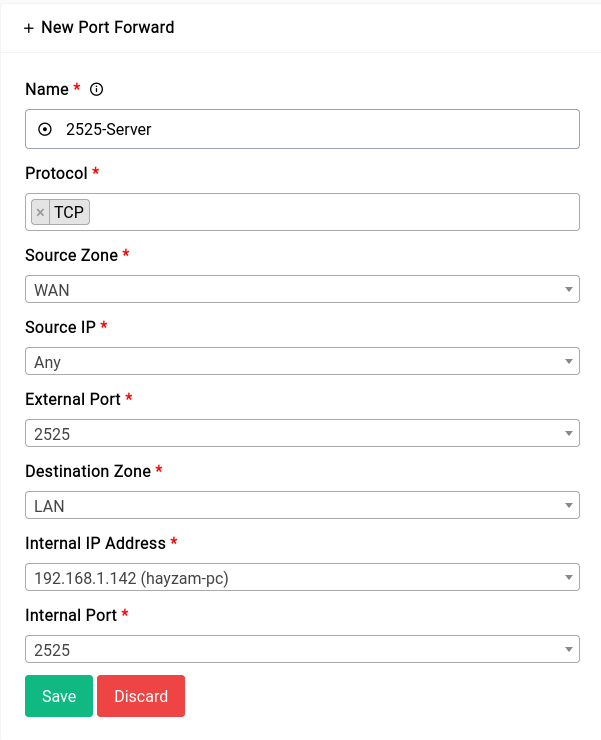
Only the source field can have an alias for portfowards, unlike traffic rules which can have both source and destination aliases.
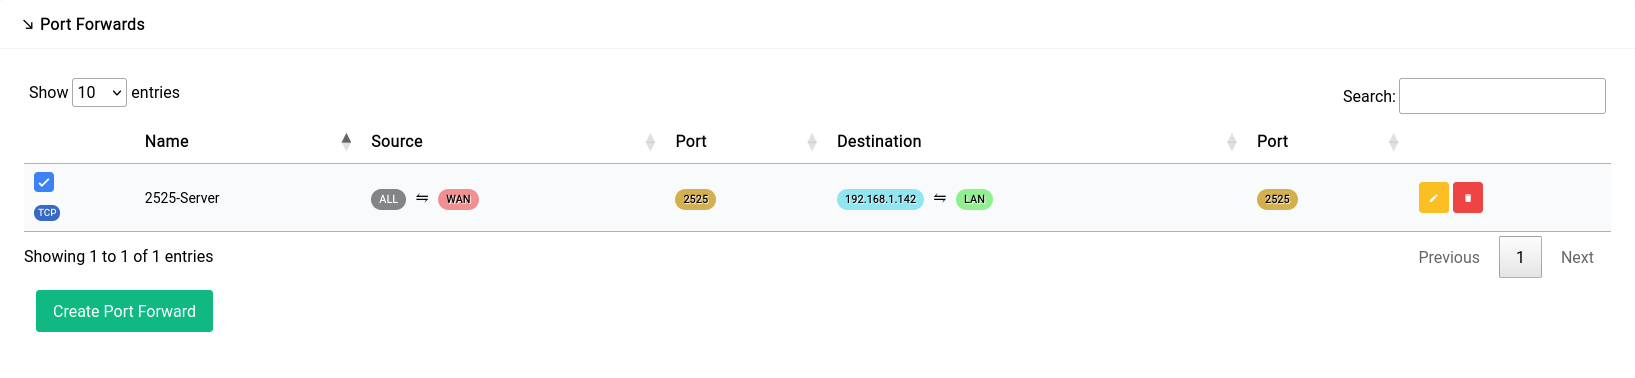
Now for purposes of demonstration we have an HTTP server listening on port 2525 on the IP 192.168.1.143. We need all hits to WAN IP and port 2525 to forward to that IP and port on the internal network
The new rule would look something like this:
Once the rule is created it would look something like this in the table:
Firewall - Traffic Rules
Traffic rules are used to control the flow of incoming and outgoing traffic on a network. These rules specify the conditions under which traffic is allowed or denied, as well as the actions that should be taken when these conditions are met.
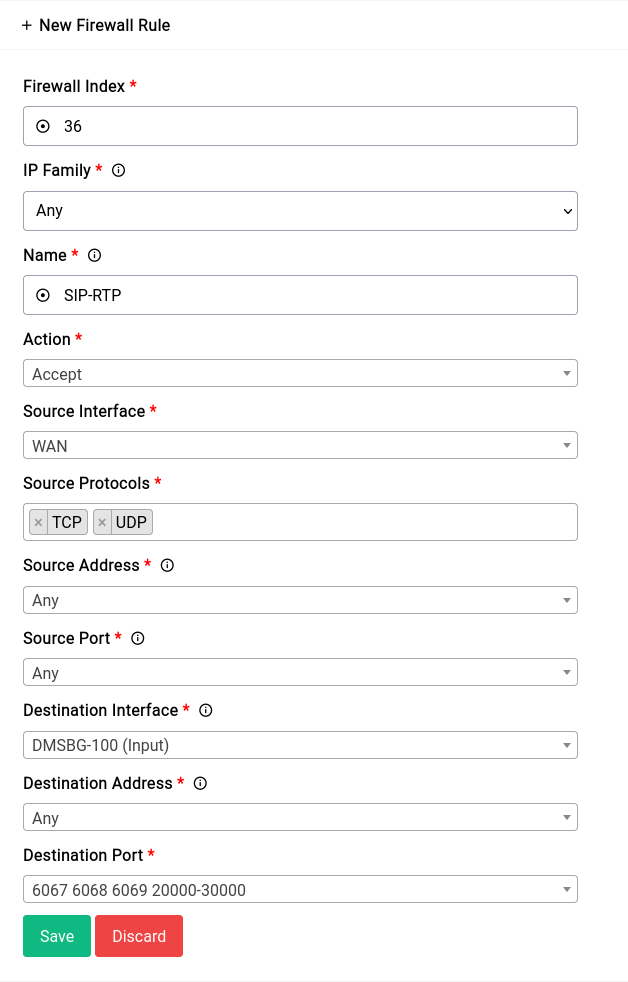
For purposes of demonstration we are going to create 4 firewall rules:
-
A rule that allows connections to all the SIP and RTP ports which are:
- SIP: 6067 (UDP)
- SIP: 6068 (TCP)
- SIP TLS: 6069 (TCP)
- RTP: 20000-30000 (UDP)
-
A rule that allows for remote administration of Difuse using the TCP ports 80 and 443.
-
A rule that let’s all traffic through to a specific globally routable IPv6 address.
Index’s are assigned automatically at the creation of a new rule. You can edit them later to placed before or after a particular rule if need be using the same index field or you can use the grey button in the table to drag and drop the rules in the order you want.
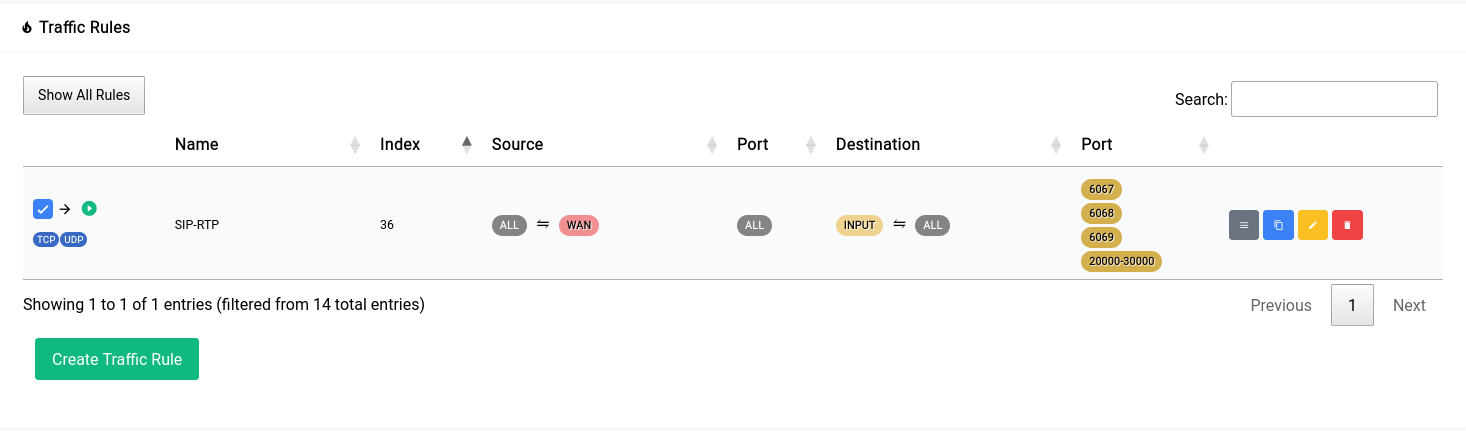
Allowing SIP and RTP connections
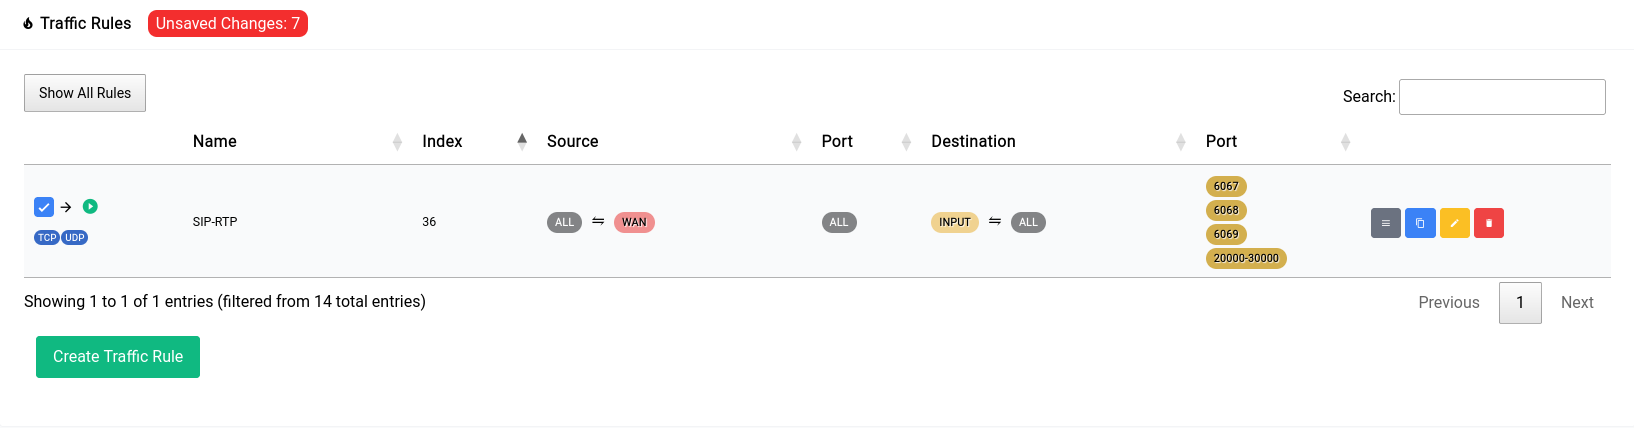
This is what adding the rule should look like:
Now once you add a rule, it doesn’t get applied right away. You can see that there’s a red pill that pops up near the title
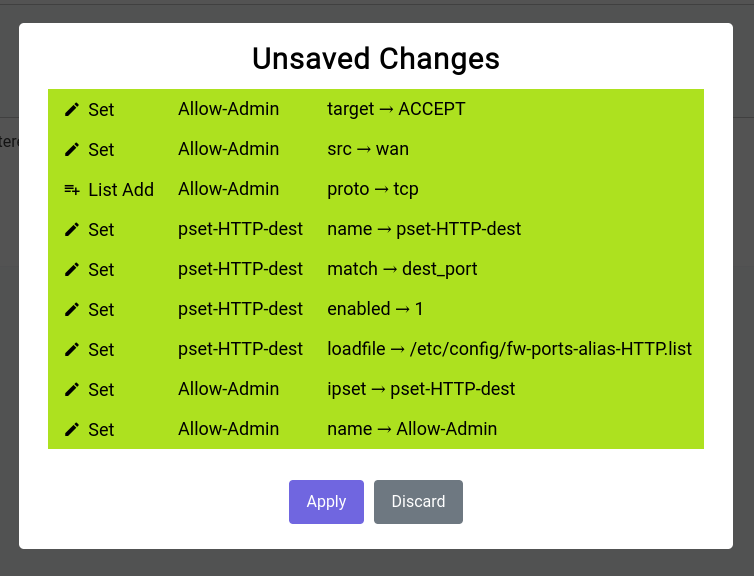
When you click on it, it shows you a gist of the things that have been changed:
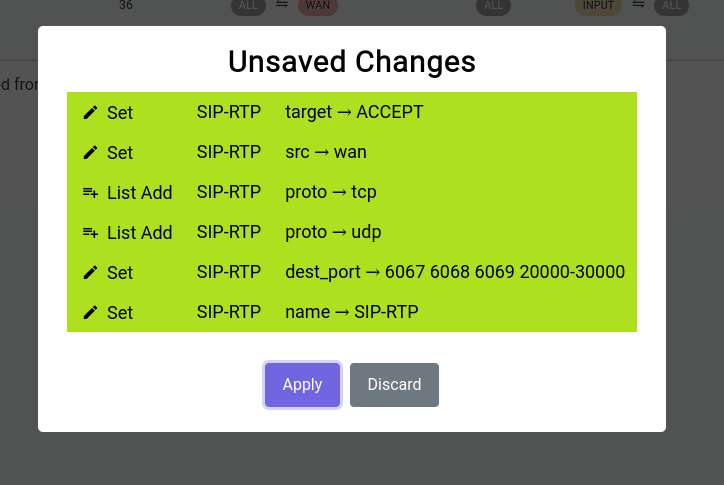
It’s really not a good idea to keep these unsaved changes for a long time as they’re ephemeral and have to be committed to disk or discarded at some point in time.
Once you click apply you will see it go away and the rule you added will show up in the table as such:
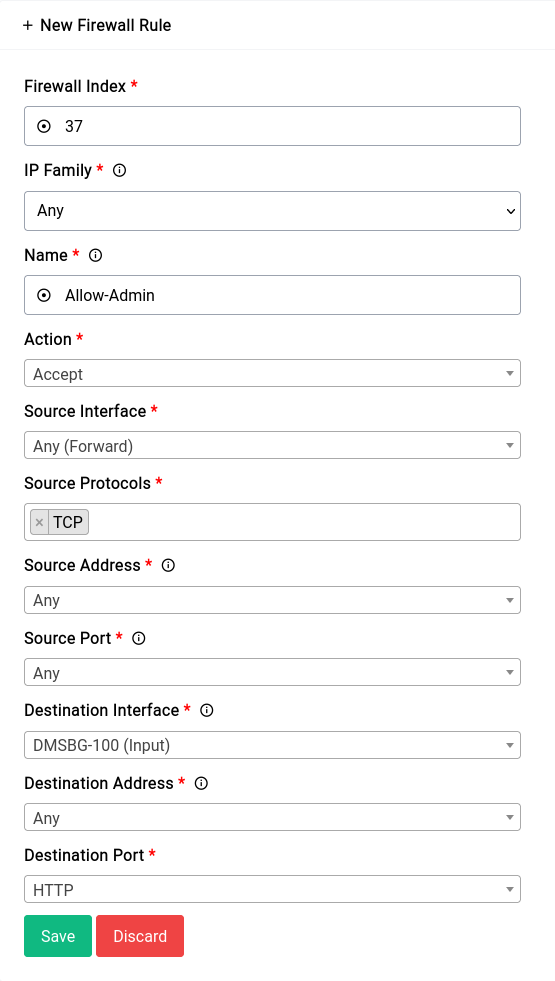
Allowing Remote Administration
For this rule we’re gonna make use of a Ports Alias. Namely the “HTTP” alias that has the ports 80 and 443 defined. This is just for demonstration you could also just specify the ports directly with a space in between them.
This is an exceedingly bad idea. You should never allow remote administration of your router with source set to ANY ip unless you know what you're doing. We're just using this as an example.
The unsaved changes modal should look something like this:
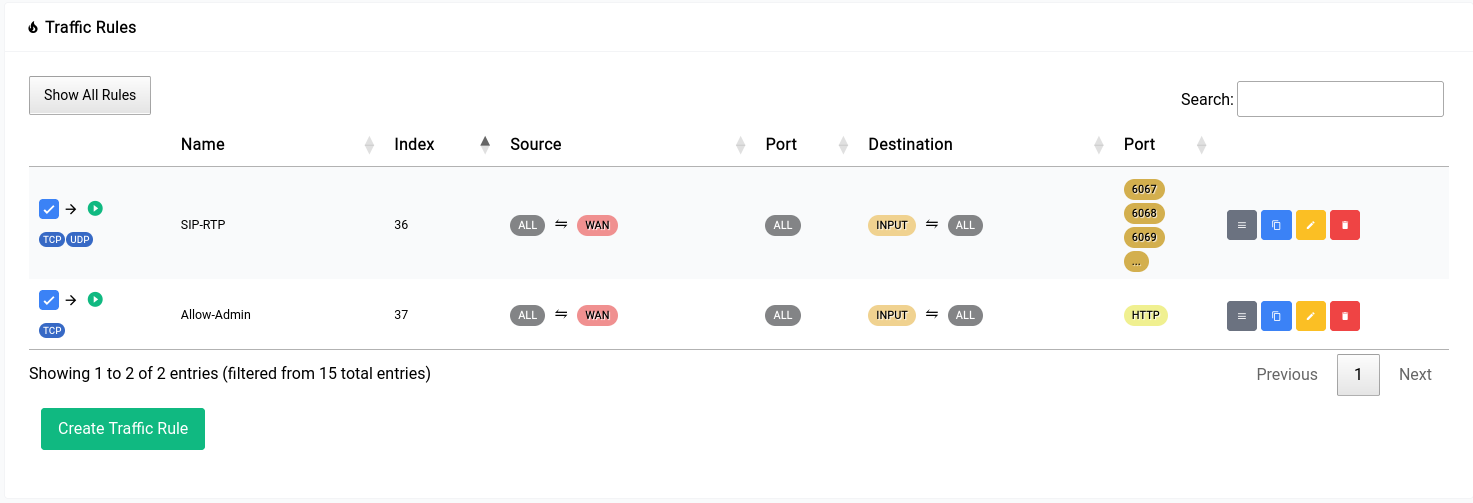
After the rule has been made the table should look something like this:
Allowing All Traffic to a Specific IPv6 Address
It's a bad idea to allow all traffic to a specific IPv6 address. You should only do this if you know what you're doing, we're just using this as an example.
If your ISP hands out a sufficiently large prefix (/64 or below) all devices on the host network should already have a globally routable IPv6 address. Now in this case we want the firewall to let all traffic flow to and from a specific IPv6 address without any blocks whatsoever.
First you need to find the IPv6 address of the host and then create a new rule. The new rule would look something like this:

Firewall - NAT Rules
Network Address Translation (NAT) allows you to translate IP addresses and ports for traffic flowing between networks.
It translates private IP addresses into public IP addresses, allowing private IP networks to connect to the internet and hiding the internal network behind the public IP address. You can create source NAT (SNAT) and Masquerade rules to enable traffic flow between private and public networks by translating non-routable, private IP addresses to routable, public IP addresses. You can create NAT rules for IPv4 and IPv6 networks.
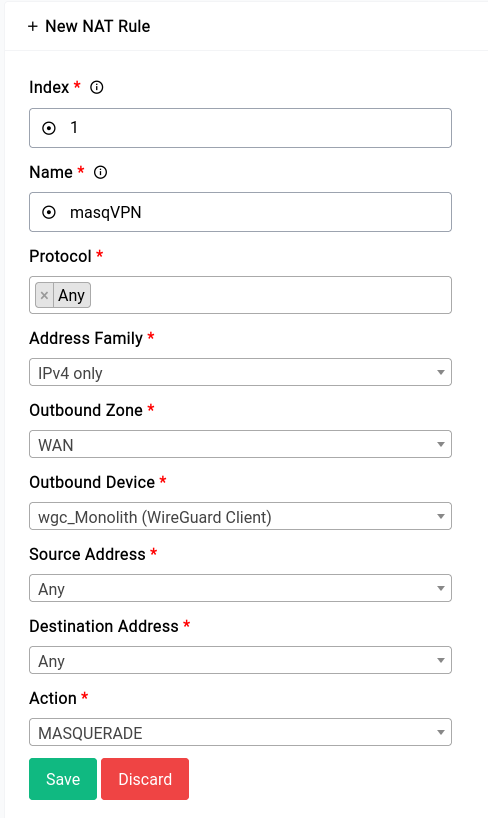
Here's an example of a NAT (Masquerade) rule:
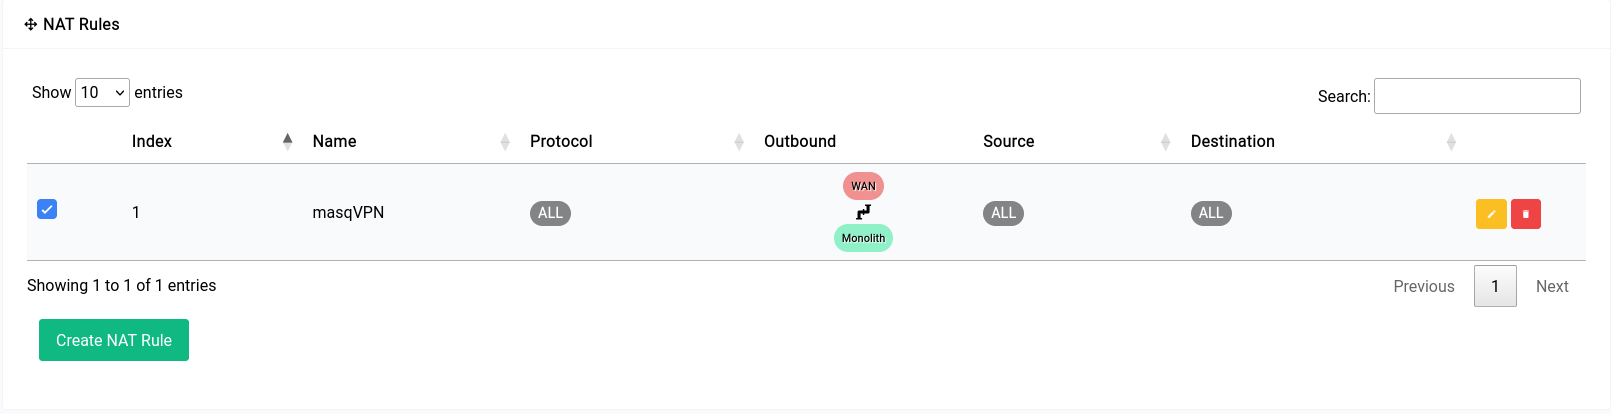
Once the rule is created it would look something like this in the table:
Firewall - Bandwidth Control
Bandwidth control encompasses both Quality of Service (QoS) and Smart Queue Management (SQM):
- Quality of Service (QoS): Also commonly known as Rate Limiting is used to limit the upload and download speed of a particular client on the network.
- Smart Queue Management (SQM): This feature allows the router to prioritize certain kinds of traffic and help reduces delays when the it becomes overloaded.
Quality of Service (QoS)
Rate limiting allows the device to limit the traffic that egresses through a port to a value less than the available link bandwidth. So if there’s a network peer consuming too much bandwidth you can limit their egress and ingress flow rate and effectively reduce network congestion experienced by other peers.
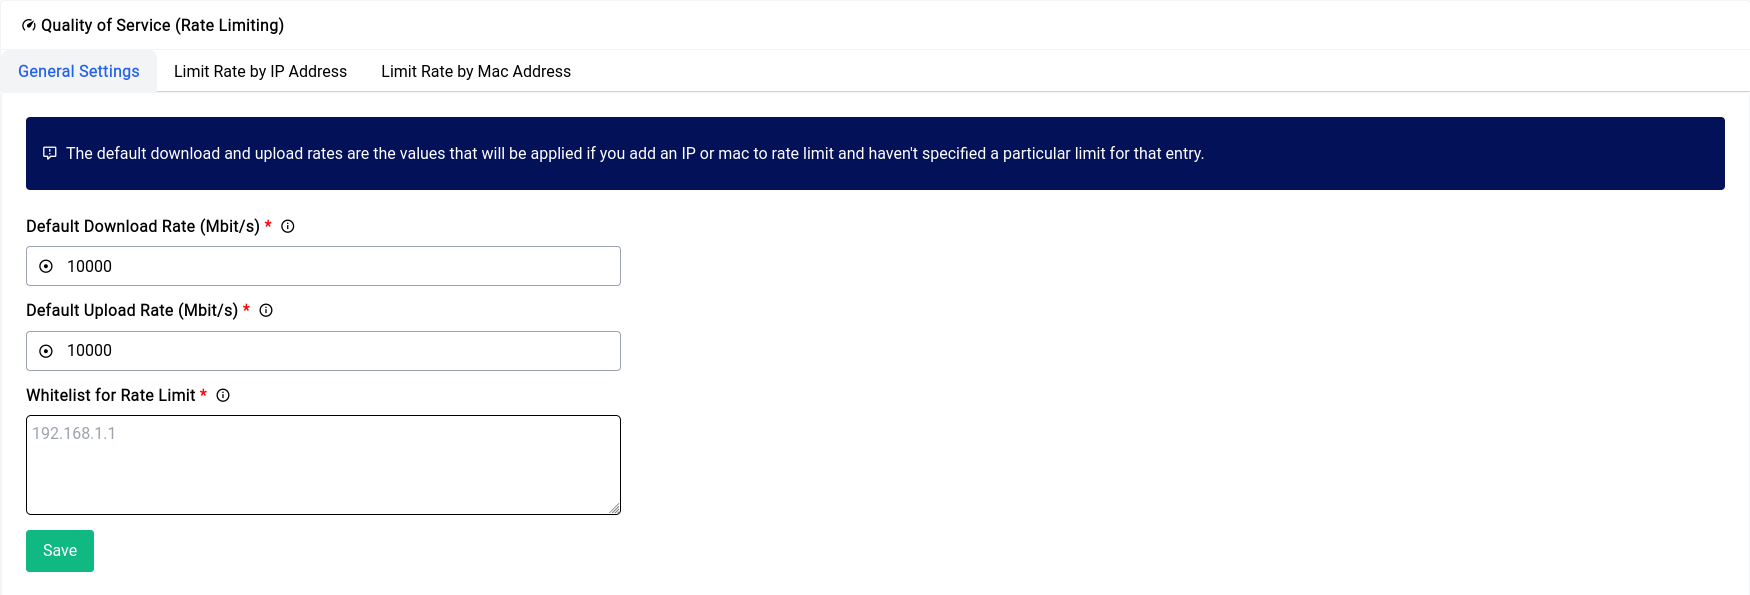
In the General Settings page the default upload and download rates are rates which are applied for entries in the Limit by IP and Limit By Mac sections when they’re added without specifying a limit.
The whitelist are for devices that should not have any effect on their bandwidth no matter what happens.
Limiting by IP Address
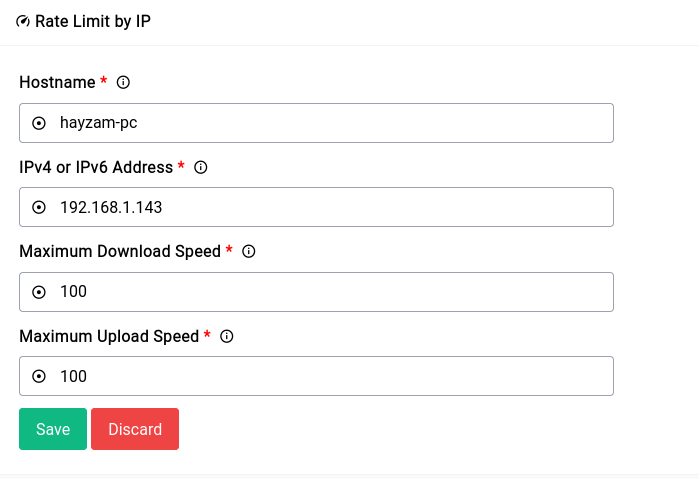
An example entry for limiting by IP address.
Limiting by MAC Address
Limiting by MAC address is highly preferable to IP Address as it’s much harder for a user to change a device’s mac address than it is to change the IP.
Here’s a simple limit added to a client on the network:
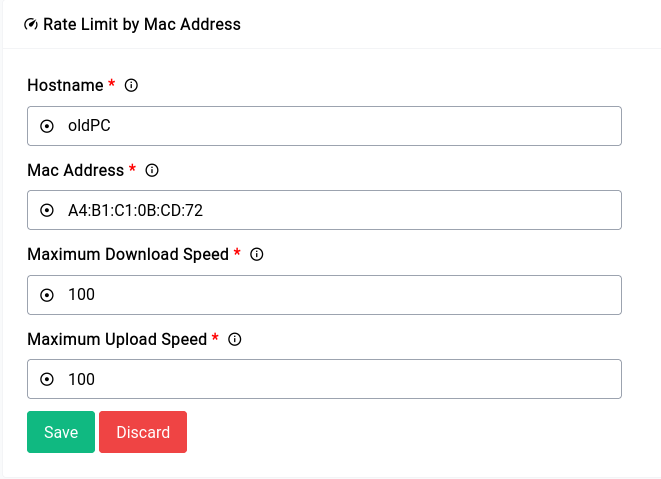
If you’re thinking of an easy way to get the MAC addresses of the client, all you need to do is go into the Static Leases section of the DNS & DHCP Configuration and copy from there.
Smart Queue Management (SQM)
QoS does rate limiting the old way as it doesn’t really care about what the packets look like, it just will cut off the user at a certain point, but SQM works in a very clever way to prioritize packets based on what they actually are.
Setting up SQM is very straight-forward. You just need to type in the ISPs advertised download and upload speeds or just click on the “Auto Fill Speeds” button which will do it for you.
It’s highly recommended to fill in 90-95% of the advertised speeds to get the most out of SQM, otherwise the intended functionality won’t really take into effect.
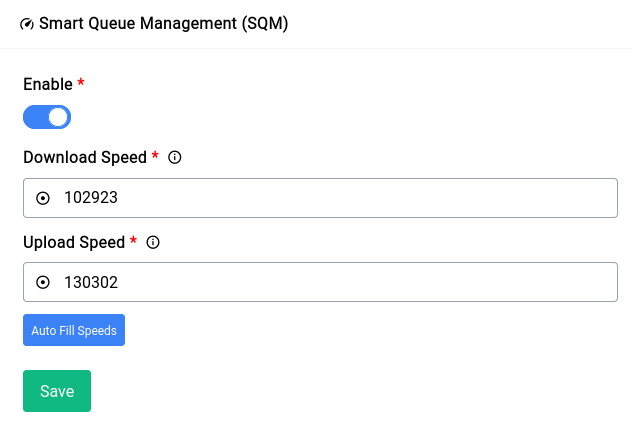
When you fill in the speeds using the auto fill button, it will calculate the exact amount you need by subtracting the necessary values instead of you having to do it yourself. If you think it’s way off (it should be within ~90 - 95% of the advertised speeds) by +5% or -5% feel free to make the changes yourself and save the settings.
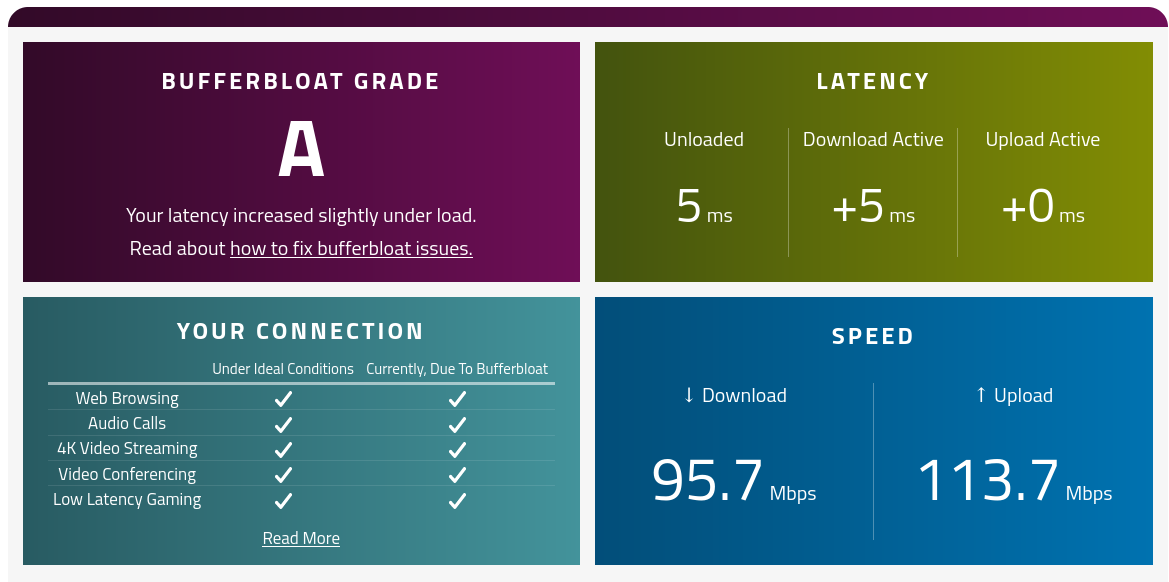
It’s a good idea to check your routers bufferbloat results using this really great tool. We did a couple of tests with and without enabling SQM and below are the results.
Bufferbloat is a software issue with networking equipment that causes spikes in your Internet connection’s latency when a device on the network uploads or downloads files.
Bufferbloat - Without SQM
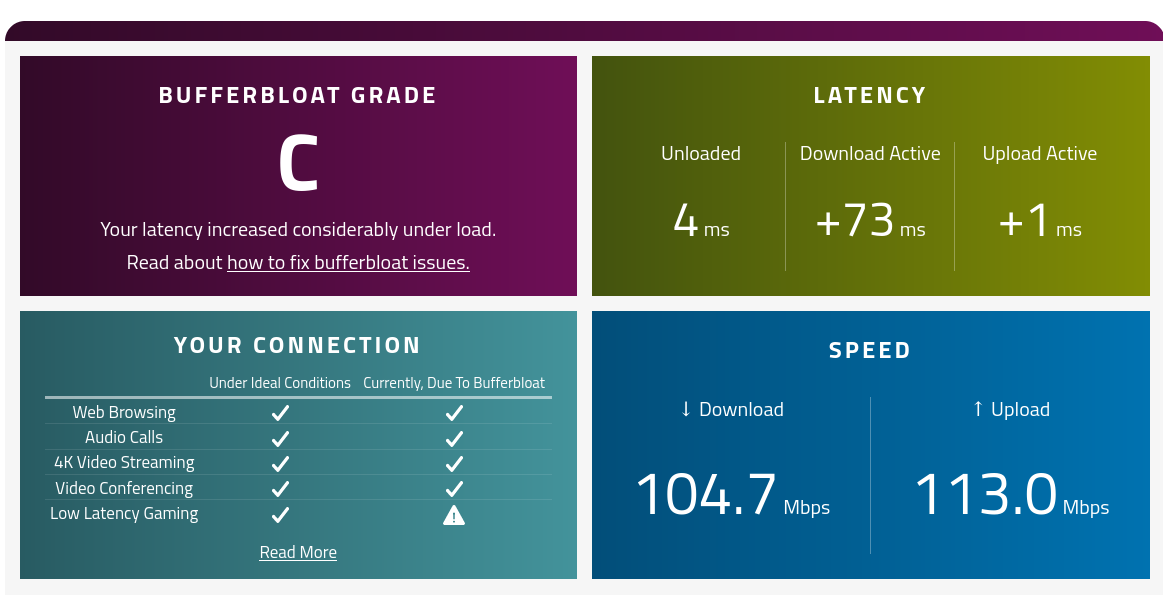
Bufferbloat - With SQM
Services
Difuse provides a bunch of services that can be used within the network. Here's all of them:
ACME Certificates
ACME Certificates is a service that allows you to generate SSL certificates for your domains. It uses Let's Encrypt as a certificate authority.
Adblock & Content Filtering
Adblock & Content Filtering is a service that allows you to block ads and other unwanted content on your network. It uses the built-in DNS server to block domains. We also provide custom list of domains to block in their own categories.
Cloudflare Tunnels
Cloudflare Tunnels is a service that allows you to expose your local services to the internet using Cloudflare Argo Tunnels. It's a really good choice if you're behind a CGNAT or don't want to expose your IP address to the internet. This also provides protection via the cloudflare web application firewall (WAF).
Storage
Storage is a service that allows you to create a NAS (Network Attached Storage) on your network. It uses Samba to provide SMB shares, you can mount USB drives or use the built-in storage (if you have a device with the M.2 SSD).
Dynamic DNS
Dynamic DNS is a service that allows you to create a domain name that points to your public IP address. We support upto 70 different providers, so you can choose the one that you prefer.
Intrusion Prevention
Intrusion Prevention is a service that automatically blocks bad peers from trying to authenticate to critical services over and over again, think of it like a simpler version of fail2ban. It currently supports 3 services, namely: SSH, Asterisk and the Difuse GUI.
IPFS
IPFS is a service that allows you to create a local IPFS node on your network. It uses kubo to provide a web interface to manage your node.
WireGuard VPN
WireGuard VPN is a service that allows you to create a VPN server on your network. It uses WireGuard to provide a secure connection to your network. You can also use it to connect to other WireGuard servers.
Services - ACME Certificates
Two services namely the Difuse GUI and Asterisk PBX software uses TLS certificates for encryption. The device from the factory comes with a self-signed certificate. As you may already know self-signed certificates cause warnings generated on the client side and sometimes the certificate doesn’t work at all in the case of some soft phones to mitigate this the ACME certificates service comes into play.
ACME, or Automated Certificate Management Environment, is a protocol that makes it possible to automate the issuance and renewal of certificates, all without human interaction.
Now we’re going to use ACME to generate Let’s Encrypt certificates and use it for both our GUI as well as Asterisk.
To set up a certificate you need to have a domain name setup already, please follow the Dynamic DNS Service guide for doing that. Once that is set up you can start the setup process as that page will no longer have a disabled link button.
Creating Certificates
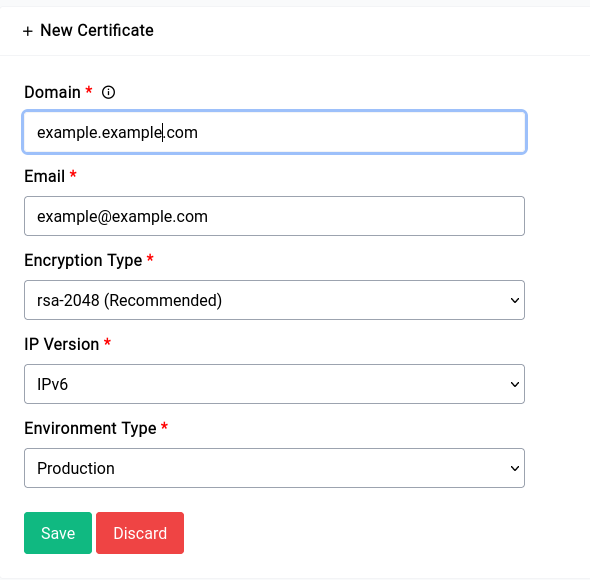
Let's go over the fields:
Domain
You can use the domain name you had set up in the dynamic DNS service page.
You need to specify a valid email address here, this is used by Let's Encrypt to send you notifications about your certificate.
Encryption Type
ec-256 is orders of magnitude faster than RSA-2048, but that being said it is also not the most widely supported encryption type across all the asterisk clients whereas RSA-2048 is. Which is congruently the reason why we recommend it.
IP Version
Coming to IP version it’s a very good idea to use the option which makes the most sense to you. If you’re under strict CGNAT it’s mandatory to run the generation on IPv6 as the CGNAT IP is not globally routable whereas the IPv6 is but if you have a regular dynamic or static IPv4 address you can pick that.
If you have both A and AAAA records on your domain ACME servers might randomly pick one to query, you can try both IP versions one after the other if either doesn’t work the first time.
Enviroment Type
If you want to test the generation it’s a very good idea to set the environment type to staging and try generating a few times before you try out production since failing a few times on production will put you on a black list for a few hours during which you will not be able to verify/generate any new certificates.
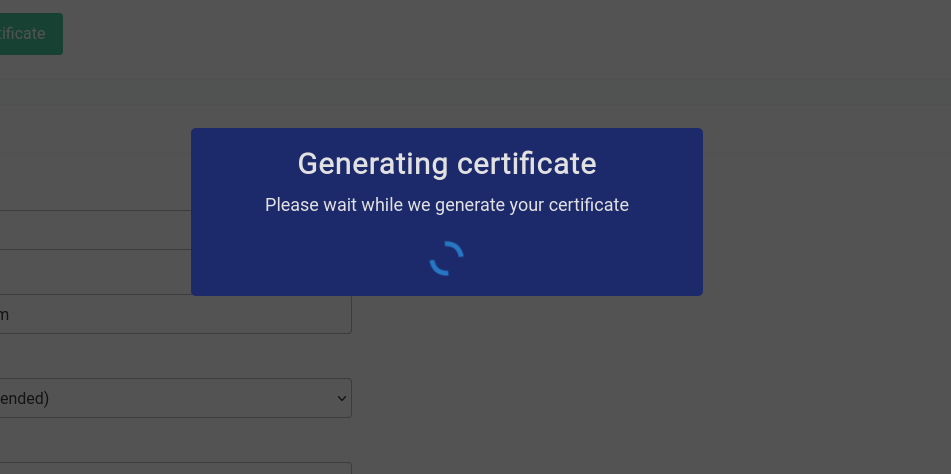
Generation of a new certificate will take a long time, which is around 2-3 minutes or sometimes even 5-10 minutes depending on factors such as your network speed, the load on ACME servers etc.
It will look something like this:
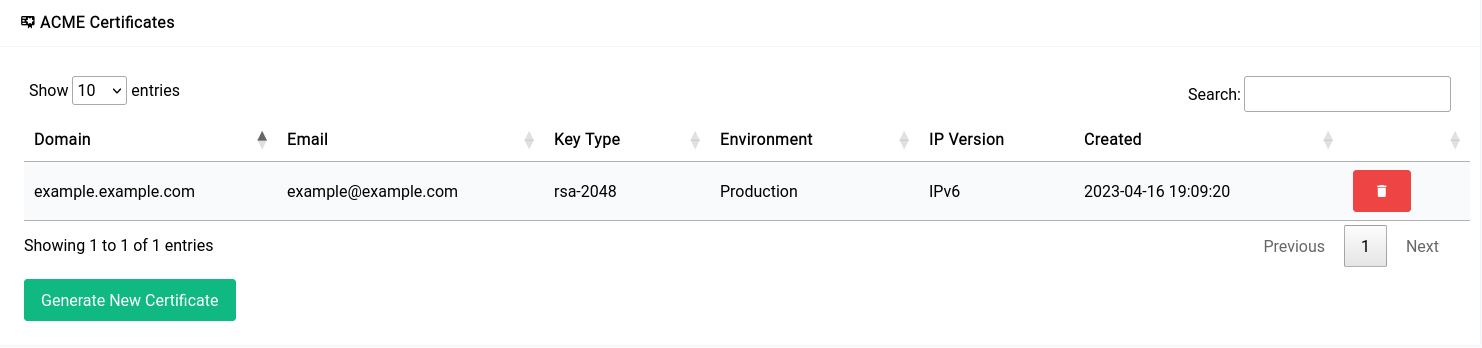
Once it’s all set up, the table should look something like this:
Using Certificates
Using Certificate for Asterisk
Setting up the ACME generated certificate for asterisk is trivial. Go into Settings under the PBX section and then into the Security tab where you will find 2 options one is for the AMI password and the other is for PJSIP TLS Certificate.
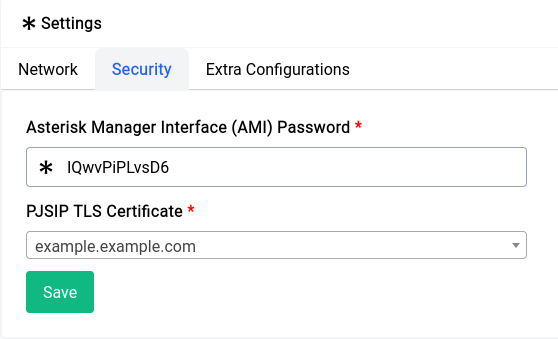
Now asterisk will start using that certificate for TLS. If you want to make sure that it applied you can always restart and-or reload the configuration using the Quick Actions menu.
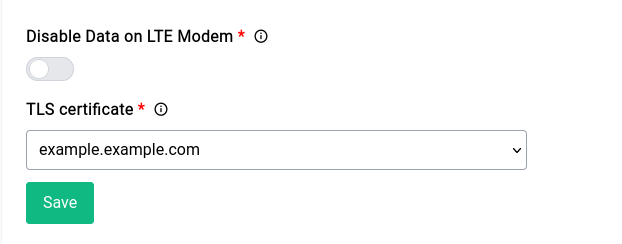
Using Certificate for Difuse GUI
This is not really necessary but it’s a really cool thing to have, especially if you do a lot of remote administration. Just like the TLS setup for asterisk you can go into the Administration section under Routing & Services section and then go into the Miscellaneous tab.
In the Miscellaneous tab you will find the TLS certificate option, you can specify the certificate you generated and save.
AdGuard Home
AdGuard Home is a network-wide software for blocking ads & other unwanted content. The software is free and open source. Difuse comes pre-installed with AdGuard Home and it is enabled by default and used as the DNS resolver for the LAN. AdGuard offers great documentation here. Some commonly used features are listed below.
You should not use the DHCP server present in the AdGuard Home web interface as it will conflict with the DHCP server that we use which is dnsmasq.
Accessing AdGuard Home
AdGuard Home is accessible via the web interface at http://<router-ip>:1887, where <router-ip> is the IP address of the router. You can also access it via the Services menu in the web interface which should automatically redirect you to the AdGuard Home web interface.
The password is the same as your router password, it automatically changes when you change that password.
Commonly Used Features
General Settings
In the general settings tab, there are 3 main sections:
-
Basic Settings: This is where you can turn on/and off things like parental control web interface, safe search, etc.
-
Logs & Statistics Configuration: We recommend you to keep the logs enabled and with a low retention period since this is stored on the eMMC and it can fill up pretty quickly especially if you have a lot of clients on your network.
DNS Settings
In the Upstream DNS settings, the following is defined:
[/pool.ntp.org/]1.1.1.1
[/pool.ntp.org/]1.0.0.1
[/pool.ntp.org/]2606:4700:4700::1111
[/pool.ntp.org/]2606:4700:4700::1001
[/difuse.io/]1.1.1.1
[/onion/]127.0.0.1:9053
https://dns.cloudflare.com/dns-query
https://dns.quad9.net/dns-query
https://doh.mullvad.net/dns-query
https://dns.google/dns-query
We highly recommend just keeping it the way it is as it is the best configuration for most users. If you want to add your own upstream DNS servers, you can do so by adding them to the end of the list. You can also remove any of the upstream DNS servers that you don't want to use.
Since the device doesn't have an onboard RTC, it uses NTP to sync the time. If you remove the NTP servers from the upstream DNS list, the time will not be synced because the device will not be able to resolve the NTP servers with just the DNS-over-HTTPS servers.
We also have kept "parallel requests" enabled by default. This means that the device will send DNS requests to all the upstream DNS servers at the same time and use the fastest response. This is a great feature to have enabled as it makes the DNS resolution faster and more reliable.
DNS Blocklists
By default AdGuard comes with 2 blocklists namely:
- AdGuard DNS filter
- AdAway Default Blocklist
We have enabled only the AdGuard DNS filter by default. You can enable the AdAway Default Blocklist if you want to block more ads but we've found that it can sometimes block legitimate content as well, the choice is yours.
DNS Allowlists
You can add your own allowlists here if you want to allow certain domains that are blocked by the blocklists.
DNS Rewrites
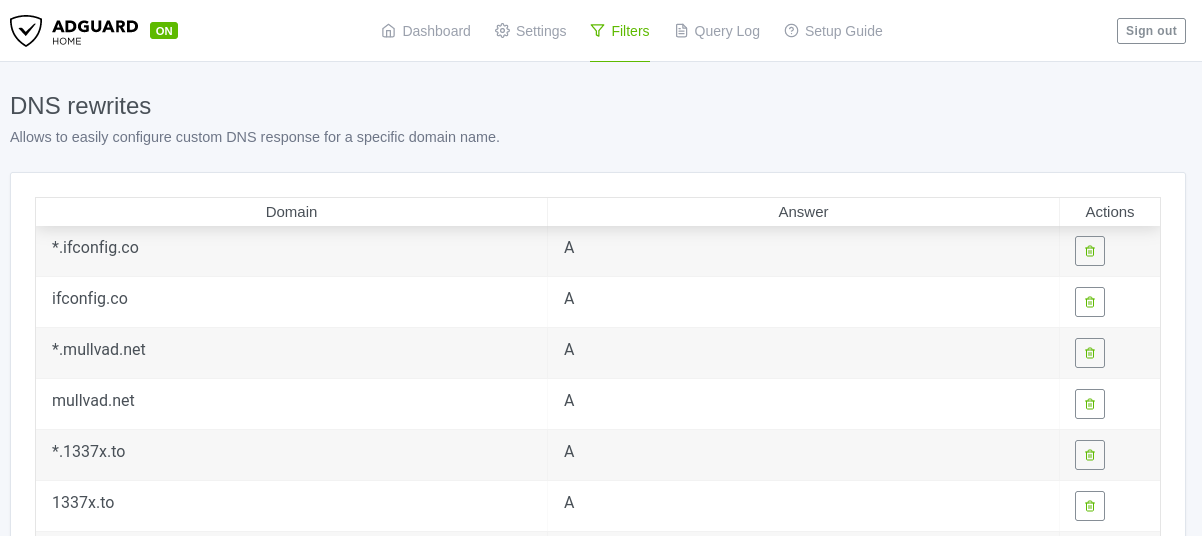
You can add your own rewrites here if you want to rewrite certain domains to other domains or return a different IP address for a domain or even return only AAAA records for a domain. The possibilities are endless. If you use policy based routing you can see that there may be domains that you've specified in the Difuse GUI present here, this is because the rewrite functionality is implemented using DNS rewrites (to return only A records for policy routed domains).
Blocked Services
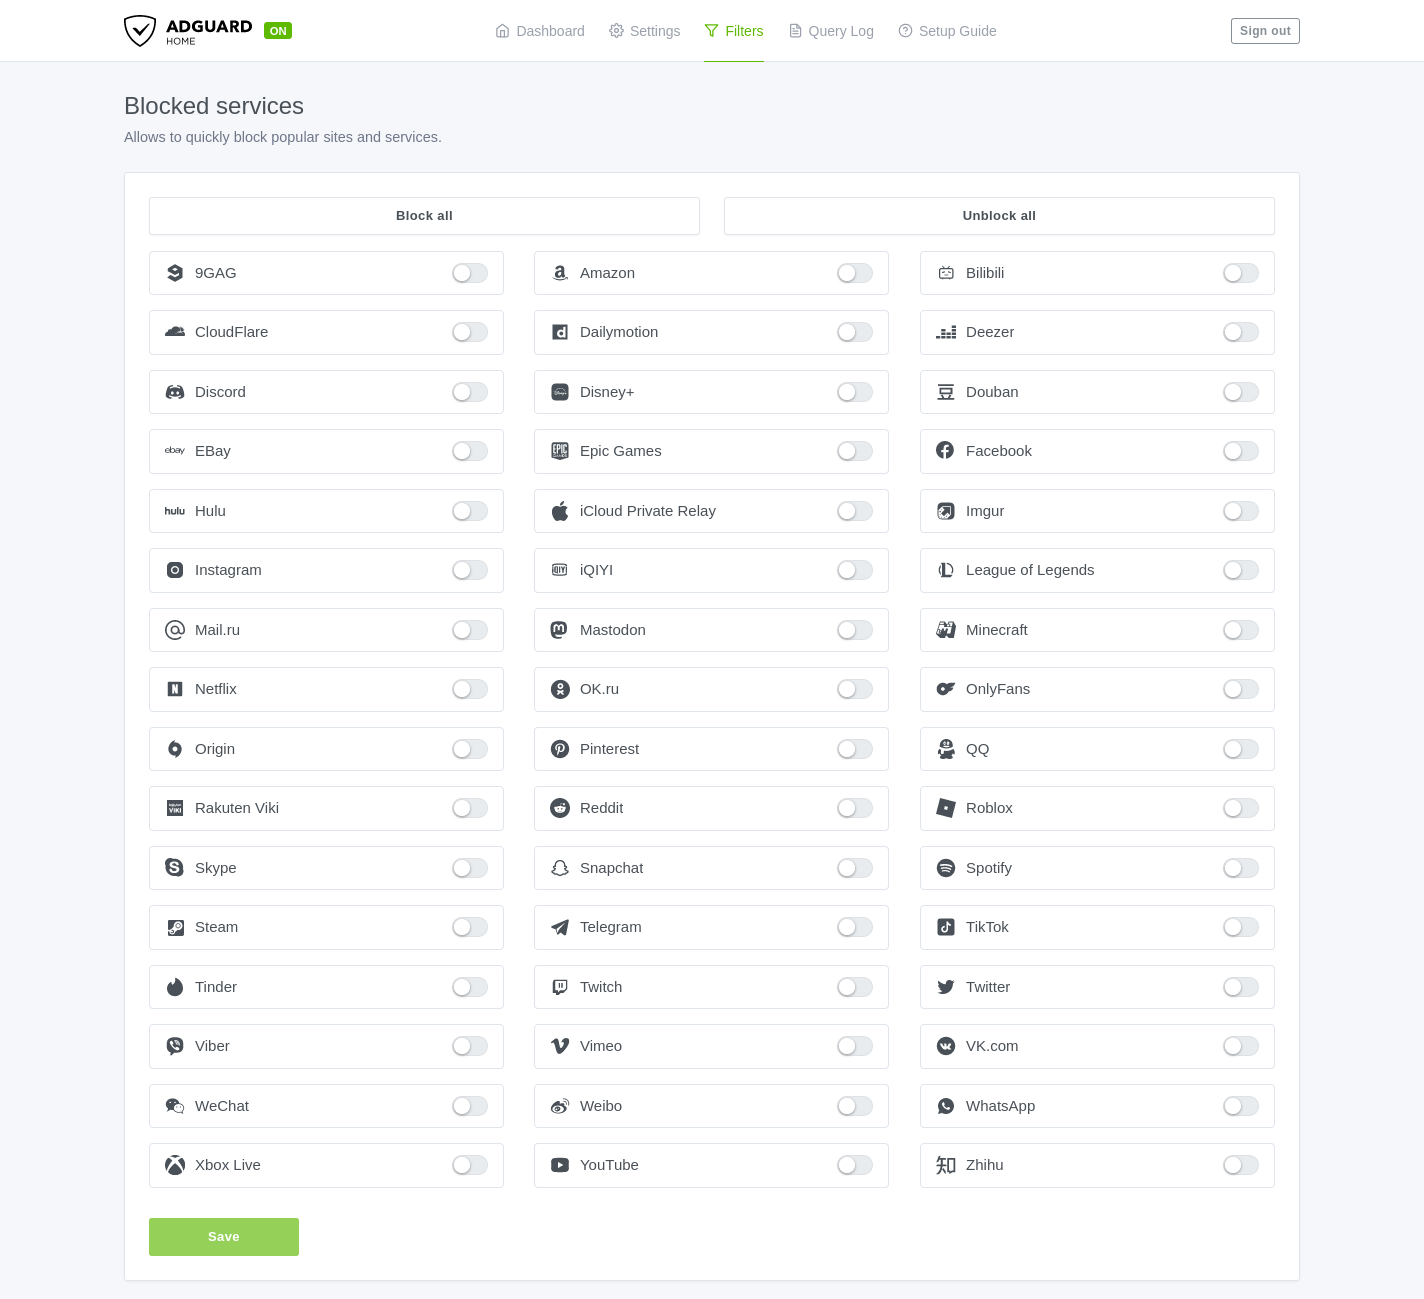
You can block certain services here. For example, if you want to block all the Facebook services you can just enable the button next to Facebook and it will block all the Facebook services. Be careful with this as it can break certain websites.
Custom Filtering Rules
You can specicy all your custom filtering rules here.
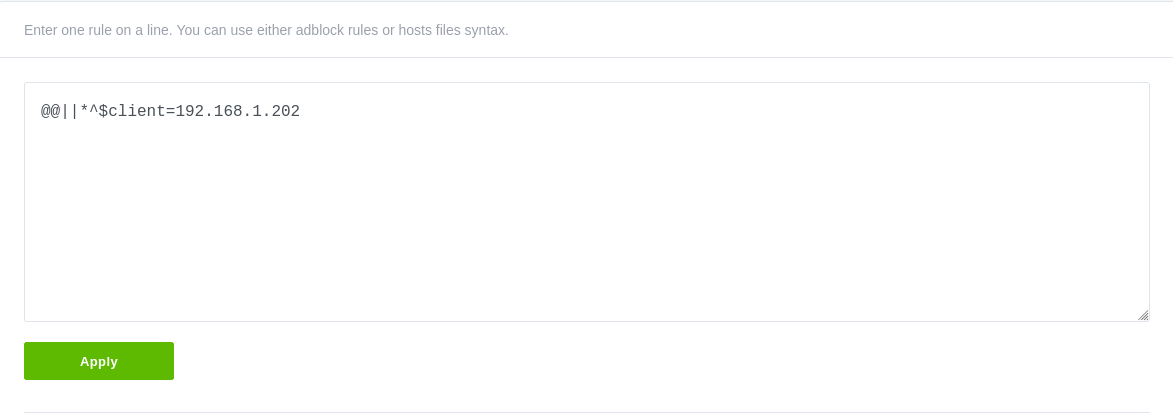
As you can see we've allowed all for the LAN IP 192.168.1.202, it's a good idea to specify IPv6 address of the client as well if you want to allow it for IPv6 as well.
Query Log
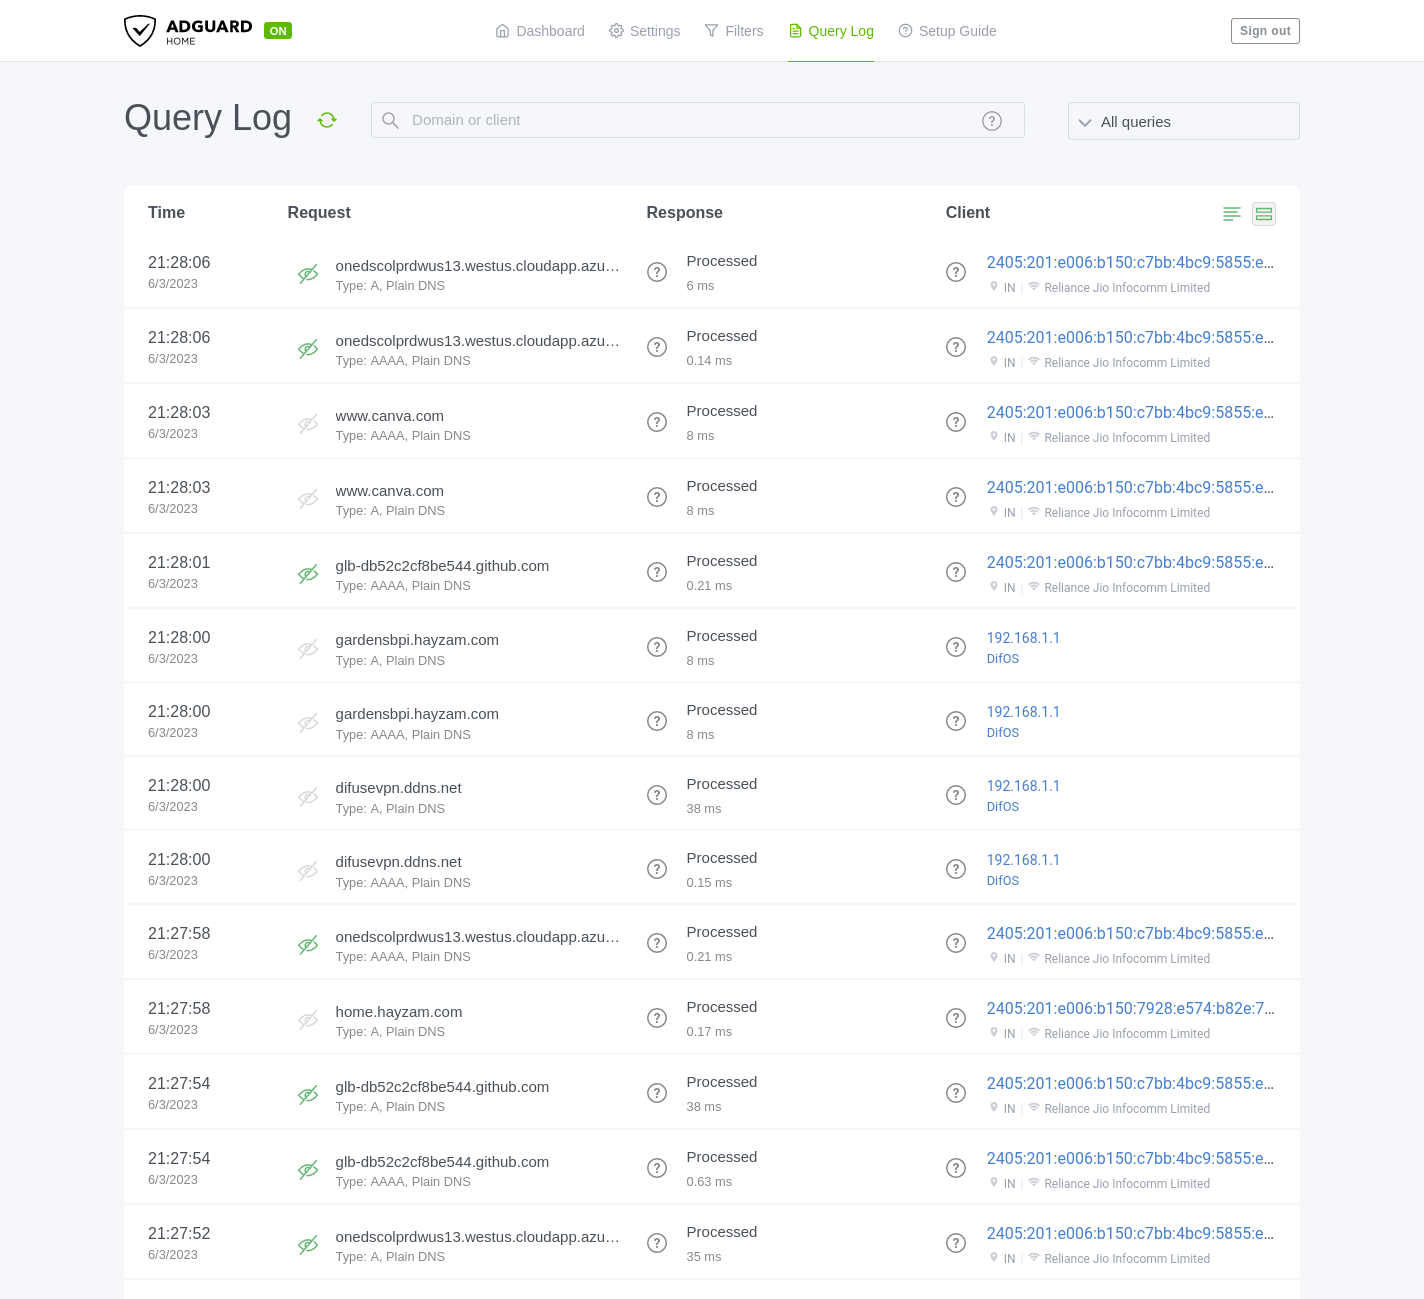
This is where you can see all the DNS queries that have been made by the clients on your network. You can also filter the queries by domain, client IP, etc.
Services - Cloudflare Tunnels
Cloudflare Tunnels is a service that allows you to expose your local services to the internet using Cloudflare Argo Tunnels. It's a really good choice if you're behind a CGNAT or don't want to expose your IP address to the internet. This also provides protection via the cloudflare web application firewall (WAF).
Enabling Cloudflare Tunnels
When you first visit this page you will be greeted with a green button which reads “Enable Cloudflare Tunnel” you can click on that to enable Cloudflare Tunnels.
Setup
Setting up a tunnel is dead simple, all you need to do is copy over your token that you got from your cloudflare dashboard into the textbox and hit save, that’s literally all there is to do. Every other configuration is done in the cloudflare dashboard itself.
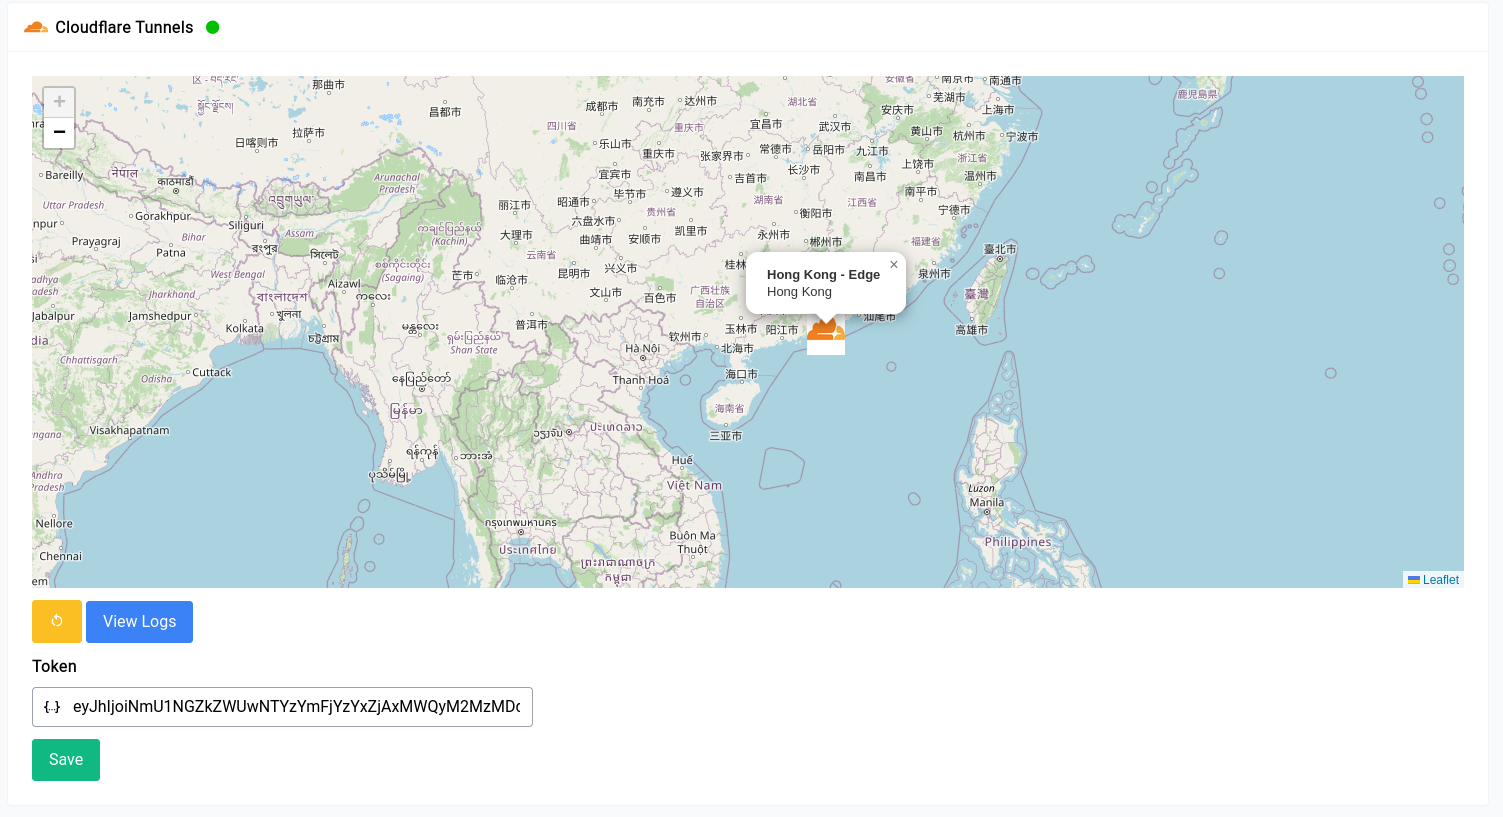
You can use this really good guide from cloudflare to set everything up. Once you set everything up, you should see something like the above with a map of your nearest edge nodes along with a green icon next to your title. If something doesn’t seem right you can always view the logs.
Services - Dynamic DNS
Dynamic DNS is a service that allows you to point a domain name to your home network's public IP address. This is useful for accessing services hosted on your home network from the internet, or for accessing your router's web interface from anywhere.
Setting up the Dynamic DNS service is pretty straight forward.
We highly recommend that you use Cloudflare as your service provider as they’re really trustworthy and integrates with Difuse the best.
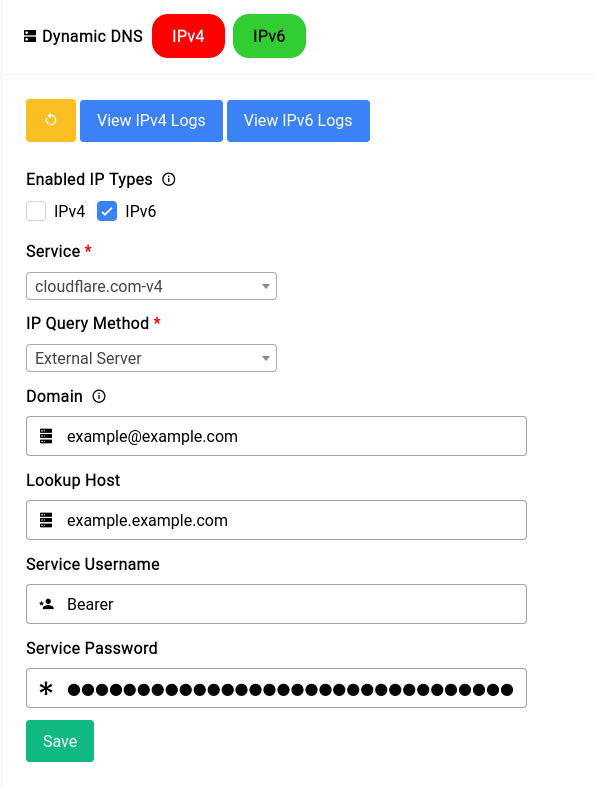
In this typical configuration. We’re setting up an IPv6 only Dynamic DNS Service. It’s a really good idea to do only IPv6 if you have a CGNAT IP.
You need to have an A and-or AAAA already configured with your nameserver provider else Dynamic DNS service will not work.
Let's go over the configuration options:
Enabled IP Types
This option allows you to choose which IP types you want to use for your Dynamic DNS service. You can choose between IPv4, IPv6 or both. Please remember the note about CGNAT above.
Service
Difuse offers over 70 different service providers for Dynamic DNS. You can choose the one that you prefer.
IP Query Method
This option allows you to choose how Difuse will get your public IP address. You can choose between:
- Interface - This option will get your public IP address from the interface that you choose. This is the recommended option.
- External - This option will get your public IP address from an external service. This is useful if you're behind a CGNAT or DHCP and don't have a public IP address on your router's WAN interface.
Domain
You can enter in the domain or subdomain here, for cloudflare we need to specify (for a subdomain) with an @ symbol. For example, if you want to use example.example.com you would enter [email protected] in the domain field.
This depends on your service provider so a little bit of trial and error might be needed. Usually the domain name or subdomain name just works as is.
Lookup Host
This is the host that will be used to lookup your public IP address. This is usually just the plain domainname like example.com or example.example.com.
Credentials
Now both the service username and password should be supplied by you that is specific to your configuration. In our case it’s the username Bearer and an API token for the password that looks something like this:
Bearer
VBpZTnM0NraVBpZTnM0NraVBpZTnM0NraVBpZTnM0Nra
Once everything is filled up you can just click on Save and you should be good to go.
If you want to restart the service you can just click on the yellow button with the restart symbol on it.
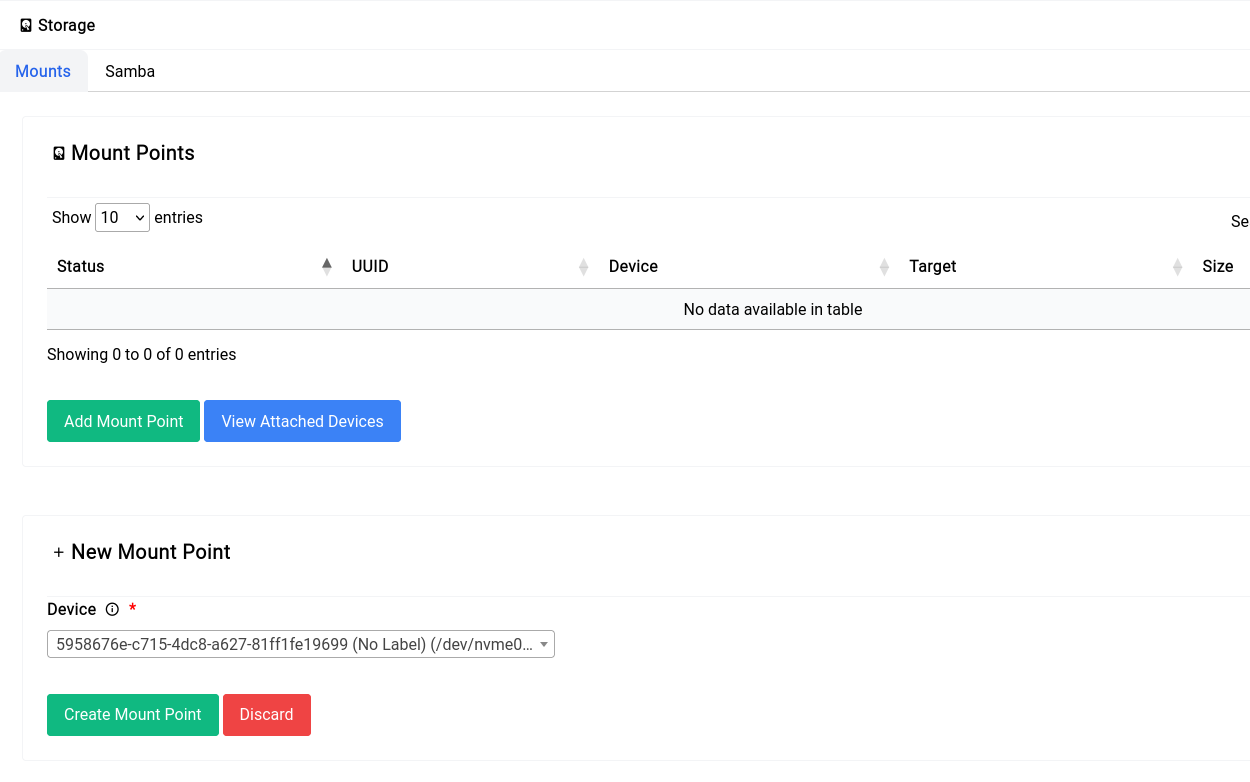
Services - Storage
Storage is a service that allows you to create a NAS (Network Attached Storage) on your network. It uses Samba to provide SMB shares, you can mount USB drives or use the built-in storage (if you have a device with the M.2 SSD).
Mounting Drives
Mounting a drive is simple, just click on "Add Mount Point" button and you should see a new form pop up, like this:
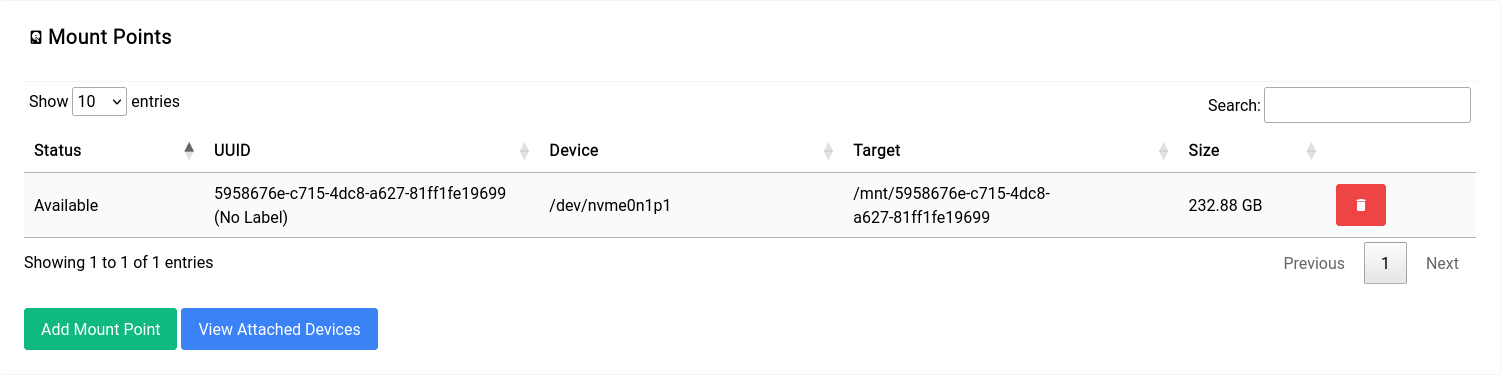
Once you click on the "Create Mount Point" button you should see the new mount point in the table, like this:
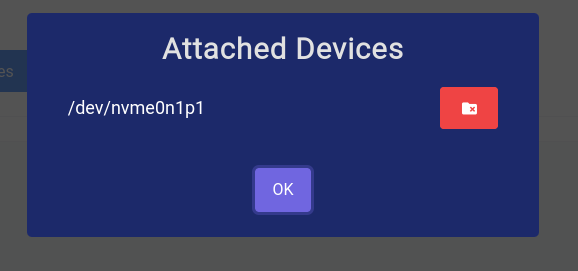
Deleting Mount Points
To delete a mount point, just click on the red delete button. Sometimes the delete doesn't go through completely since the drive might still be in use by Samba or some other service, in that case click on "View Attached Devices" and then click the delete button (red) next to the device you want to delete.
Samba
Settings
The underlying Samba server is fully configurable, you can change the workgroup, description, etc.
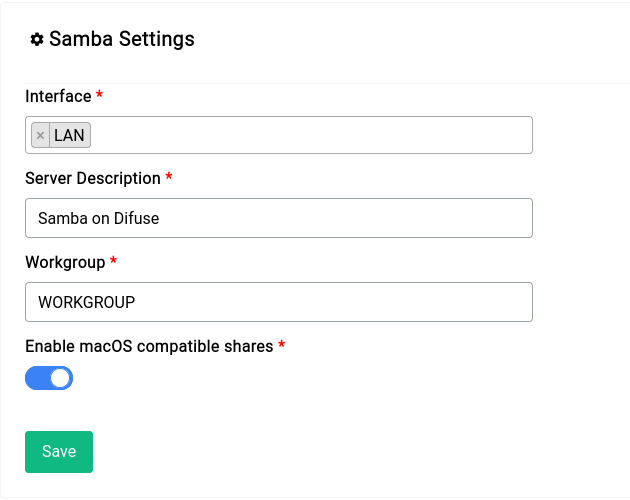
The interface you select is crucial, if you're using the WAN interface then you'll be exposing your shares to the internet, so make sure you know what you're doing.
Shares
Samba Users
You can create Samba users by clicking on the "Add New User" button, you should see a new form pop up, like this:
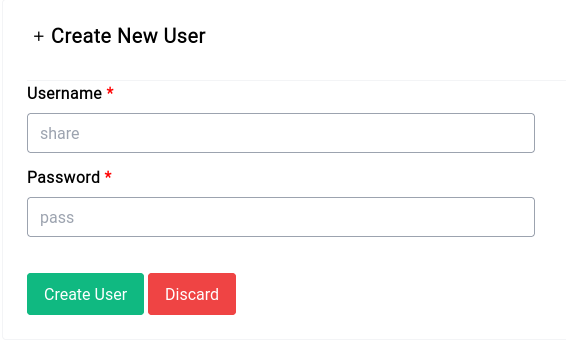
Once you click on the "Create User" button you should see the new user in the table, like this:
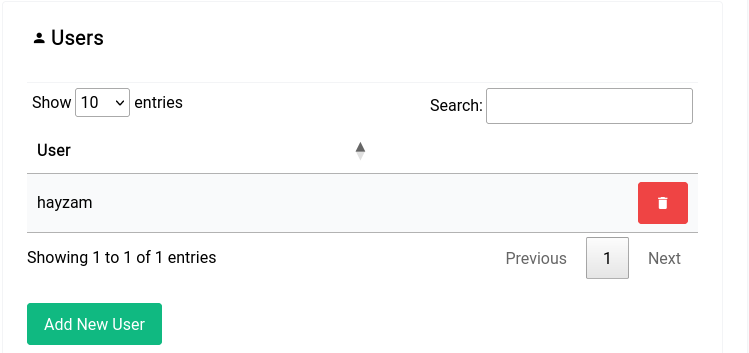
You can add these users to every share you create.
Samba Shares
You can create Samba shares by clicking on the "Add New Share" button, you should see a new form pop up, like this:
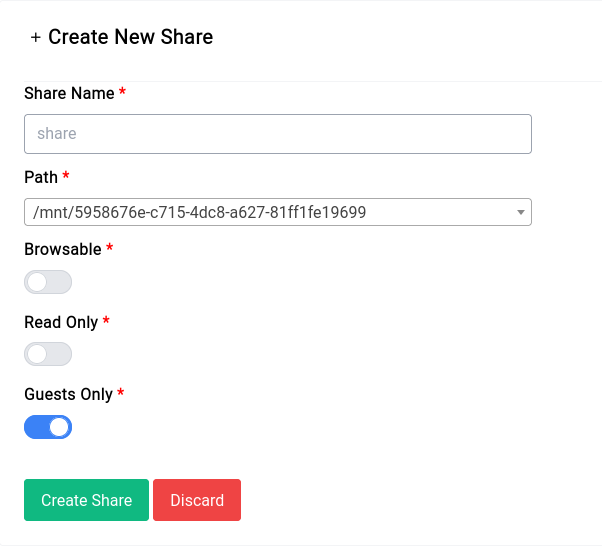
Let's go over all the options:
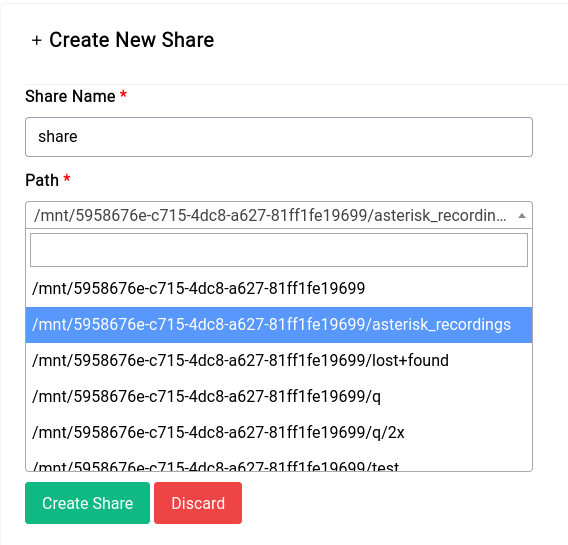
Share Name
This is the name of the share, it will be visible to everyone on the network. When you're mounting the share you should specify this name. For example if you name the share share then you should mount it like this:
\\192.168.1.1\share
Path
This is the path to the folder you want to share, it can be the root of a drive or a folder inside a drive. In our case we've selected the asterisk_recordings directory like this:
Browseable
This option allows you to hide the share from the network, if you set it to off then the share won't be visible to anyone on the network.
Read Only
This option allows you to make the share read only, if you set it to on then no one will be able to write to the share.
Guests Only
This option allows you to make the share only accessible to guests, if you set it to on then only guests will be able to access the share. If you turn it off you can see a new field appear with the users that you had created earlier, you can select the users that you want to give access to.

Once you've entered in all the details and clicked on "Create Share" you should see the new share in the table, like this:

TOR
TOR is a free and open-source software for enabling anonymous communication. It is used to protect your privacy online and to circumvent censorship. Difuse ships with a TOR client. The TOR client is used to connect to the TOR network.
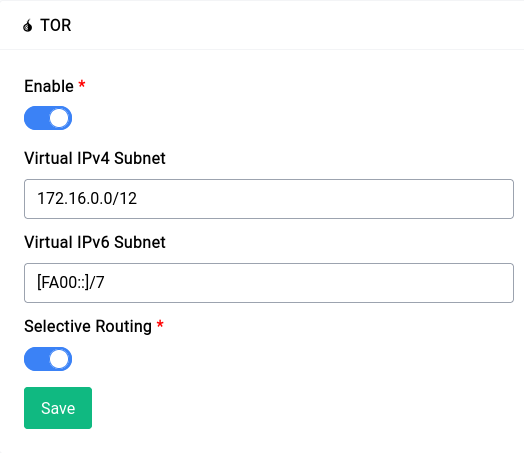
By default the TOR service is enabled, you can disable it by clicking on the toggle button and then clicking on the save button.
The service page gives you a few options to configure the TOR client, let's go over them:
Virtual IPv4 Subnet
This field is equivalent to the VirtualAddrNetworkIPv4 option in the TOR configuration file. You can specify a virtual IPv4 subnet for the TOR client to use or just leave it as is to use the default.
You should not use the same subnet as your local network, this will make it so that you can't access the GUI or SSH into your router, essentially locking you out.
You also should not use the same subnet as any of your VPN clients/peers as this will make it so that you can't access them.
Virtual IPv6 Subnet
You should not use the same subnet as your local network, this will make it so that you can't access the GUI or SSH into your router, essentially locking you out.
You also should not use the same subnet as any of your VPN clients/peers as this will make it so that you can't access them.
This field is equivalent to the VirtualAddrNetworkIPv6 option in the TOR configuration file. You can specify a virtual IPv6 subnet for the TOR client to use or just leave it as is to use the default.
Selective Routing
Selective routing is not a very good idea as it can be used to de-anonymize you by simply including non-tor traffic in a web page
If you're a casual tor user just using it to bypass censorship or to access a few websites this is a really nifty trick as it routes all the traffic to .onion domains through TOR and the rest of the traffic through your regular internet connection.
Some browsers like Firefox block .onion domains by default, you can enable them by going to about:config and setting network.dns.blockDotOnion to false.
This option takes care of all the firewall and DNS rules for you, all you have to do is enable it and you're good to go.
Using TOR
You can either enable selective routing or just use the TOR client as a proxy. If you want to use it as a proxy you can use 127.0.0.1:9050, replace 127.0.0.1 with your router's IP address in our case it's 192.168.1.1 so the proxy address would be 192.168.1.1:9050.
You can visit the following onion URLs to test your connection:
Troubleshooting
If you have any issues with the TOR client you can disable it by toggling the disable button and then clicking on the save button. This will disable the TOR client and remove all the firewall and DNS rules. Once that is done you can enable it again and it should work.
Services - Intrusion Prevention
Our Intrusion Prevention system constantly monitors for authentication attempts that end in a failure and then ends up blocking the IP from accessing the entire network using firewall rules. It’s meant for 3 major services that are usually open to the internet:
- SSH
- Asterisk
- Difuse GUI
All these should have strong firewall rules in place already but just in case it’s fully open Intrusion Prevention should help mitigate some of the risk.
General
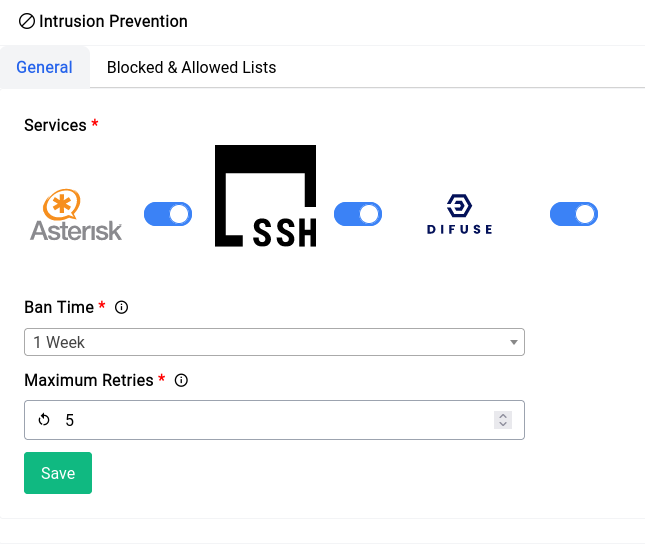
In the general page you have 3 options:
- Services Selected - This option allows you to enable or disable the Intrusion Prevention system for specific services.
- Ban Time - This option allows you to set the ban time for the firewall rules that are created by the Intrusion Prevention system.
- Maximum Retries - This option allows you to set the maximum number of retries before the Intrusion Prevention system kicks in.
Blocked & Allowed Lists
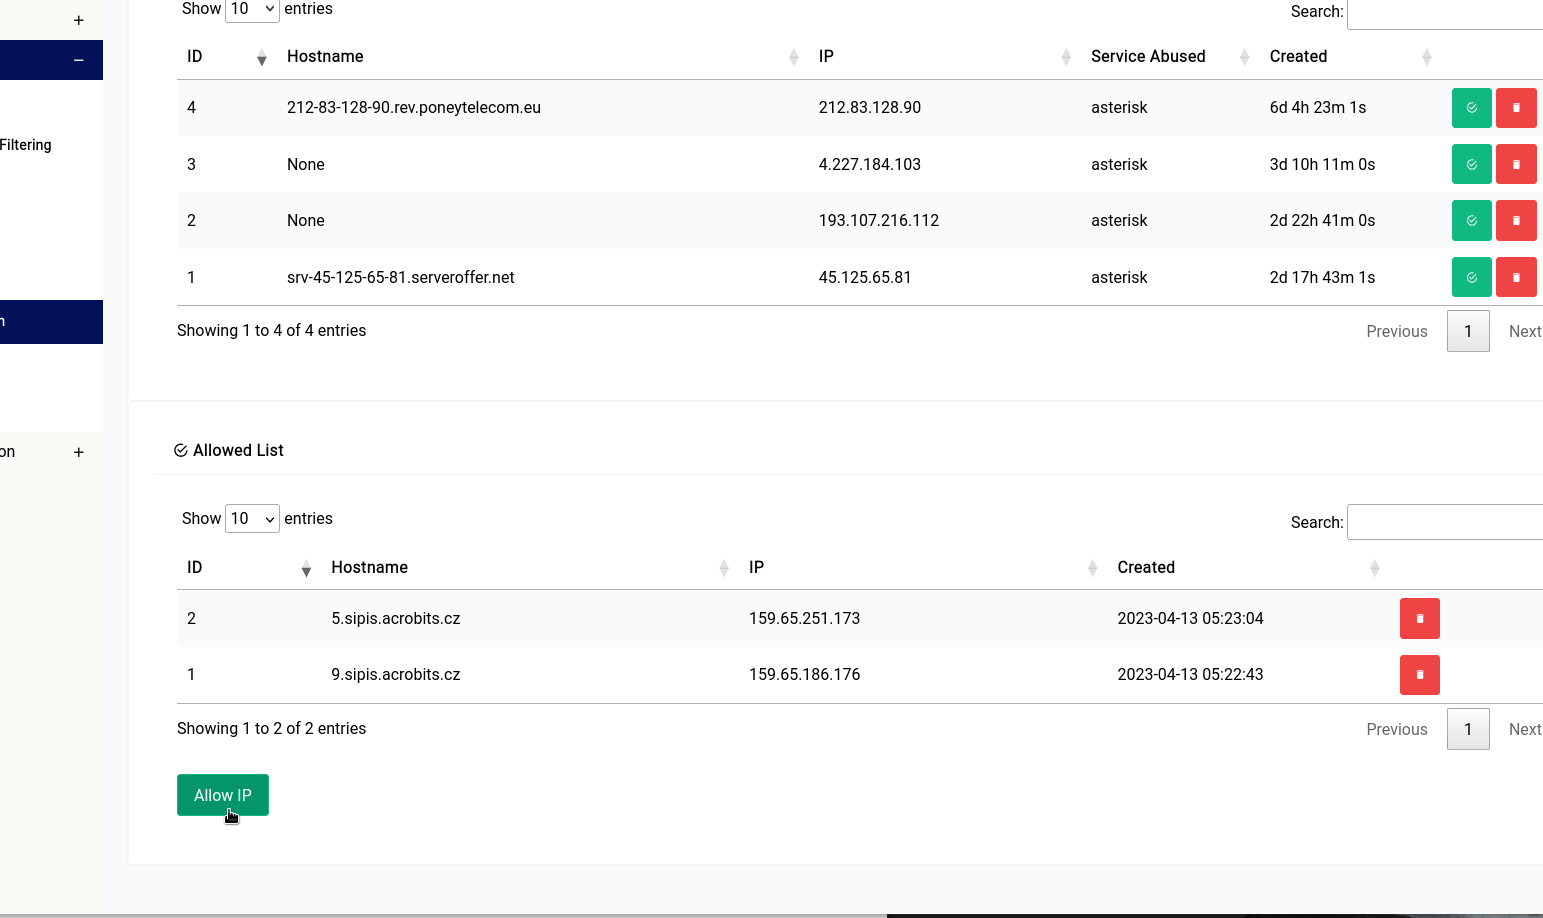
Blocked List
In the blocked list, you can see peers that have already been caught and banned by the service:
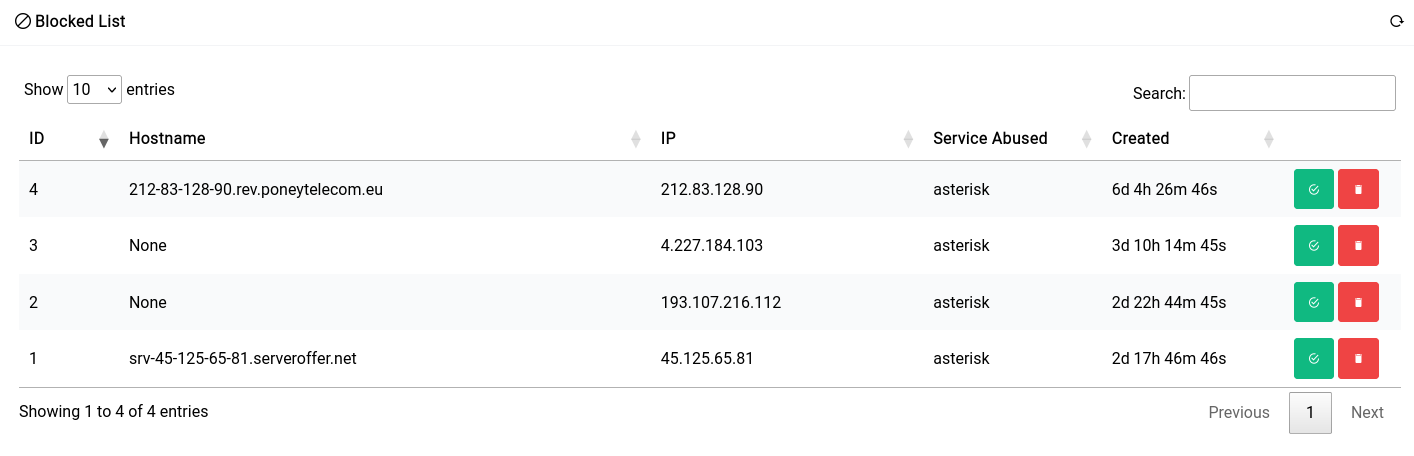
If you’d like to whitelist (having them never be banned again) a particular peer you can click on the green icon, or if you want to delete them (so that they may be banned again) you can click on the red icon.
Allowed List
As you can see here we’ve whitelisted 2 acrobits servers from being banned as this kills their remote extension functionality. If you’re having trouble using your softphone client, it’s always a good idea to check the blocklist and whitelisting them.
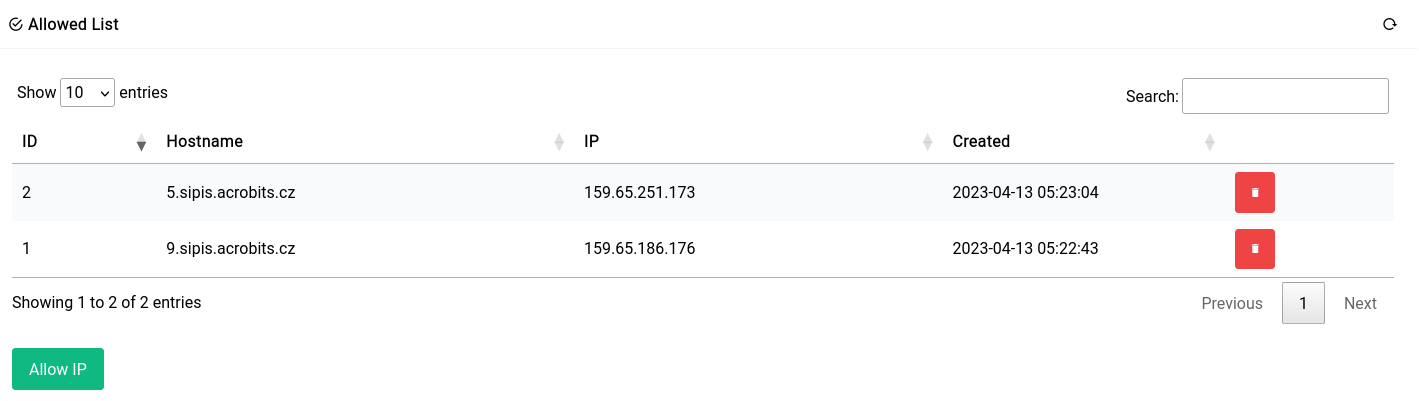
If you’d like to manually white list a known peer, you can always click on the green button and type in an IP address like this:
Services - IPFS
IPFS is a peer-to-peer hypermedia protocol designed to make the web faster, safer, and more open. It enables the creation of completely distributed applications. It aims to make the web more open, distributed, and safer by connecting all computing devices with the same system of files.
IPFS uses a lot of resources, RAM specifically. So if you have a heavy asterisk setup or a lot of devices on your network, it’s recommended to not enable IPFS.
Enable IPFS
You need to have a mounted drive in order to enable IPFS. If you don’t have one, you can follow the guide here.
When you first visit this page you will be greeted with a green button which reads “Enable IPFS” you can click on that to enable IPFS.
Usage
You can use the red stop button to stop the IPFS service and the yellow restart button to restart the IPFS service.
IPFS runs on the following ports:
- 4001 - IPFS Swarm Port (used for P2P)
- 35000 - IPFS API Port
- 38000 - IPFS Gateway Port
Using the IPFS Gateway
Let's say your router IP is 192.168.1.1 you can browse IPFS and IPNS websites by going to http://192.168.1.1/ipfs/<hash> or http://192.168.1.1/ipns/<hash> respectively.
Using the API
You can use the API to interact with IPFS. You can find the API documentation here. To access the web UI you can go to http://192.168.1.1:35000/ipfs/bafybeiequgo72mrvuml56j4gk7crewig5bavumrrzhkqbim6b3s2yqi7ty/#/
Using the iframe embedded into the web UI is the easiest way to interact with IPFS, but sometimes large file uploads or downloads can fail. In that case you can use the API directly.
Configuration
The IPFS configurations are all handled from the web UI itself, let's increase the maximum storage limit to 10GB as an example.
First we have to go to the settings page by clicking on the gear icon in the sidebar.

Then we scroll down until we see the IPFS CONFIG section.
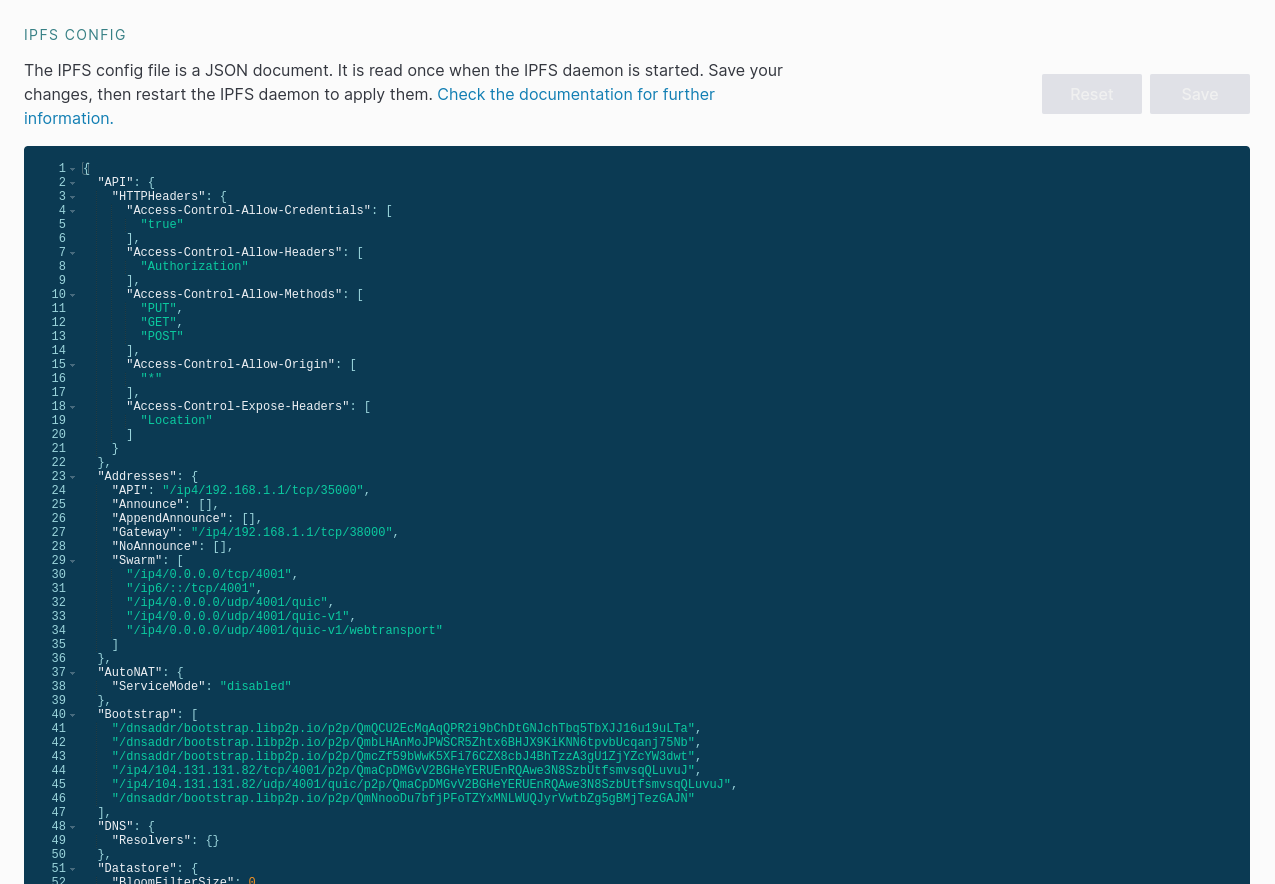
Then we can change the "Storage Max" value to whatever we want in the "Datastore" property found here:
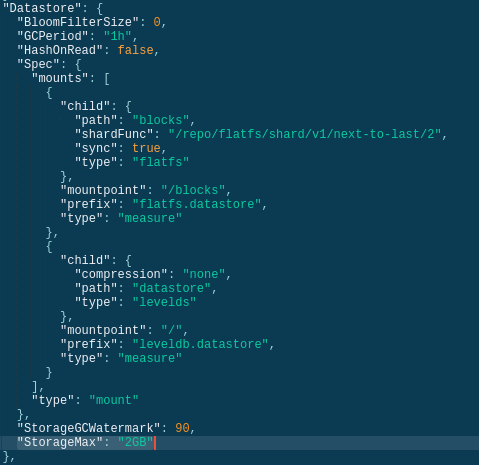
You will need to restart the IPFS service for the changes to take effect.
VPN
IPSec
IPSec is pretty complicated and we don't recommend you to use it unless you know what you're doing. If you're looking for a VPN solution, we recommend you to use WireGuard instead, which is much simpler, faster and easier to setup.
Overview
IPSec is a protocol suite that is used to secure traffic on a network. It is used to authenticate and encrypt traffic between two peers. It is commonly used in VPNs to secure the traffic between the client and the server. Difuse only implements PSK (Pre-Shared Key) based IPSec tunnels.
Quick Commands
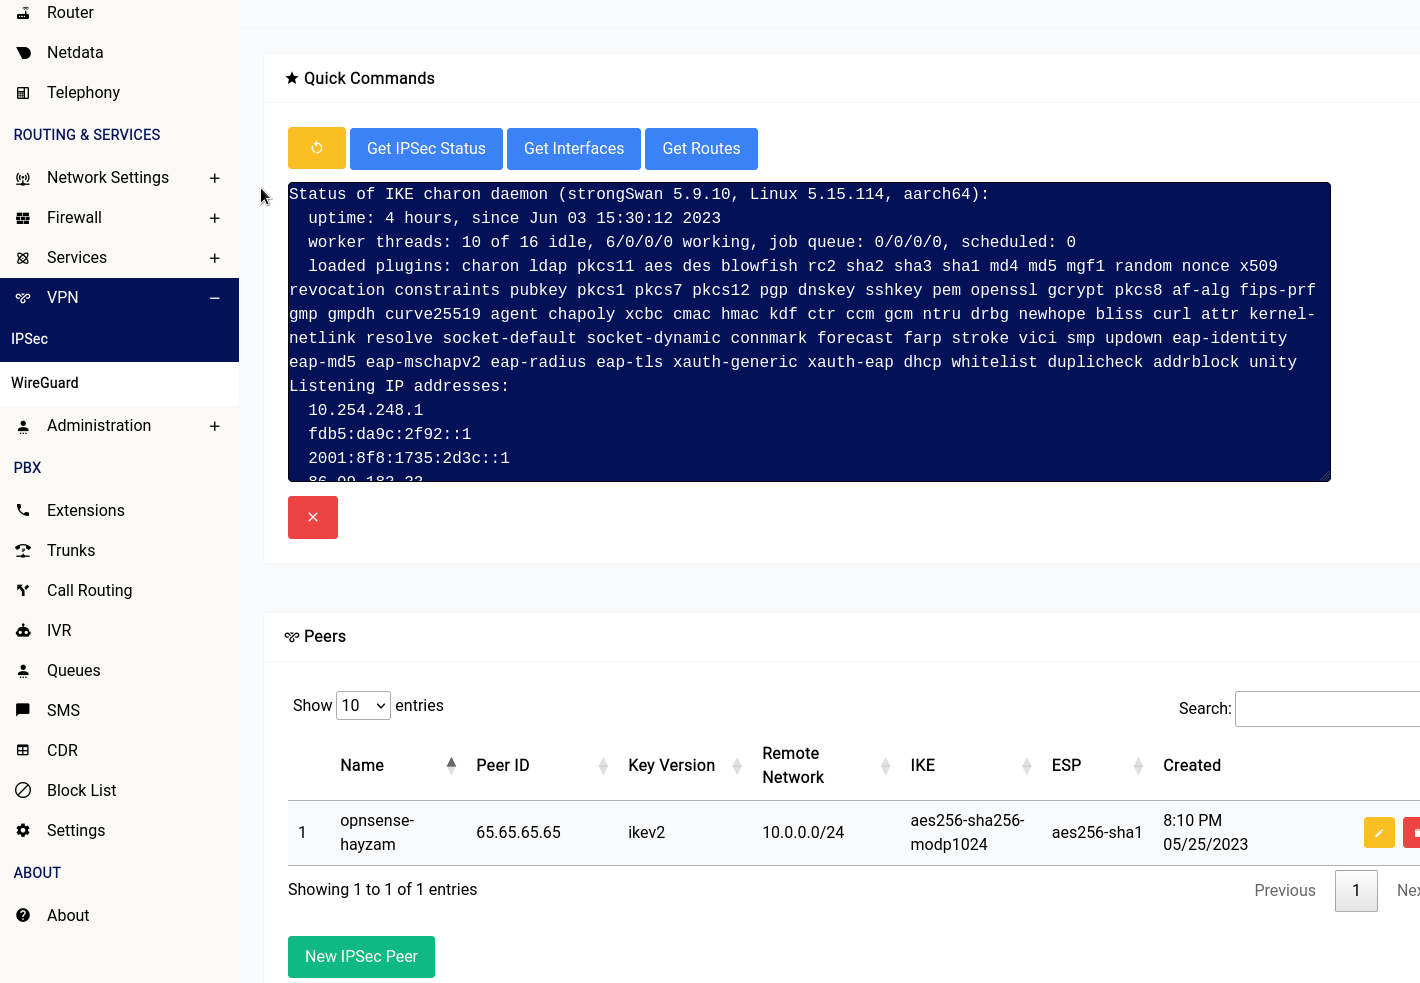
There are 4 buttons in the IPSec section of the web interface:
- Restart IPSec: This button will restart the IPSec service running on your device.
- Get IPSec Status: This button will show you the status of the IPSec service running on your device.
- Get Interfaces: This button will show you the interfaces that are currently configured on your device.
- Get Routes: This button will show you the routes that are currently configured on your device.
Setting up a peer
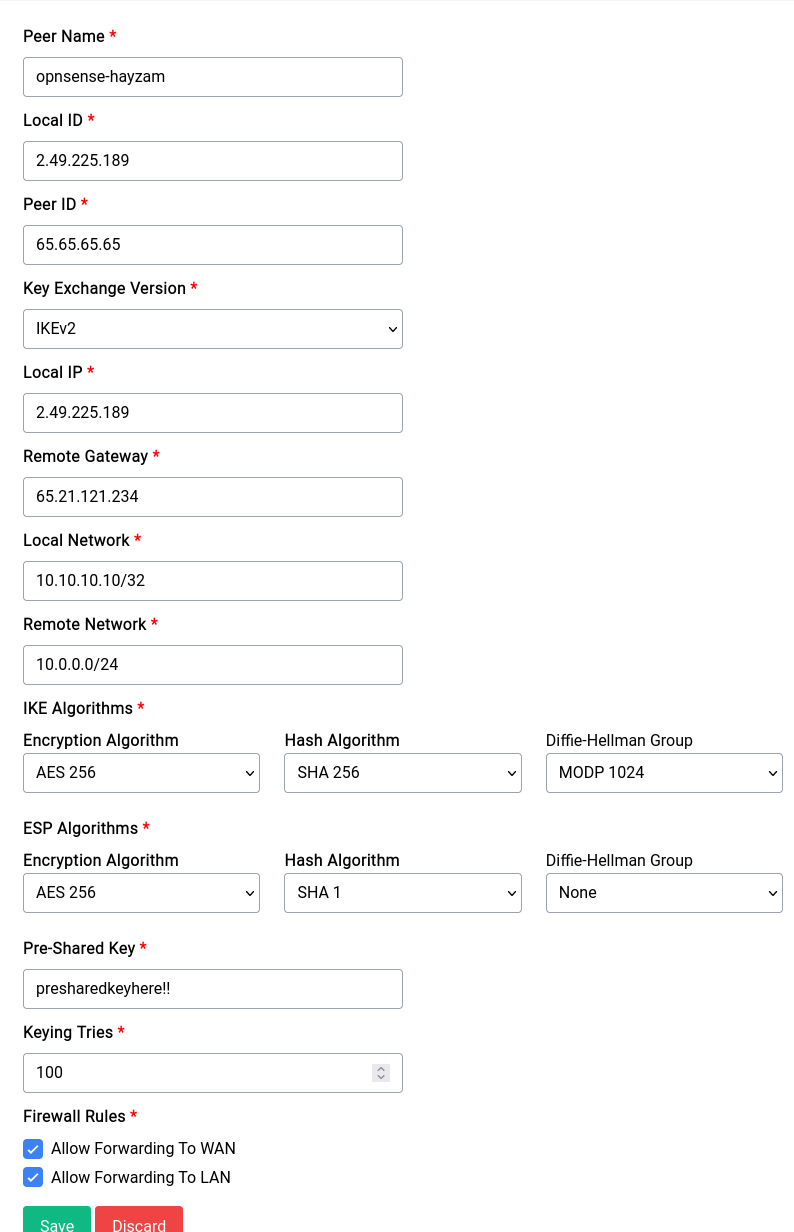
As you can see there are a lot of options to configure a peer, let's go over them one by one:
Peer Name
This is the name of the peer, it can be anything you want.
Local ID
This is the local ID of the peer, it is used to identify the peer on your side of the tunnel. It can and probably should be an IP address.
Peer ID
This is the peer ID of the peer, it is used to identify the peer on the other side of the tunnel. It can and probably should be an IP address.
Key Exchange Version
This is the version of the key exchange protocol that will be used to establish the tunnel. IKEv1 and IKEv2 are supported.
Local IP
This is the local IP address of the peer, it is used to identify the peer on your side of the tunnel. It can and probably should be an IP address. FQDNs are not supported yet.
Remote Gateway
This is the remote gateway of the peer, it is the IP address of the peer on the other side of the tunnel. It can and probably should be an IP address. FQDNs are not supported yet.
Local Network
This is the left side or local network of the tunnel, it is the network that is behind the peer on your side of the tunnel. It probably should be an IP that is separate from the subnet of the peer and subnet of LAN.
Remote Network
This is the right side or remote network of the tunnel, it is the network that is behind the peer on the other side of the tunnel.
IKE and ESP Algorithms
These are the algorithms that will be used to encrypt the traffic between the peers. You can choose any combination of algorithms that you want, but you should choose the ones that are supported by the peer.
Pre-Shared Key
This is the pre-shared key that will be used to authenticate the peers. It should be a long and random string.
Keying Retries
This is the number of times the device will try to establish the tunnel before giving up.
Firewall Rules
These are the firewall rules that will be applied to the traffic that is going through the tunnel. It's best to leave it at allow forwarding to WAN and LAN.
VPN - WireGuard
WireGuard is a modern VPN protocol with state-of-the-art formally verified cryptography while being extremely minimal and fast.
There are many different ways you can use WireGuard and we’re going to demonstrate a few ways you could use it effectively:
- Connecting to a VPN to route to route some IPv4 traffic through it.
- Connecting to a Site-To-Site VPN to access a LAN that is outside your network.
- Creating a server (endpoint) along with provisioning some peers that can connect to it.
Routing WAN Traffic
In our Routes guide, we wrote about how you can route traffic through a specific WireGuard Endpoint for a single (or multiple) website. Now we’re going to setup that WireGuard endpoint that made it possible.
The first thing that you’ll need to do is go into the Clients tab of the WireGuard page and click on the "Create New Client" button, you will be greeted with a form that has a lot of inputs, now you can either fill in the form yourself or you can import a configuration that you you or your provider has generated.
Importing Configuration
A configuration usually looks something very similar to this:
[Interface]
Address = 172.19.210.3/32,fc00:deeb:2a4e:0000:0000:0000:0000:0003/128
PrivateKey = yM+DlGcSO2Br8kNfjTwbZkyM+DlGcr8h/SKYwnUPX04=
DNS = 1.1.1.1,2606:4700:4700::1111
MTU = 1280

[Peer]
PublicKey = ySvXw64LcpJK5TOBglw64LcpJK5h7yN6bL5x4=
AllowedIPs = 0.0.0.0/0,::0/0
Endpoint = example.example.com:46170
PersistentKeepalive = 25
You can click on the Import Config button and simply paste the configuration into the modal that opens up like this:
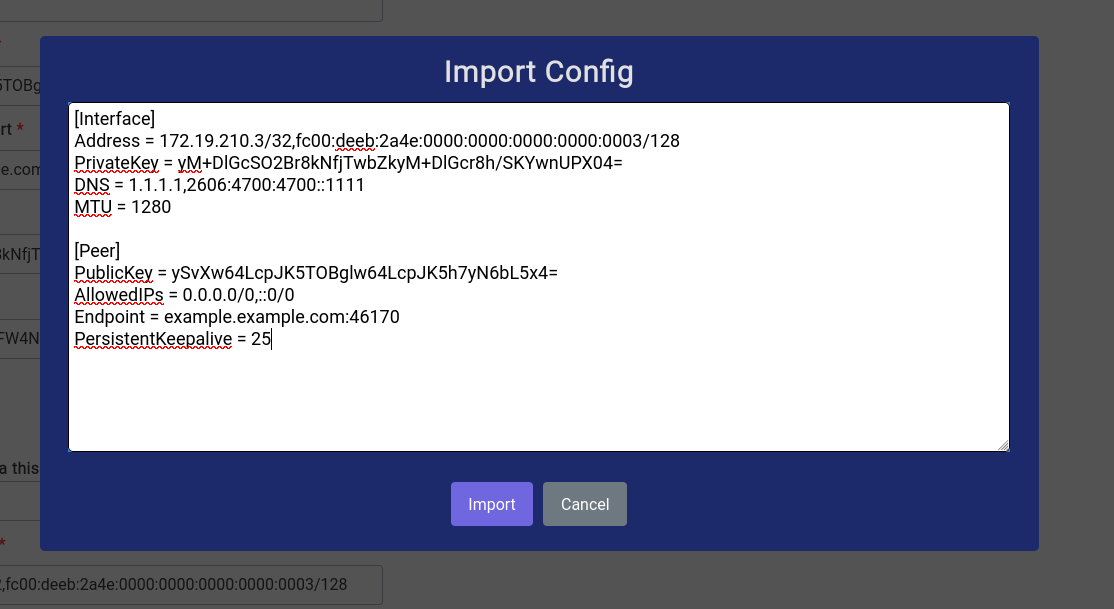
Once you have copied the configuration in, just click on the Import button and most of the fields should be filled automatically like this:
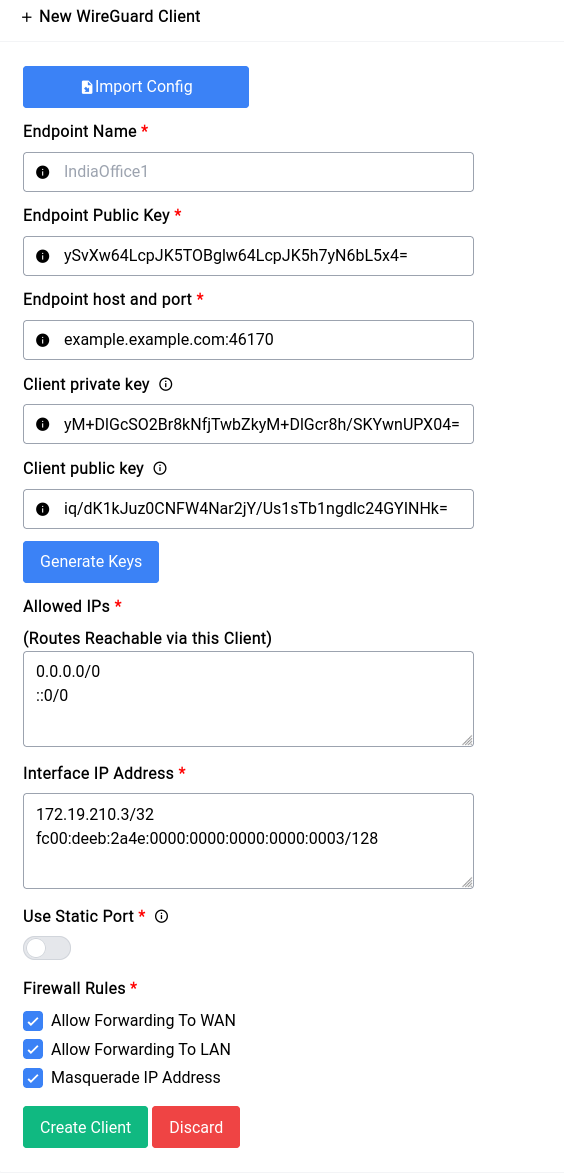
You still have to fill in a name for the client, always give something small and simple, in our case we’ll call it PIA (Private Internet Access).
If for some reason you don’t have a configuration or would like to fill out the form yourself, you can always do that and just not use the Import Config button.
It’s a good idea to leave static port disabled, but some endpoints will require you to connect and reconnect with the same listening port, in that case you can turn it on and specify a port.
As far as Allowed IPs (Routes Reachable via this Client) goes, since we don’t know the IPs we will be routing for we give in:
0.0.0.0/0
::0/0
that simply means all IPv4 and IPv6. This will add a route to all subnets, but the WireGuard interface is always assigned a higher metric than the existing WAN interfaces so it will not start routing all traffic immediately, you need to manually assign a route using Policy Based Routes or Static IPv4/IPv6 Route.
For this setup we’re going to check all the firewall rules, here’s a brief description of all of them:
- Allow Forwarding to WAN: This allows the WireGuard interface to forward traffic to the WAN interface and receive from the WAN interface as well.
- Allow Forwarding To LAN: This allows clients on the LAN to forward their traffic to the WireGuard interface and vice versa.
- Masquerade IP Address: This is critical for being able to route your traffic to hosts that are in the public domain, as they must see your WireGuard endpoints WAN IP and not your local IP.
So in summary if you’re going to use your WireGuard endpoint for routing certain WAN traffic, you need to enable all these 3 options, or create your own firewall rules which may start getting confusing, especially if you have more than one endpoint configured.
Now once it’s setup, it should look something like this:

The interface will show up in the routing pages now albeit with a slightly different name:
wgc_PIA is the interface we just created.
Site-To-Site VPN
Now imagine you have an office in Dubai, but you work remotely from India and there’s a device in the LAN network of the office in Dubai and you want to access that securely, site-to-site VPNs are the way to go.
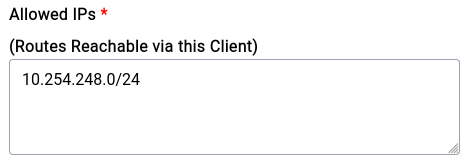
The setup is very similar to the one that we did for the Traffic Routing endpoint with the key difference being us adding the specific LAN IP Range instead of 0.0.0.0/0 ::0/0 for the Allowed IPs like this:
[Interface]
Address = 172.19.210.2/32,fc00:deeb:2a4e:0000:0000:0000:0000:0002/128
PrivateKey = wGiO88ShFkNXEbCWX/9Cw5UbV9goh4AgfLhKyoX0r1E=
DNS = 172.19.210.1,fc00:deeb:2a4e::1
MTU = 1280

[Peer]
PublicKey = ySvXw64LcpJK5TOaT7J5wDBBglcjrppg9h7yN6bL5x4=
AllowedIPs = 172.19.210.1/24,fc00:deeb:2a4e::1/64,10.254.248.0/24
Endpoint = example.example.com:46170
PersistentKeepalive = 25
This is an example configuration for a Site-To-Site VPN, notice the AllowedIPs now contains the exact IPs that we need to allow:
172.19.210.1/24
10.254.248.0/24
fc00:deeb:2a4e::1/64
This will add the routes into the routing table albeit still with higher metric, but since there’s a Destination provided this time it will always be chosen if queried by a client for traffic to be routed through.
You can always still keep:
0.0.0.0/0
::0/0
as your allowed IPs and add manual Static or Policy based routes, but doing this is in the client configuration itself is a lot more cleaner and the recommended way of doing things.
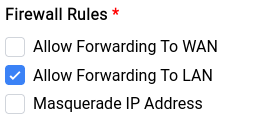
Now as far as Firewall Rules are concerned we don’t need the client to allow forwarding to WAN nor do we need masquerading since we’re just accessing their LAN clients, so the checkboxes will look something like this:
Creating a Server (Endpoint) with Peers
Netflix recently came out with a policy that made password sharing (if you’re not under the same roof) against their Terms-Of-Service and the way they’re blocking it is by looking at your IP address, now the reason why we’re mentioning this is because it’s a good example of where a VPN endpoint will do the trick and let you (who is away from home in this example) browse netflix like you never left.
Creating a WireGuard endpoint (we like to call this the Server) on your device is trivial, especially if you don’t want to add any custom configuration (like IP Addresses).
Now coming to the actual setup, you can switch to the Server tab in the WireGuard page and click on the Auto Fill button.
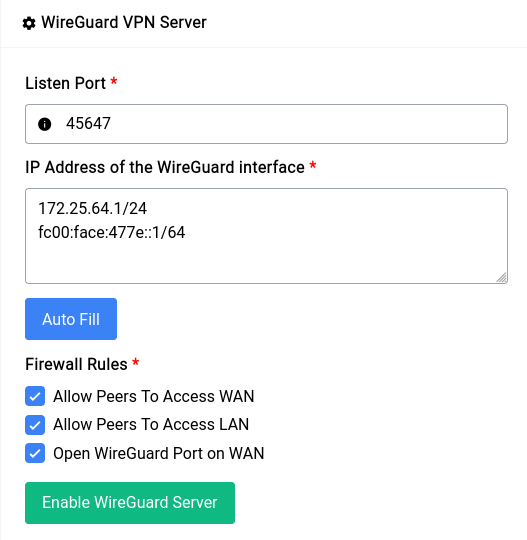
This will fill the Listen Port as well as the IP Address section with a random (unused) port and IP Address respectively. Now as far as firewall rules are concerned for our example we’re going to let the peers access both the WAN and LAN network. But if you want the peers to be only able to connect to the devices in the LAN network uncheck the first checkbox.
Since WireGuard needs a port, specifically a UDP port to function it’s a good idea to check the Open WireGuard Port on WAN option so that all the peers can connect to the underlying WireGuard server.
Once the form inputs have been filled you can just click on the Enable WireGuard Server button and you’re off to the races!
Once the setup is done (which might take a few seconds) you should see something like this:

The private and public key’s are securely auto generated and it cannot be changed. This is a good time to make changes if any to the IP Address and Firewall Rules section.
Now that we have an endpoint running, let’s add a client (or a Peer in WireGuard terms). You can just click on the Add VPN Client button and it will show a form where you can type in specifics:
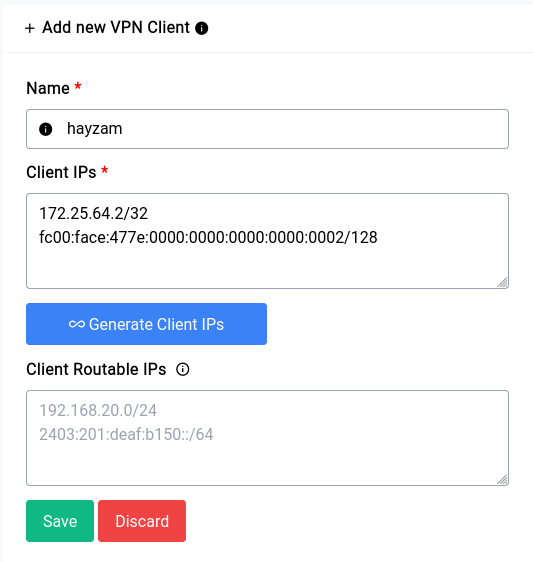
If you click on the Generate Client IPs button it will auto fill with the next IP in the range that you specified, we highly recommend you use the auto generate function of both the client and server sections as this makes configuration let’s vulnerable to problems.
Now you can see a form element that we’ve kept empty, namely the Client Routable IPs element. In this section you can fill in an IP Address or range like 10.254.248.0/24 in our previous example, what this would do is allow us to access that range in our Clients network. But in our case since we just want the client to be able to access the WAN through us, it should be fine to leave it empty, but this is something to keep in mind.
Now when you click on Save it will show the peer along with their details in the table on top of the server configuration section:

Now let’s generate a config for our client to import on their device. You can click the green asterisk button to do so.
Once that button is clicked a modal opens where you can twist a few knobs:
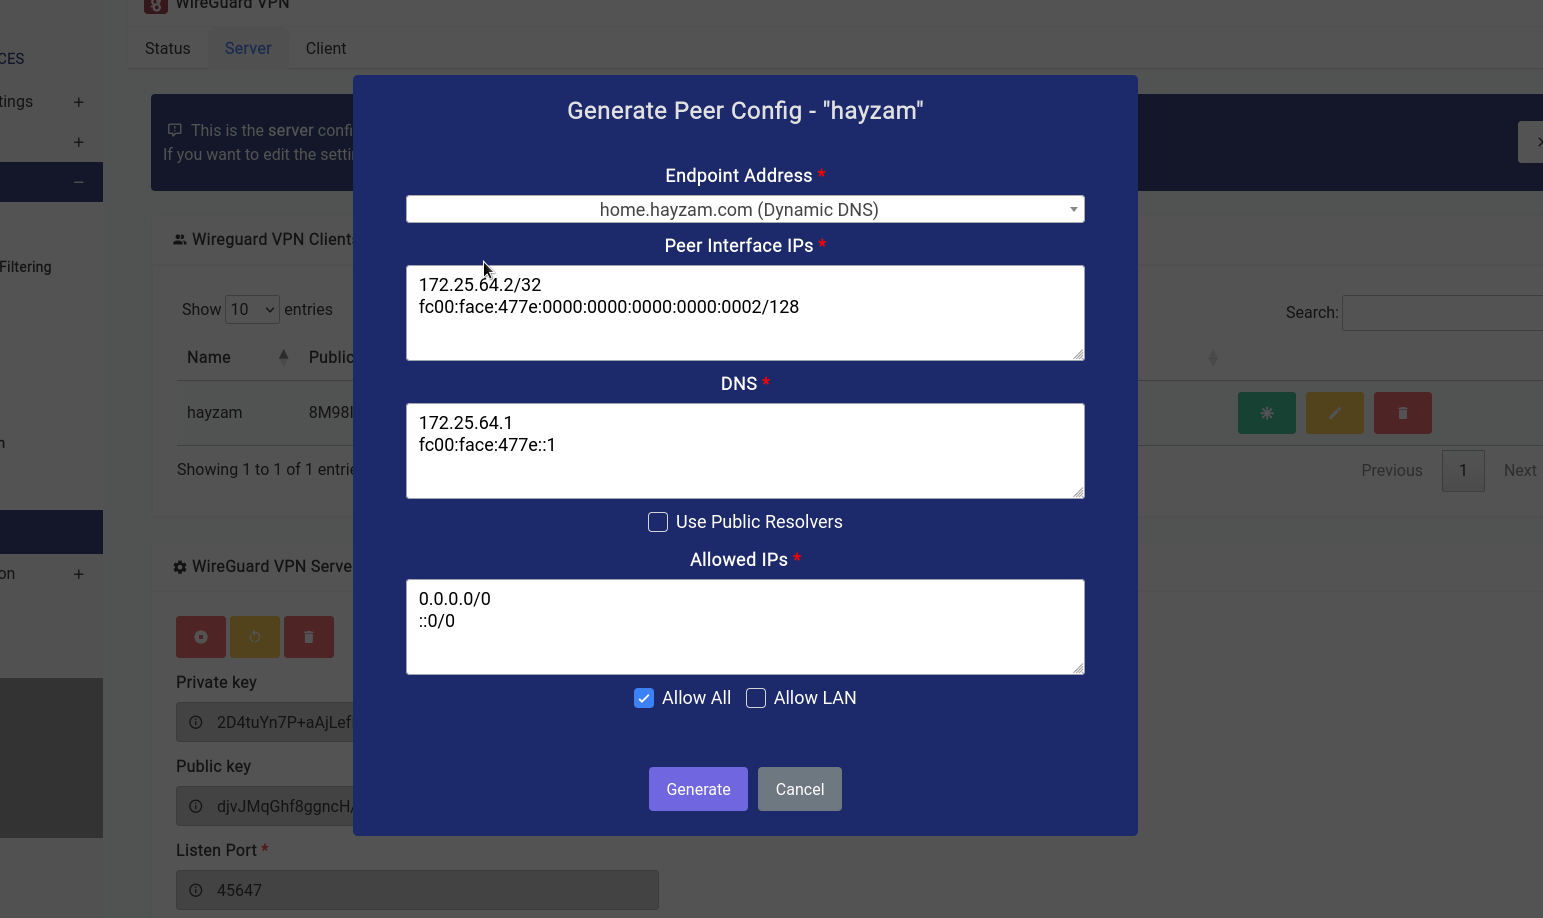
In our case, we want to let the client route all traffic through our endpoint, so we’ve checked the Allow All checkbox, if you want them to access the LAN range click on the Allow LAN check box and the LAN IP range should populate itself in the textarea.
You can have them use public resolvers (Cloudflare DNS is what we configured by default) but it’s recommended that you keep the default resolvers as they already have DoH enabled and will have the capability to block ads/other content filter stuff on the client as well.
As far as endpoint address goes you can see that we’ve selected a domain name that we’ve configured using the Dynamic DNS Service. But if you want to select the WAN IPv4 or WAN IPv6 (although not recommended) you can do so.
Once that’s all done and you click on the generate button a modal similar to this should open up:
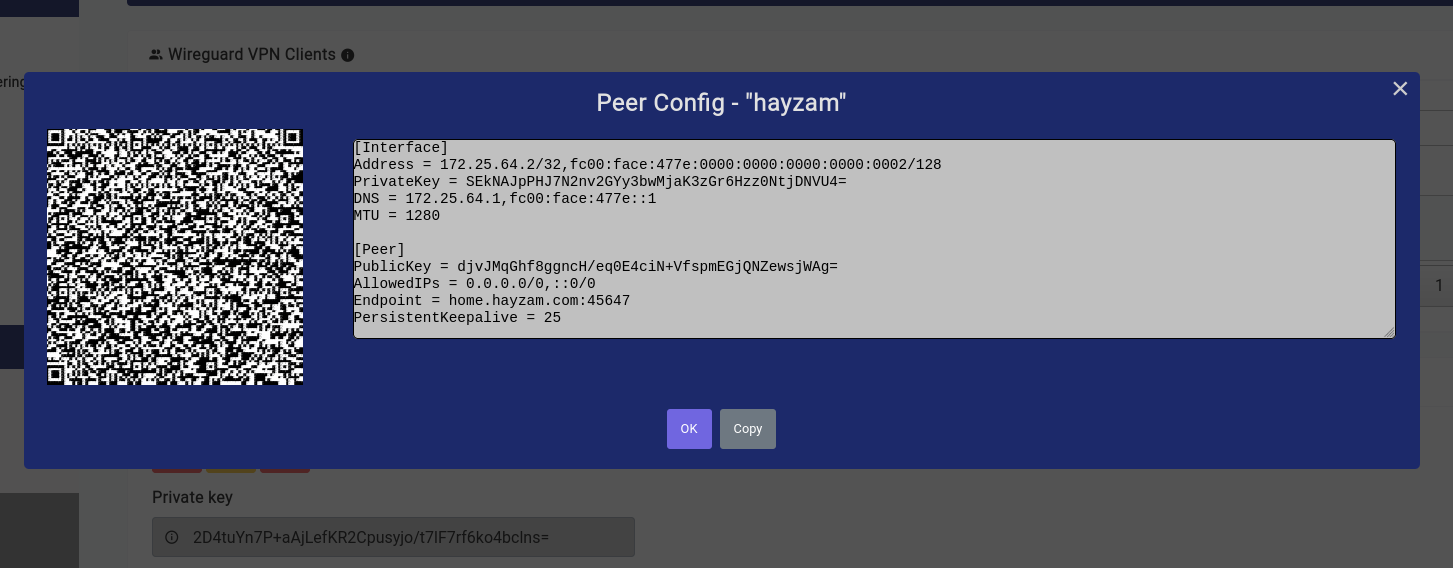
The QR code is very easy to import on phones as we’ve done in the video below:
You can always import that config into regular WireGuard clients as well, by simply copying and pasting the config into the WireGuard client of your choice.
Administration
System Administration is the place to go for all the system related settings and utilities. This section is divided into two sub-sections: Utilities and System.
Administration - Utilities
Utilities come with 2 tabs:
- Terminal - This tab contains an iframe to a running ttyd terminal instance.
- Speed Tester - This tab contains a speedtest tool that can be used to test the speed of your internet connection.
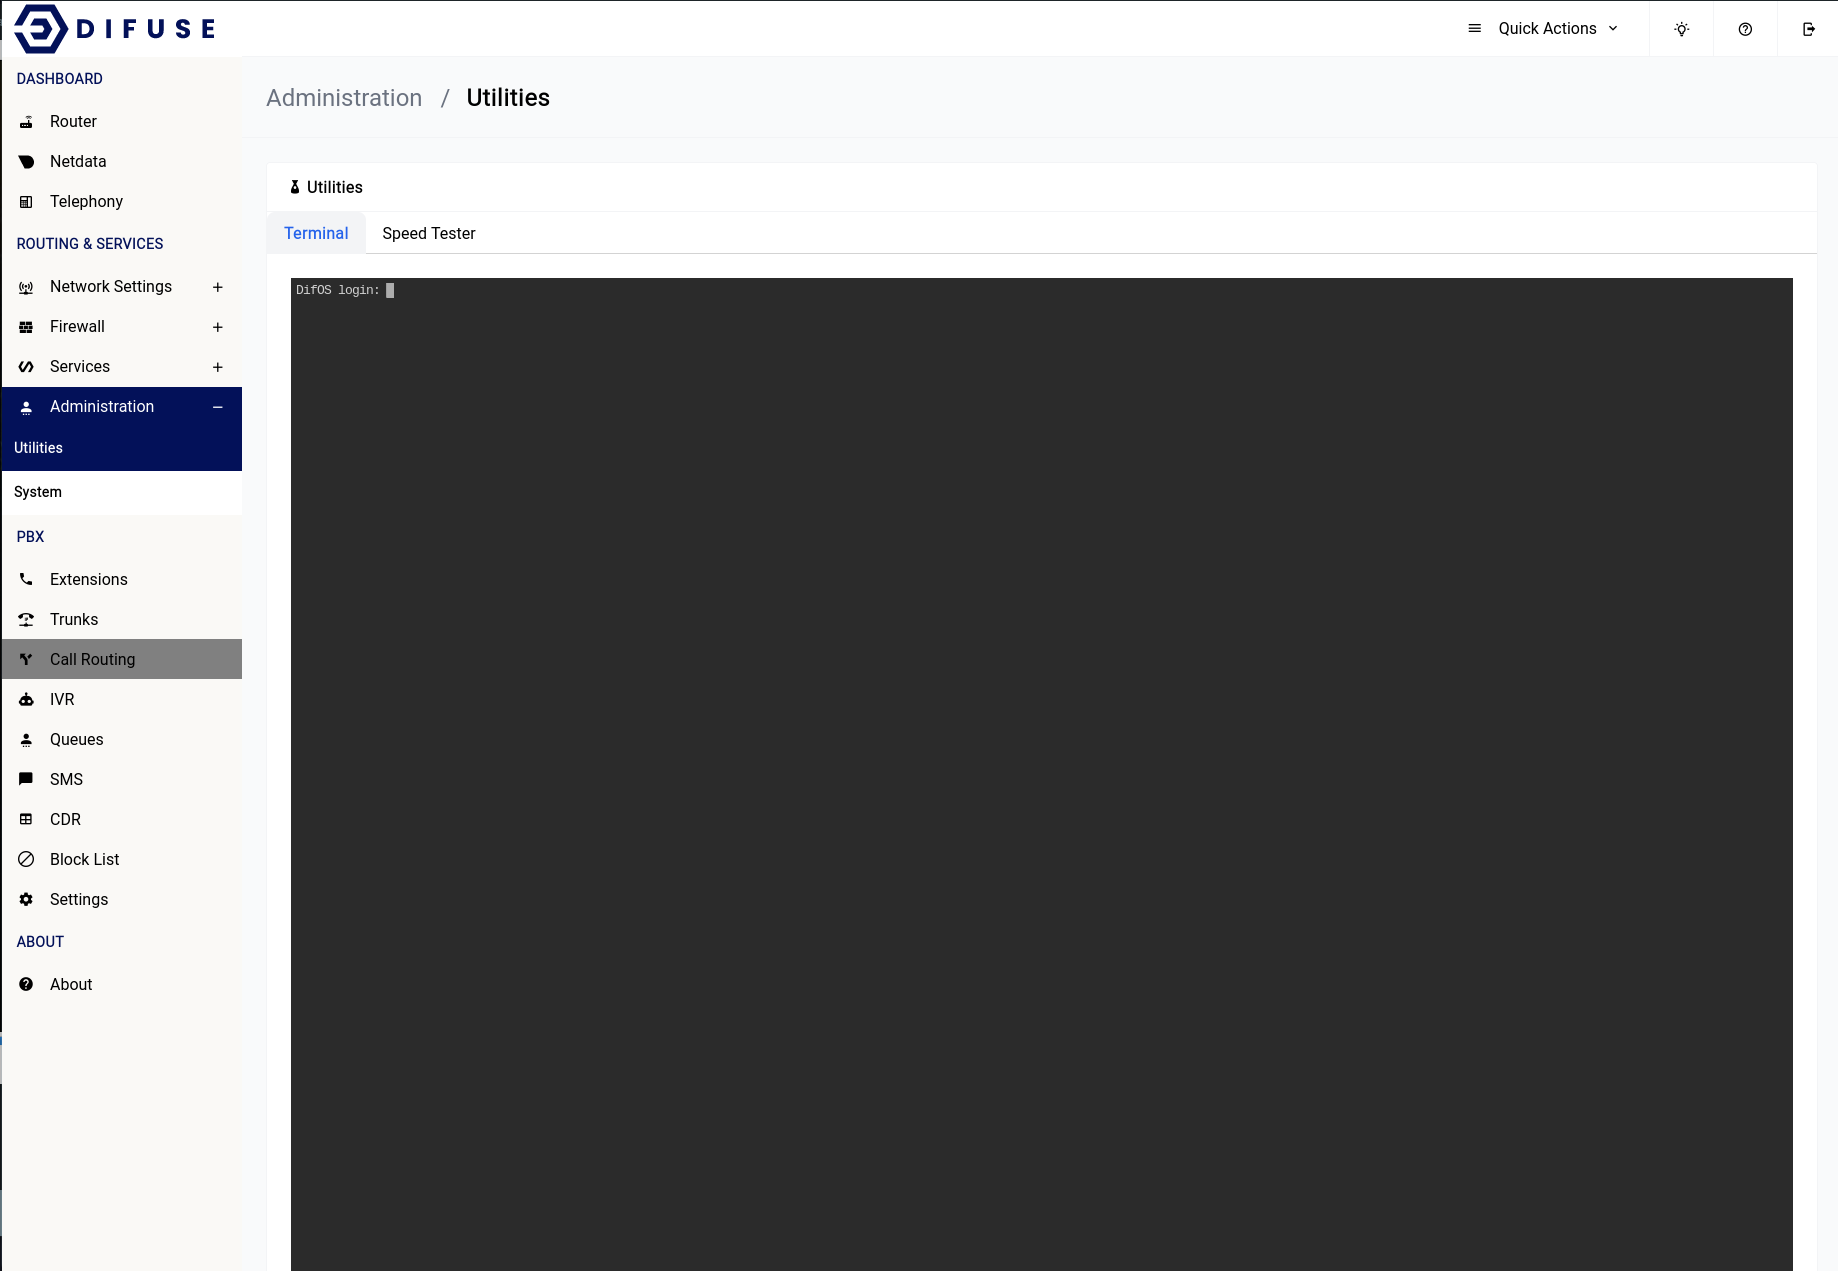
Terminal
The terminal is a powerful tool, please use it with caution. If you make an irrepairable change to the system, your warranty will be voided.
The terminal is a web-based terminal emulator that allows you to run commands on the system. It's powered by ttyd.
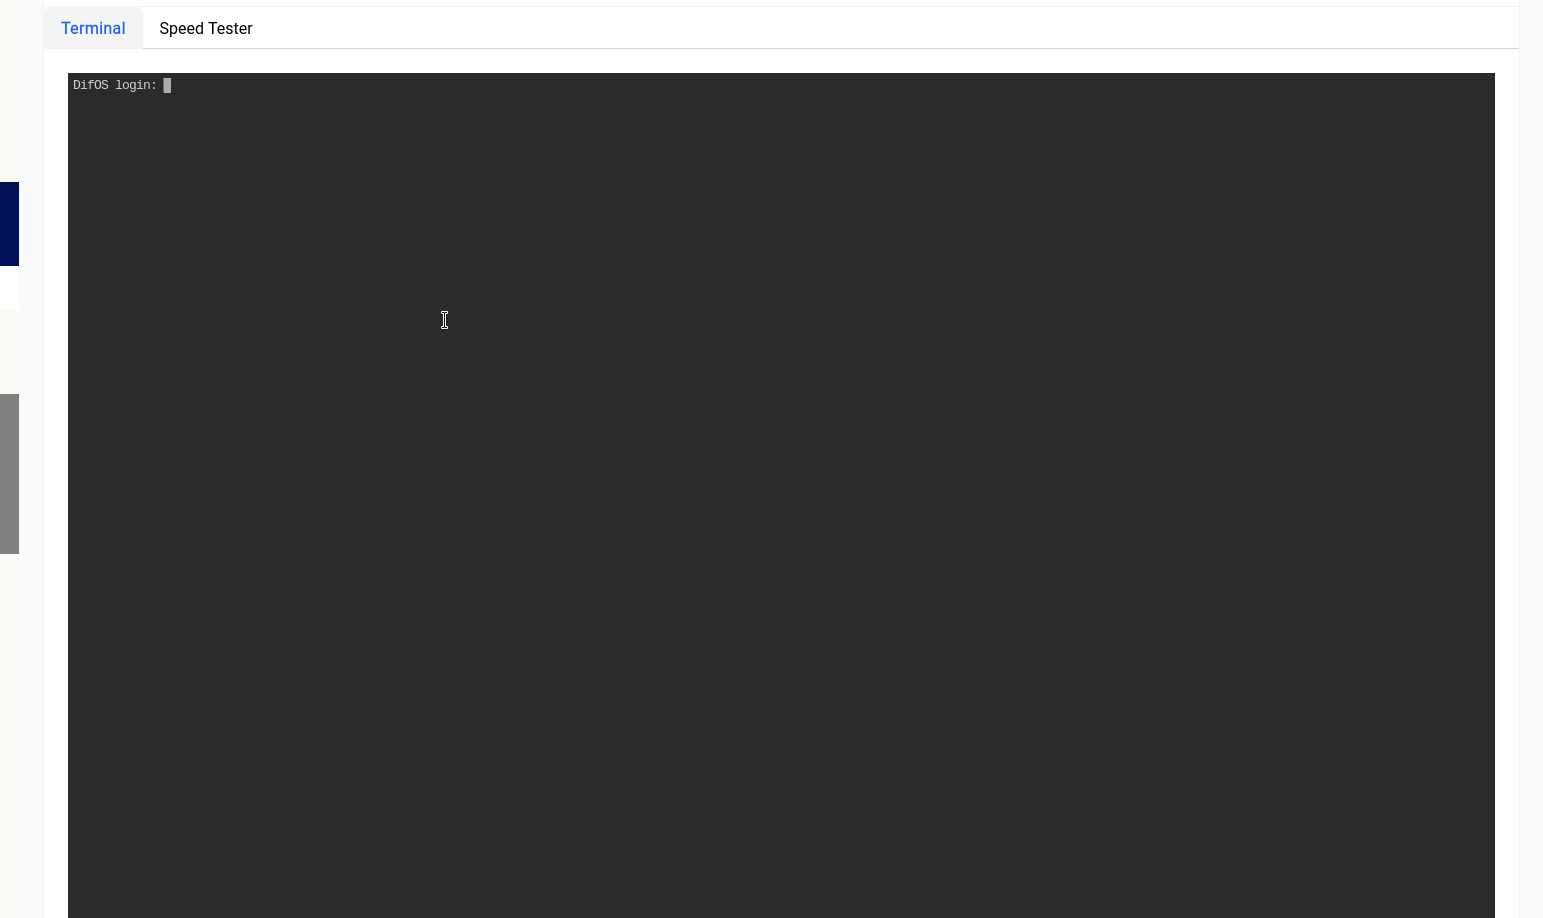
This can be very useful in cases of troubleshooting, the underlying operating system has very little userland packages installed, this is done to keep the operating system itself very small.
The password for the user root is the same as your admin password for the GUI. It’s highly recommended to change that using the GUI itself (the admin password and root password will change at the same time).
Again it’s imperative to note that if you do not fully understand what you’re doing it’s best not to use the terminal.
Speed Tester
The Speed Tester leverages Cloudflare’s speed.cloudflare.com to provide accurate network tests, it might take upto a minute to run each test and you need to obviously have a WAN configuration.
If you had ran a speed test while configuring the SQM functionality, that old speed test will show up here.
Administration - System
System Administration is the place to go for all the system related settings and utilities. This section is divided into multiple sub-sections:
- Hostname & Credentials - Set the hostname and change the credentials for the web interface as well as root user.
- Region & Time - Set the region and timezone for the system.
- Backup & Updates - Backup and restore the system, as well as update the system.
- Miscellaneous - Miscellaneous system settings.
Hostname & Credentials
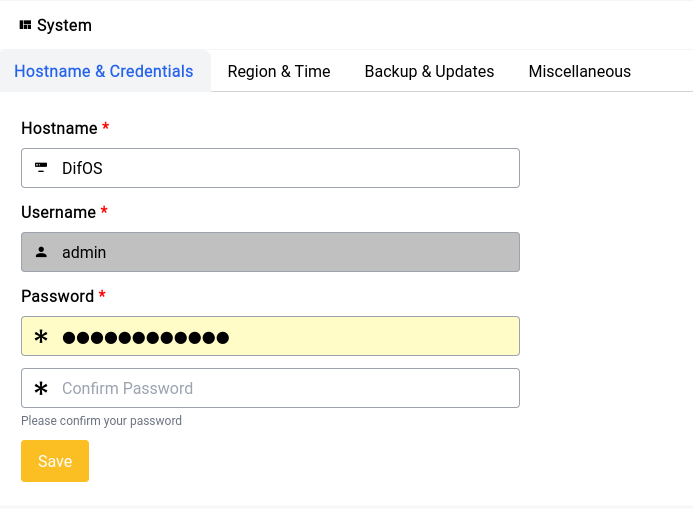
You can give something short and sweet for the hostname and access your device from the LAN using
You can also setup a strong password here. It’s very important that you change your password the moment you boot up the device for the first time to ensure that you’re safe and secure.
Region & Time
The date and time are crucial for proper functioning of many services within the device so it’s imperative that you set them up properly.
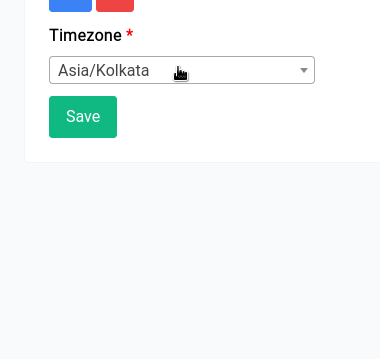
If for some reason it doesn't show the right time like this:
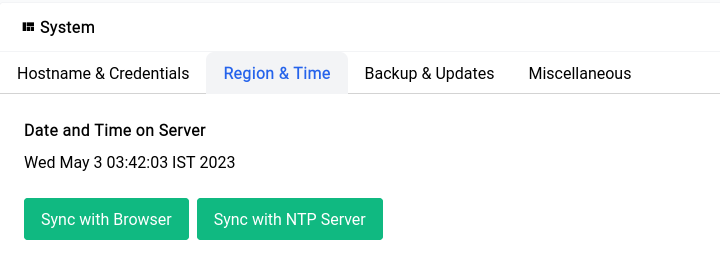
You can always click on the Sync with NTP Server button to sync the time with the NTP server.
Backup & Updates
Never restart or turn off your device while it’s updating as this could lead to corruption of the filesystem which can be a hassle to fix.
We’ve fine tuned the backup and updates process with a lot of care and it’s as simple as clicking 3 buttons to get your device up and running with the latest updates.
To take a backup of your currently running system you can just click on the green Create Backup File button and it should automatically start downloading a gunzipped tar ball that can be used for restoration later using the form right below it. It might take a few seconds for the entire system to be backed up and the file size all things considered should be around 20MB, the file is somewhat large because it also backs up all the asterisk sounds by default.
Once the restore is done the GUI should restart automatically within a few seconds and restore all the configurations found in the backup file.
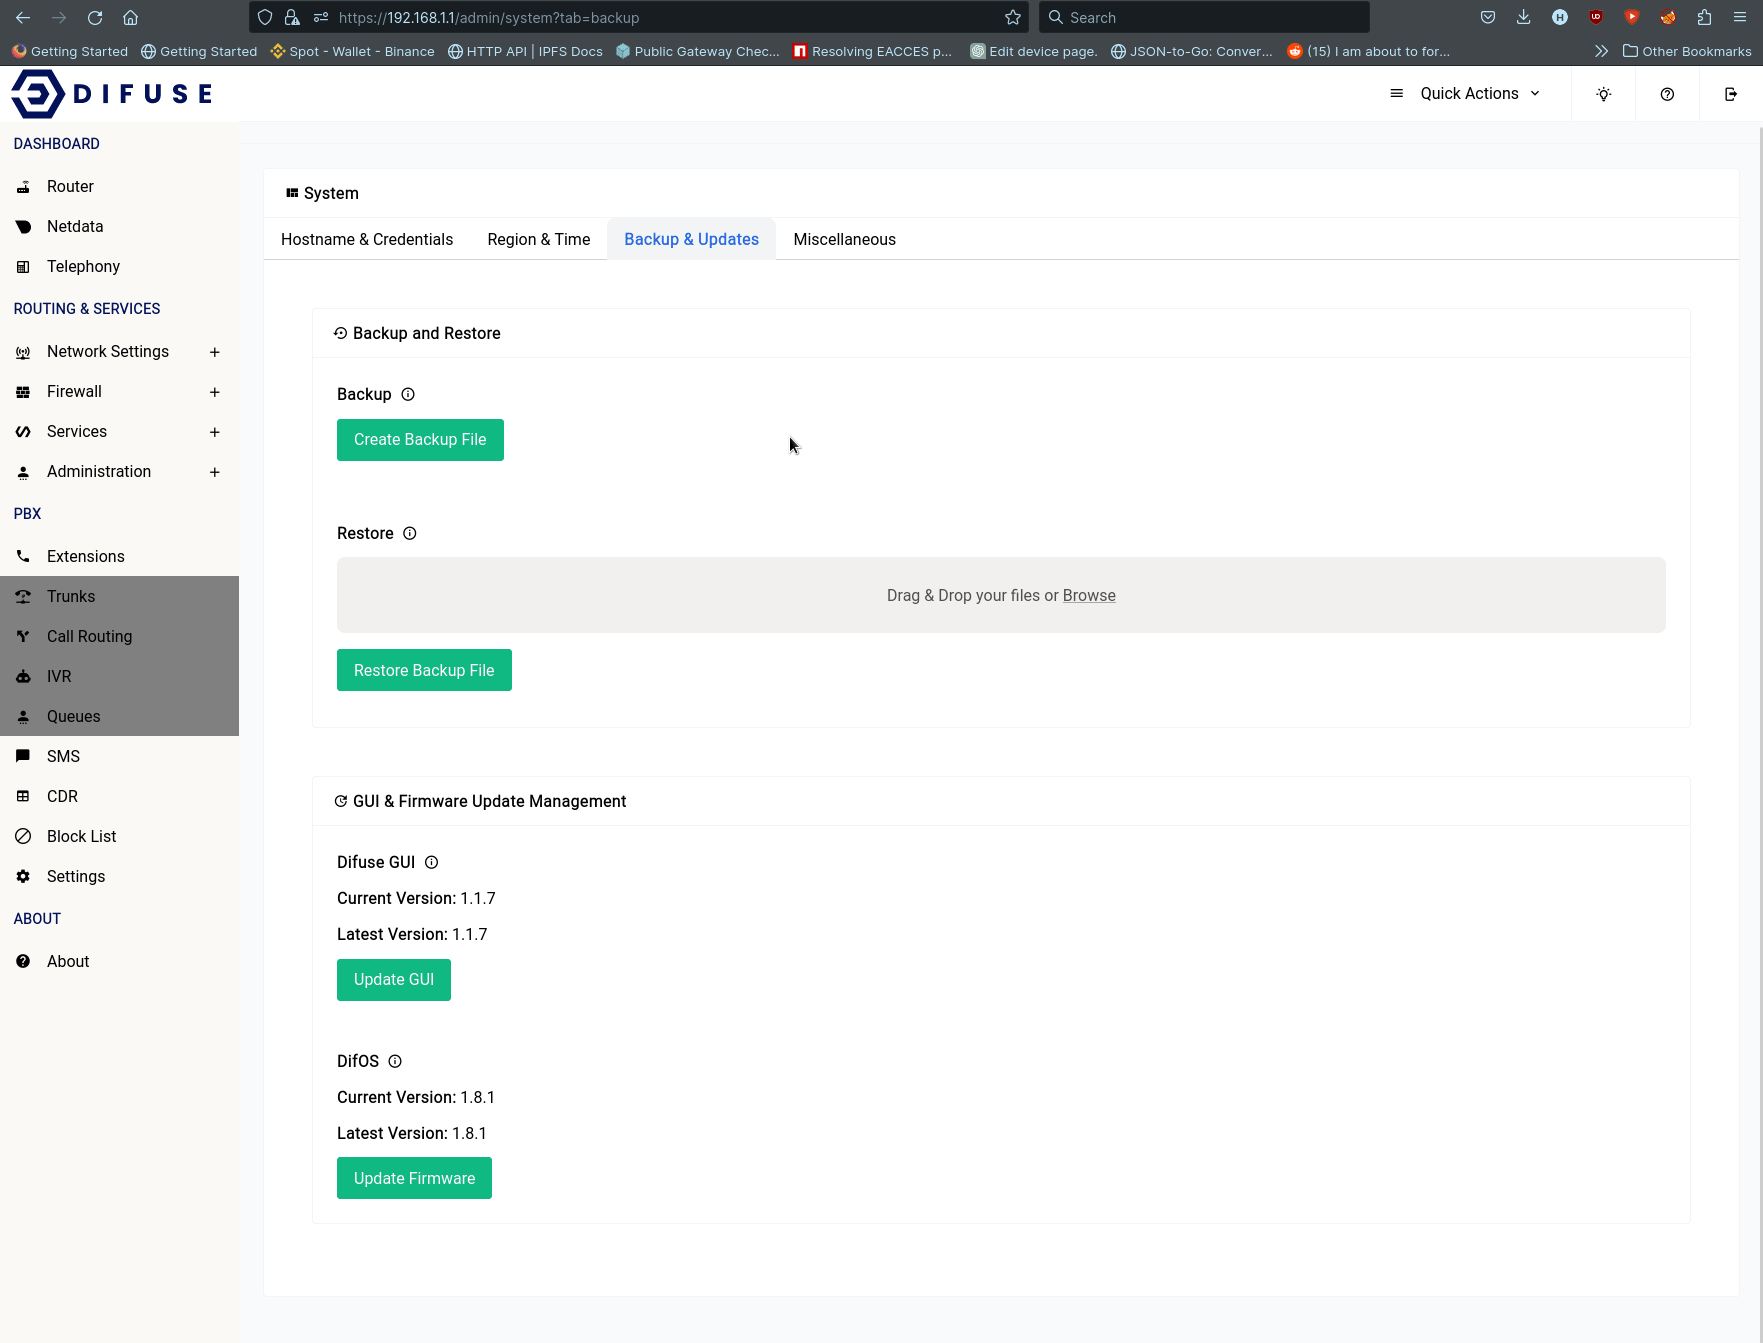
The Difuse GUI and DifOS Firmware update also can be done in the very same way, by just clicking on the update button and then letting the device do it’s thing.
Miscellaneous
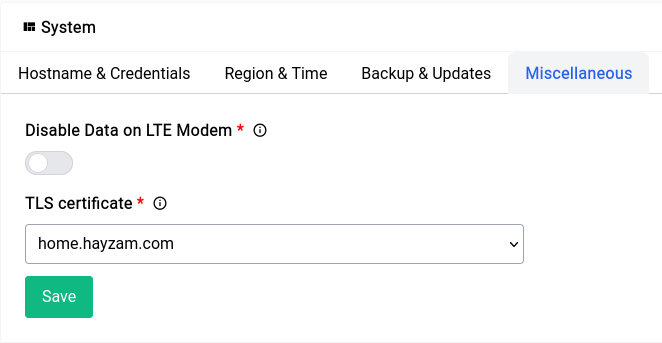
Disabling Data on LTE module
If you have LTE module installed on your device and you use it for calls and-or SMS, it’s important to disable the data on that device as when there’s a call in progress some telecom operators don’t support the version of LTE that lets call and data pass at the same time and this will lead to calls being dropped as a result.
The main reason this happens is because the device aggressively tries to maintain an active internet connection (every 30 or so minutes the ISP forces a drop in most cases) so it will restart the module to re-initiate a connection, this happens only when the LTE module is not in use so when this restart occurs the calls are dropped.
TLS Certificate
This section let’s you use a TLS certificate that you generated with ACME, it’s particularly useful if you’re going to me administering/monitoring the device on the go, this will take care of all TLS warnings in browsers.
PBX
Difuse leverages Asterisk as the core of the Telephony system. It’s packaged in a simple to use GUI, hiding all the complexities involved in setting up a PBX there by allowing non-IT staff to configure and manage the system.
PBX - Extensions
In any PBX system, extensions are a primary requirement. The process of creating an extension is straightforward with our GUI, as only a few parameters need to be filled in. You cannot add trunks, queues, or IVRs without first adding at least one extension, as all of those configurations require an extension to forward calls to.
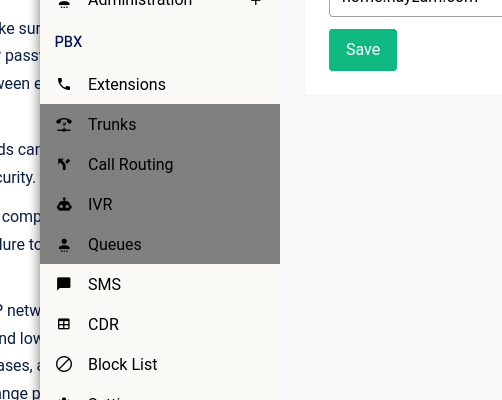
Adding an Extension
As aforementioned setting up an extension is very straight forward, all you need to do is click on the green Create New Extension button and fill in the blanks of the form that show’s up beneath the screen.
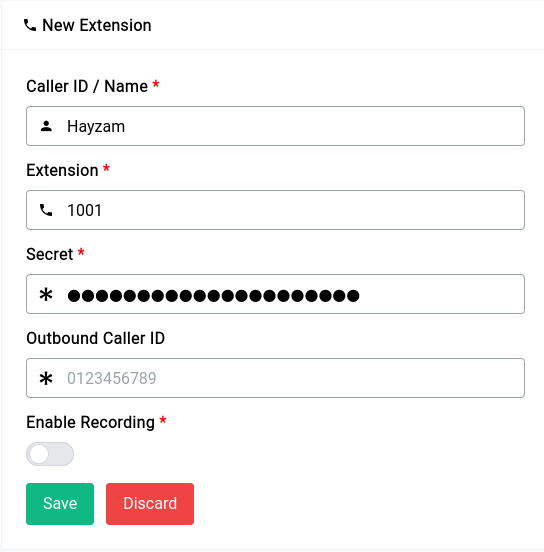
Now let’s go through the form and see what each field does:
Name
The name can be pretty much anything, but as always avoid spaces and keep it short.
Extension
The extension has to be a valid number, in our case we’ve gone with 1001.
Password
Check out this funny XKCD comic on a guide to create strong passwords.
Use strong passwords for SIP endpoints in Asterisk to prevent unauthorized access and protect sensitive information. Passwords should be 12-15 characters with a mix of upper/lower case letters, numbers, and special characters. Avoid common phrases, don't reuse passwords, and change them regularly.
Outbound Caller ID
The Outbound Caller ID is only used for setting the caller ID while dialing outside world using a SIP or PRI trunk with DID (Direct Inward Dialing) Facility. In case of analogue trunks, this will be ignored by provider.
Recording
As far as recording goes, if enabled you can see the recordings show up in the CDR page.
PBX - Extensions - Softphones
About Softphones
Softphones are software applications that run on your computer or mobile device and allow you to make and receive calls over the internet. They are a great alternative to traditional desk phones and can be used in conjunction with them.
There are some conditions that must be met in order for softphones to work properly with Difuse:
- Support for UDP/TCP or TLS SIP transport protocols.
- Support for the G.711u and G.711a audio codecs at the very least. (We recommend opus if available for better audio quality)
- Support for STUN, TURN or ICE for NAT traversal if you are behind a NAT.
- Optional but highly recommended support for SRTP for secure audio transmission.
There are a lot of softphones on the market with only a few supporting the above mentioned functions and protocols in a reliable way. The ones that we know work well are:
Acrobits is a paid softphone that is available for Windows, macOS, iOS and Android. Their push notification service is extremely useful to save battery life on mobile devices. TLS and SRTP are supported flawlessly.
Bria is a paid softphone that is available for Windows, macOS, iOS and Android. Their push notification service is good but not as good as Acrobits. TLS SIP is supported well, but SRTP doesn't work properly on iOS (as of version 6.12.1 this may change in the future).
MicroSIP is the best free and open source softphone that we have found atleast on Windows. It supports all the protocols and codecs that we need and works well with Difuse.
Blink is also a free and open source softphone that is available for Windows, macOS and Linux. It supports all the protocols and codecs that we need and works well with Difuse. It's user interface is a bit difficult to use but it's a great softphone nonetheless.
This is a non-exhaustive list of softphones that we have tested and know work well with Difuse. If you have a softphone that you would like to use with Difuse and it's not on this list and has trouble working with Difuse please visit our community forum or discord and let us know so we can add it to the list.
Pre-requisites for softphones
Firewall
If you are using a softphone on a computer or mobile device that is connected to the same network as the Difuse router then you don't need to do anything. If you are using a softphone on a computer or mobile device that is connected to a different network than the Difuse router then you need to make sure that the firewall on the Difuse router is configured to allow traffic from the network that the softphone is connected to.
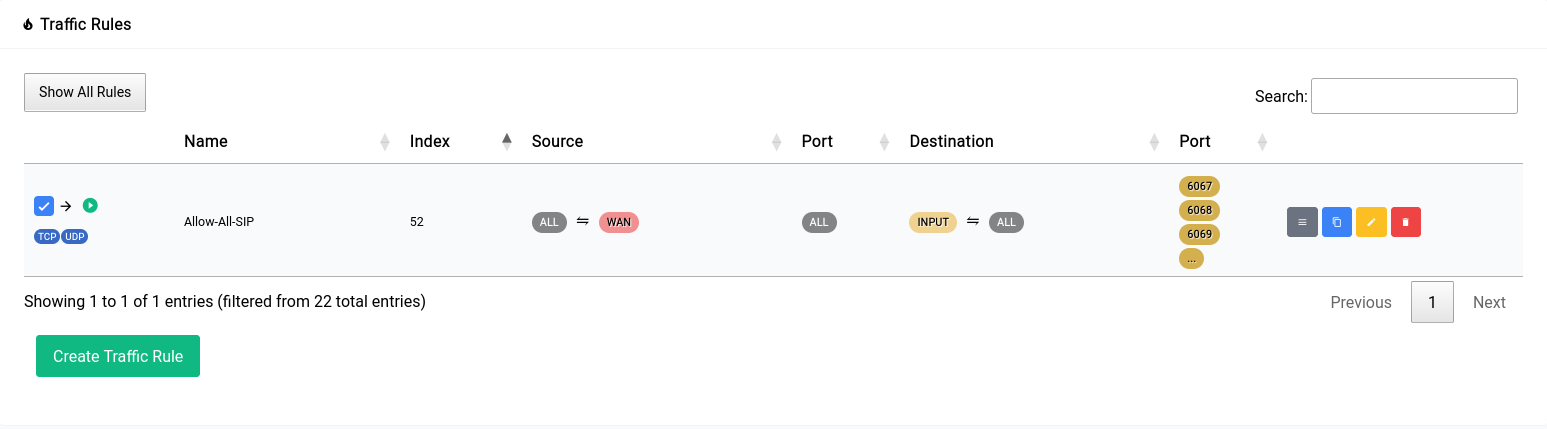

You need to allow ports 6067 (UDP Transport), 6068 (TCP Transport), 6069 (TLS Transport) and 20000-30000 (RTP) from the network that the softphone is connected to. It's pretty safe to allow all traffic from any network if you have intrusion detection enabled in Difuse as well as a strong password for the extensions. Above given is the rule that we're using for demostration but you can change it to suit your needs.
Extensions
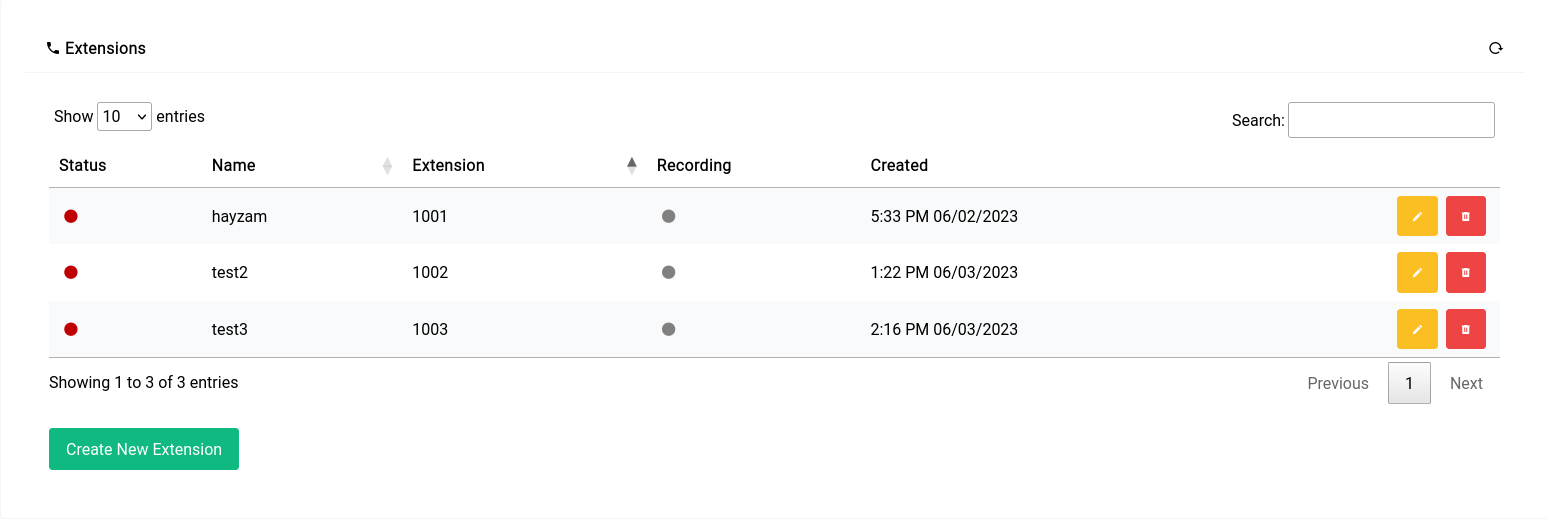
In the guides that we've written for each softphone, we're using the extension 1001 as an example. You can replace that with your own extension number.
PBX - Extensions - Softphones - Acrobits
Acrobits is pretty easy to setup with Difuse. In the following guide we're going to setup an extension on an iOS device, but the process is pretty much the same on all platforms.
Setup
We're going to assume that you have already purchased and installed the Acrobits app on your device. If you haven't, you can find it on the App Store or Google Play. As aforementioned this guide is for iOS but the process is pretty much the same on all platforms.
Adding the extension
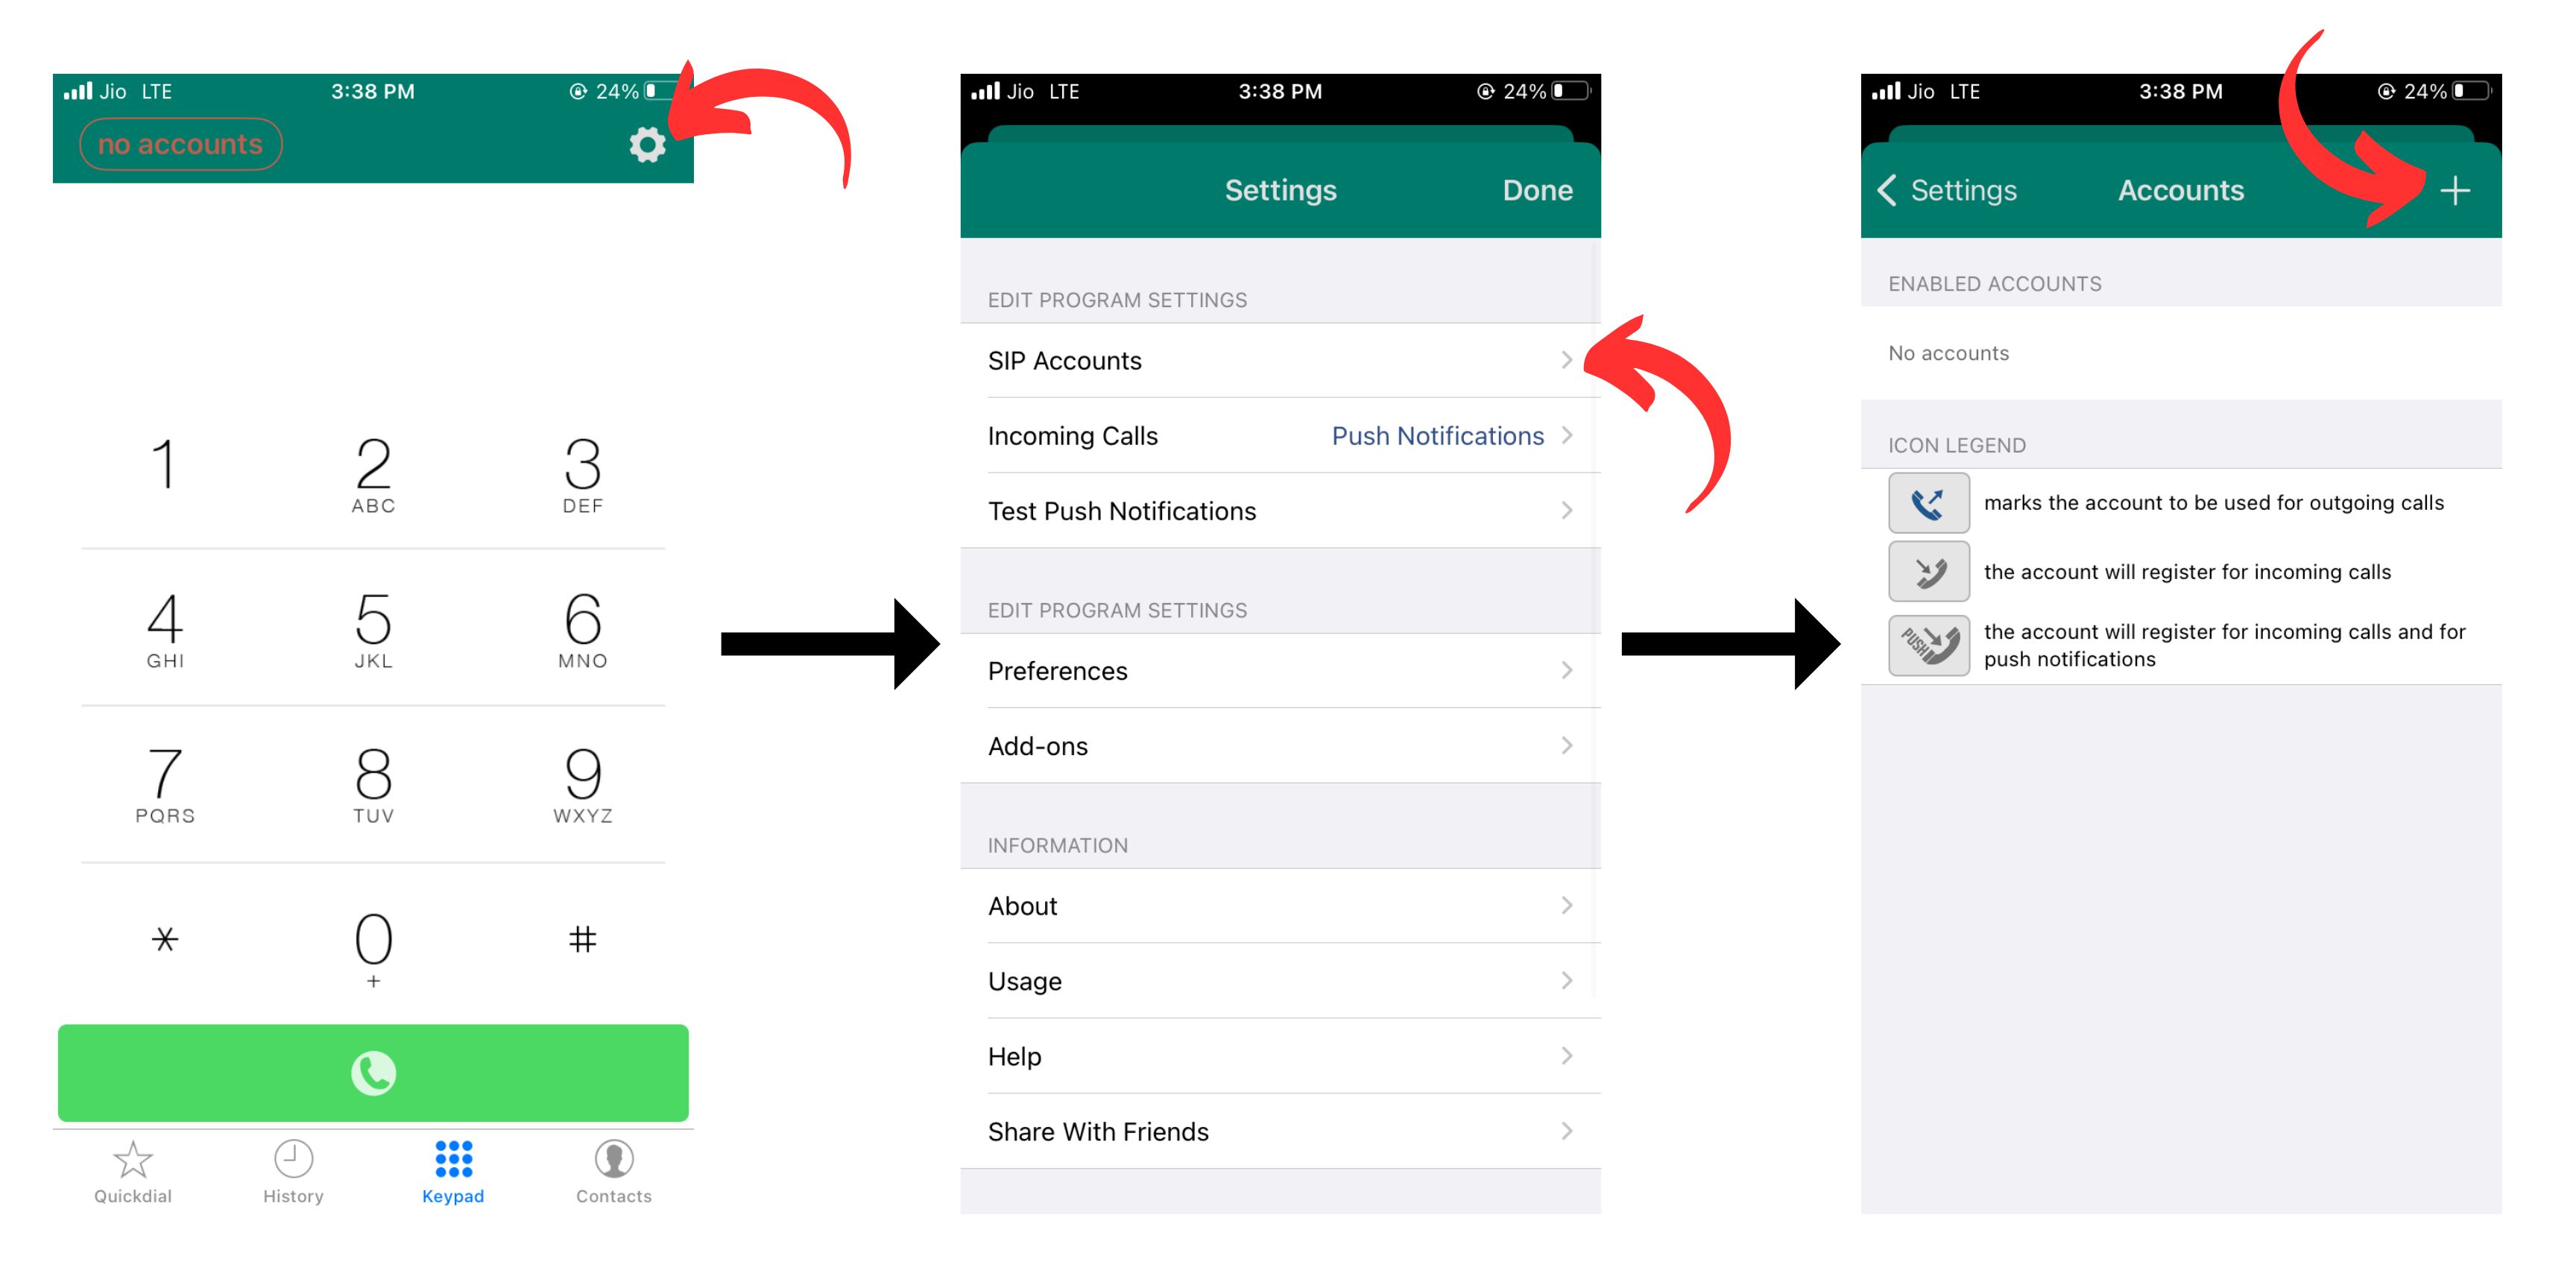
Click on the top-left gear icon to open the settings menu. Then click on the "SIP Accounts" option, after which you'll be presented with the accounts screen where you will see a "+" icon on the top-right corner. Click on it to add a new account.
Moving onto actually creating the extension:
Basic Settings
In the "New Account" page there are a few entries to fill out:
- Title: This is not really important, it's just a name for the account for you to identify it.
- Username: This is the extension number that you want to add.
- Password: This is the extension's password.
- Domain: This is the IP address or FQDN of the PBX. If you're using the PBX's FQDN you should make sure that the PBX's certificate is valid and that the FQDN resolves to the correct IP address.
Once that's all filled out you can move on to the "Incoming Calls" section we've selected global settings but standard settings are also fine. As mentioned in the app it drains the battery a bit more but it allows you to receive calls even when the app is not running.
Advanced Settings
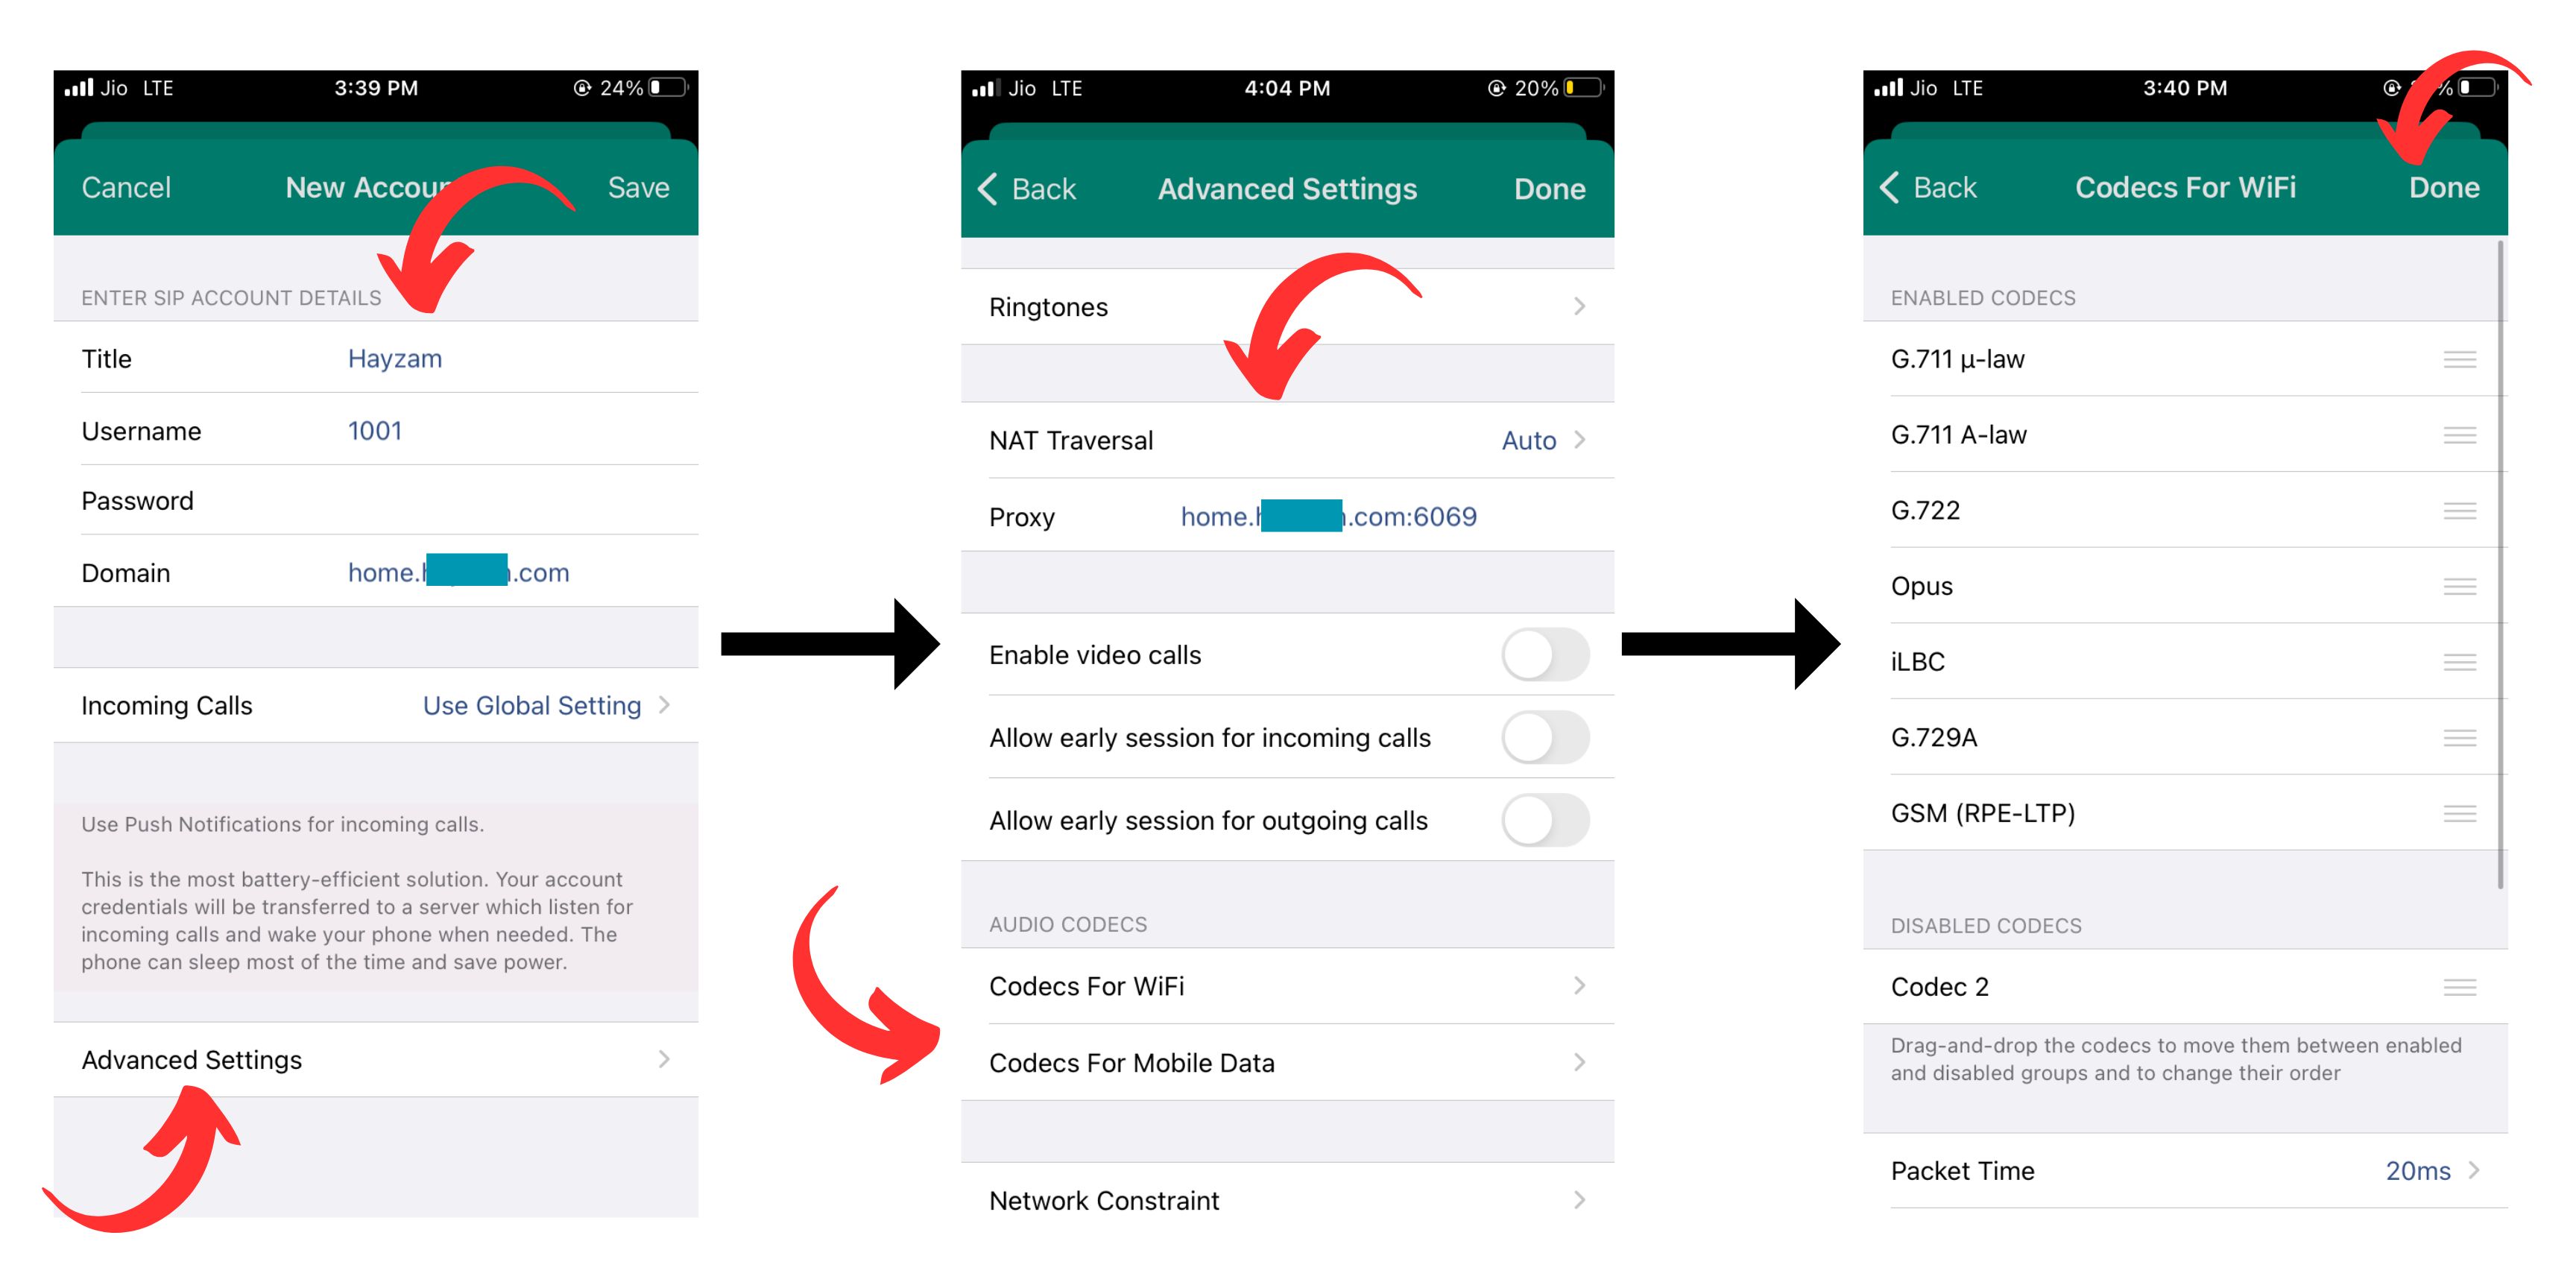
Now moving on to the "Advanced Settings" section there's a lot of options here but we're only going to go over the ones that are the most important.
-
NAT Traversal - This should be set to "Auto" as it will automatically detect if you're behind a NAT and use the appropriate method to connect to the PBX.
-
Proxy - Specify the IP address or FQDN of the PBX here along with the port of the protocol you're using, we highly recommend to sticking with TLS as it's the most secure as well as the most resistant to censorship and the default TLS port is 6069, this is the port you should use unless you've changed it on Difuse.
-
Codecs - We recommend using the same codecs for both WiFi and Mobile Data, but the choices are yours, all the codecs in the list are supported by Difuse.
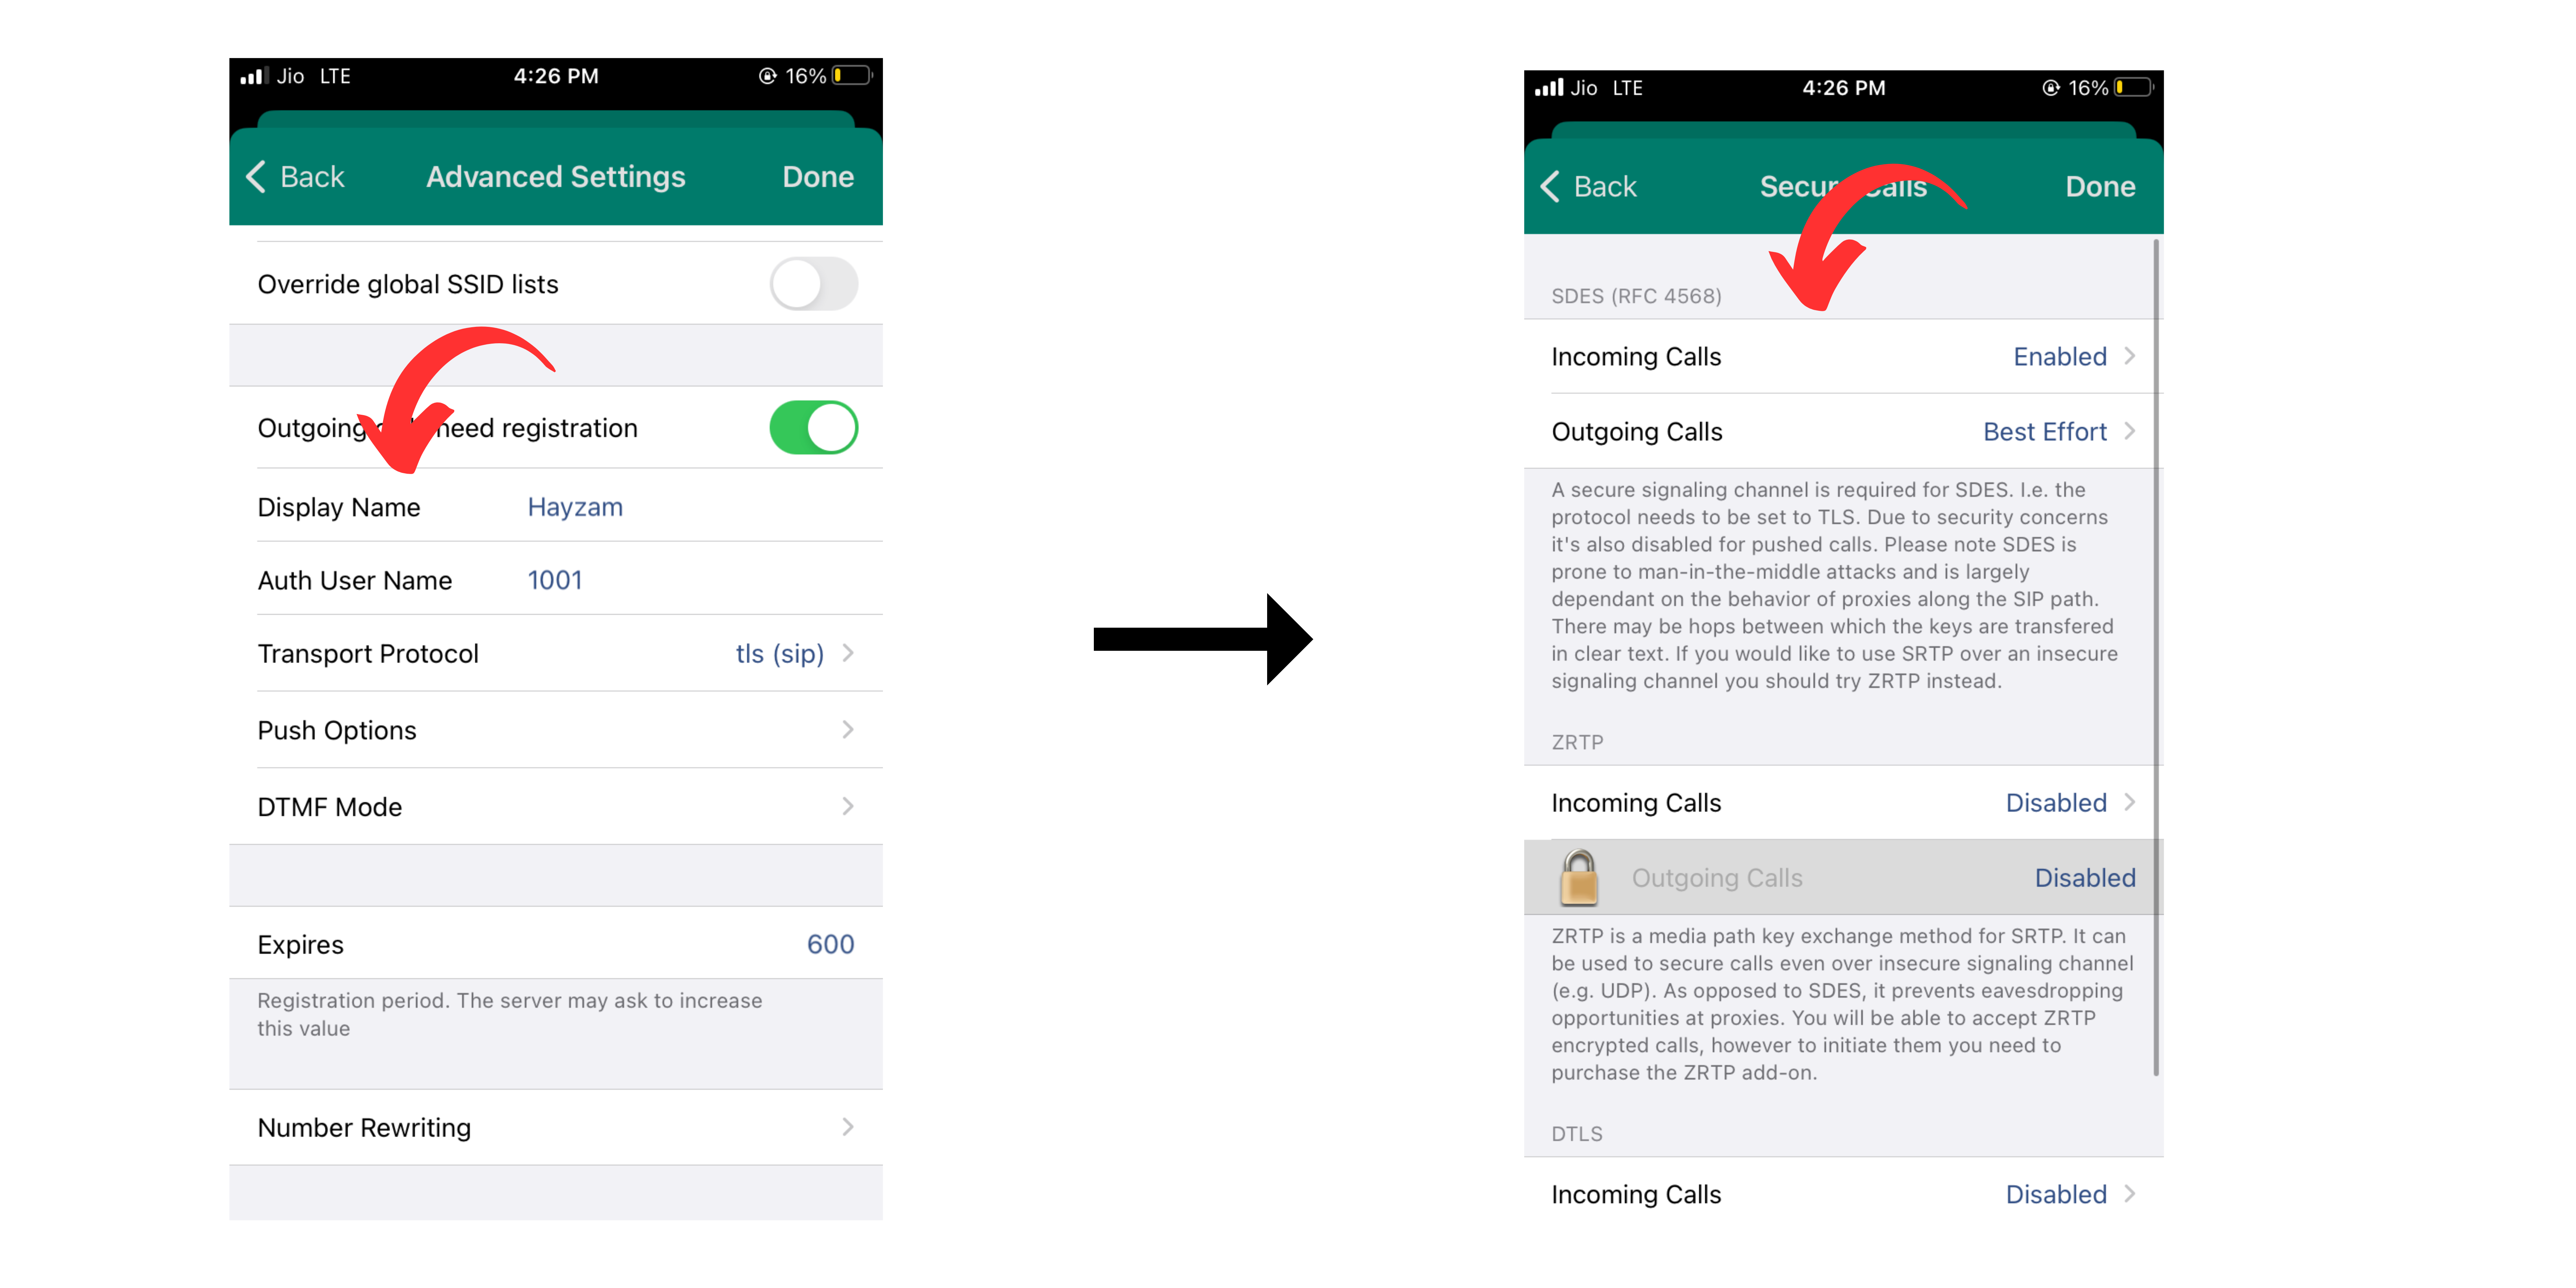
-
Display Name - This is the name that will be displayed on the other party's phone when you call them.
-
Auth Username - This is the extension number that you want to add.
-
Transport Protocol - This should be set to "TLS" as it's the most secure and the most resistant to censorship. But you can also use TCP or even UDP if you want to.
-
Secure Calling - This should be set to "Enabled" and "Required" for both incoming and outgoing ideally. But if you're facing issues with it you can set it to "Enabled" and "Best Effort" for incoming and outgoing respectively.
Once you're done with all that you can click on the "Done" button on the top-right corner and you're done. You should now be able to make and receive calls using the extension you just added.
Bria
Bria is a softphone application for Windows, macOS, iOS and Android. It is developed by CounterPath Corporation and is available for purchase on their website or on the respective app stores for mobile devices.
Setup
We're going to assume that you have already installed Bria on your device and also that you've made an extension on the Difuse PBX. In this guide we're going to be setting up Bria Mobile on an iOS device, but the process is similar for other devices as well.
Adding the extension
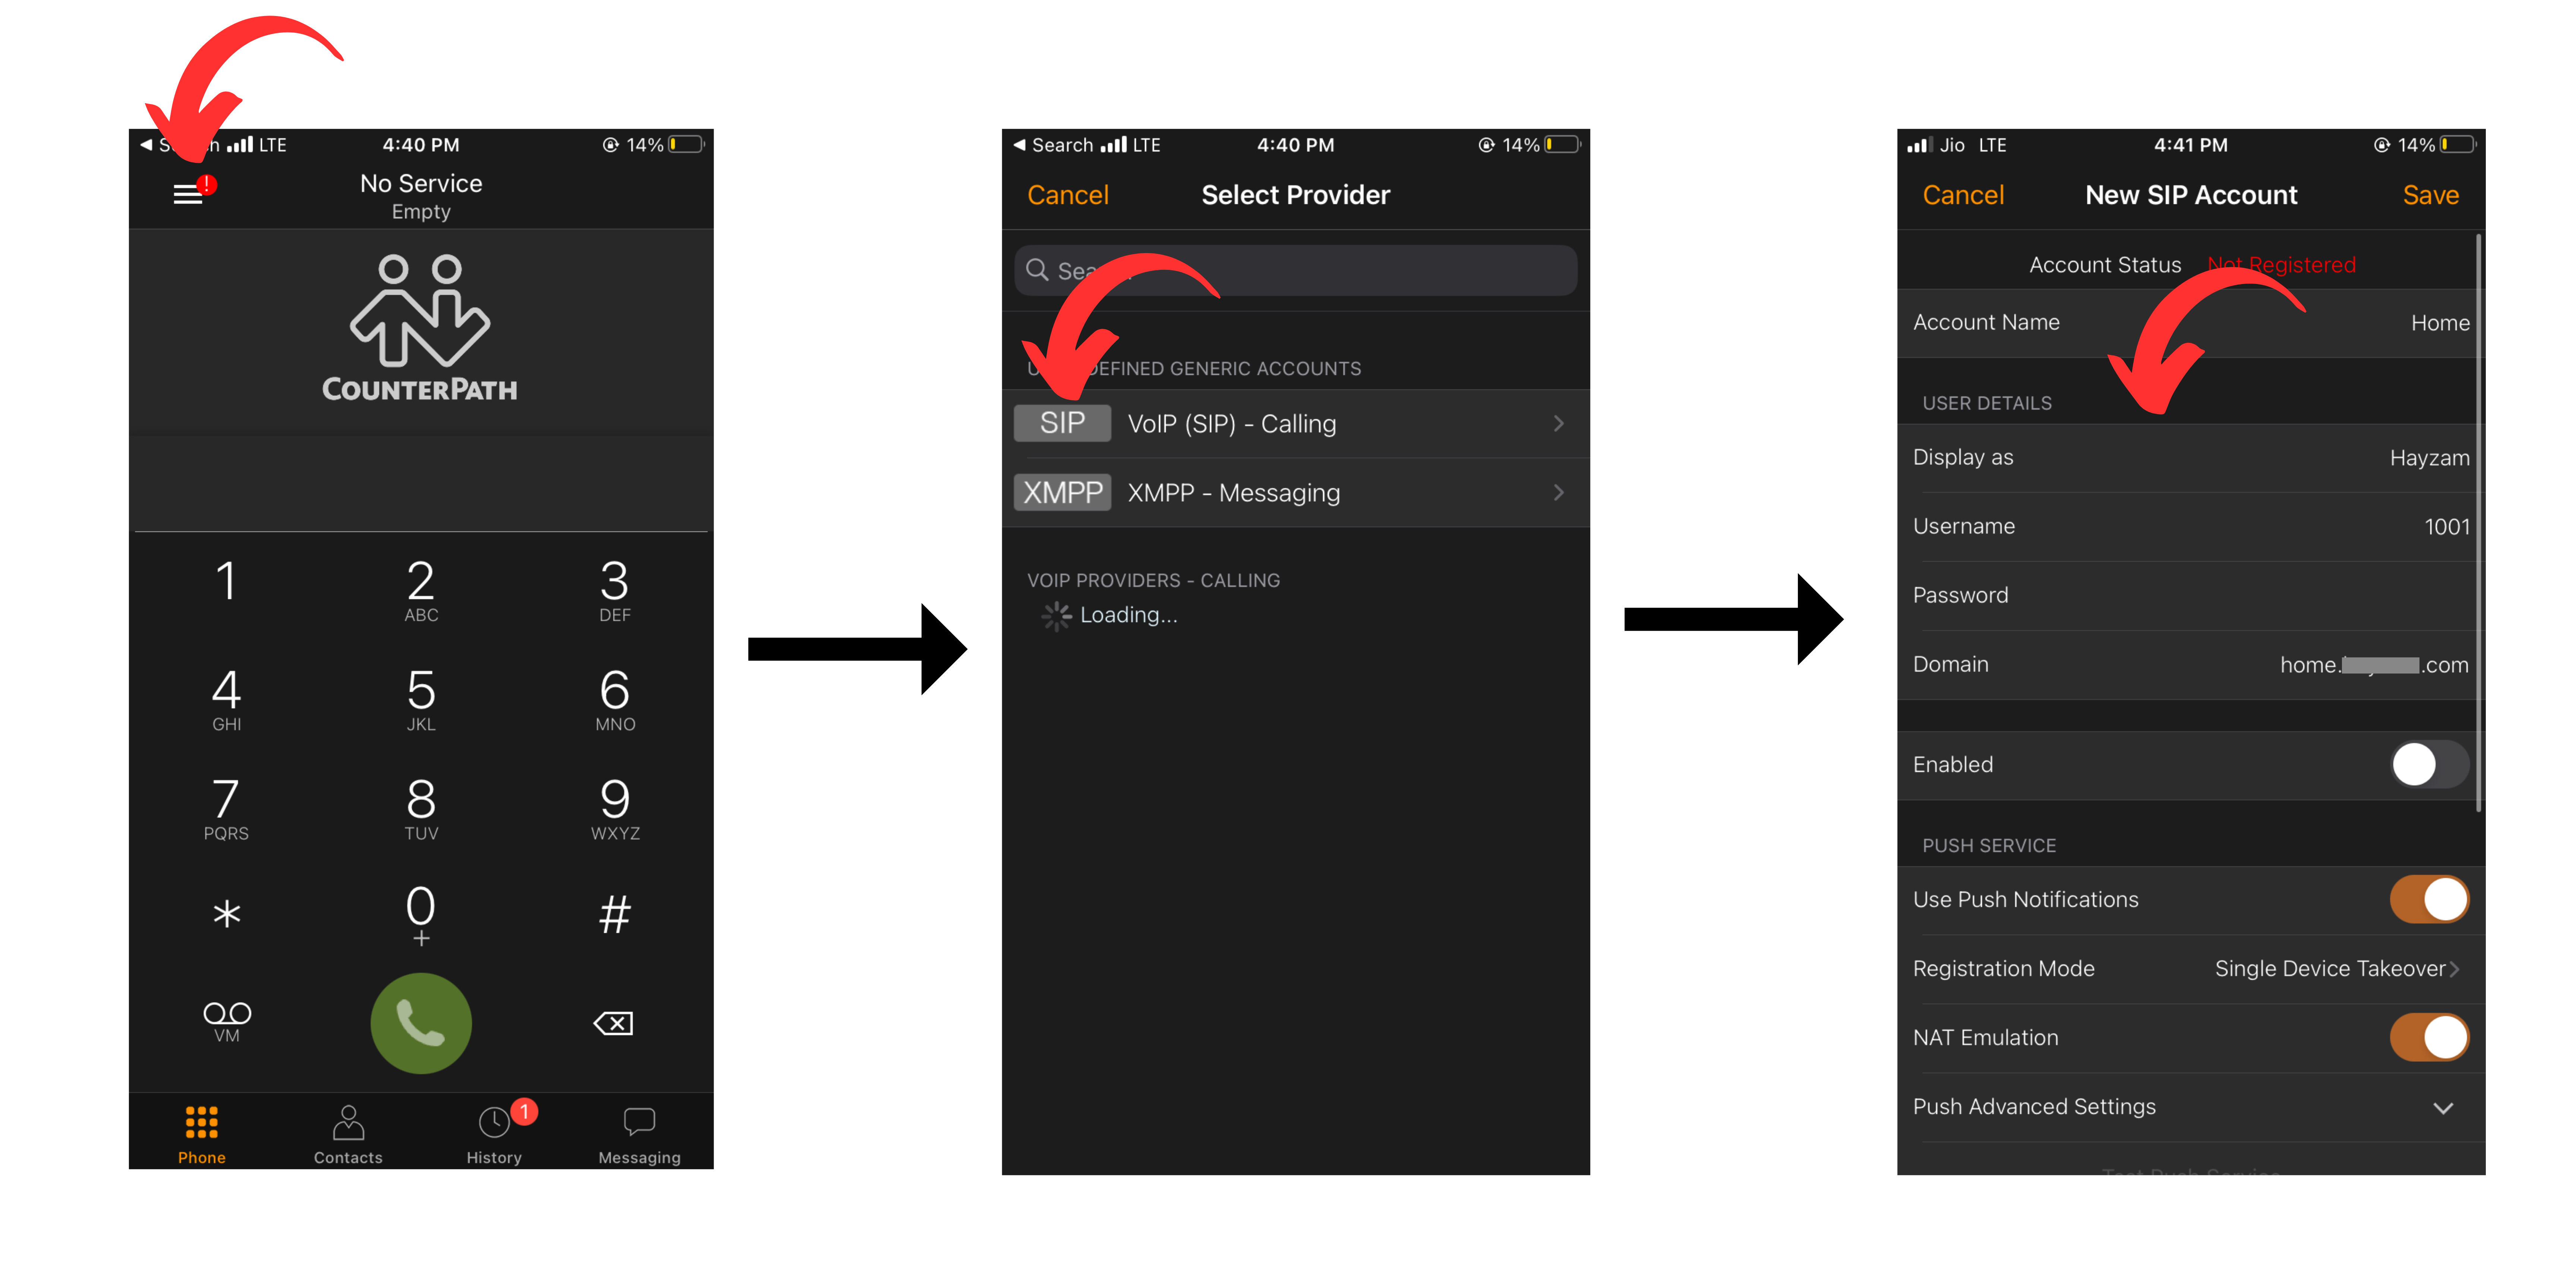
Basic Settings
Click on the top left hamburger icon and you will be greeted by a page where you can add a provider, select "VoIP (SIP) - Calling" and you will go to another page where you can add a new account.
In the new page you will be presented with a few options to fill out:
-
Account Name: This is not really important, it's just a name for the account for you to identify it.
-
Display As: This is the name that will be displayed on the other party's phone when you call them.
-
Username: This is the extension number that you want to add.
-
Password: This is the extension's password.
-
Domain: This is the IP address or FQDN of the PBX. If you're using the PBX's FQDN you should make sure that the PBX's certificate is valid and that the FQDN resolves to the correct IP address
-
Enabled: Once you're done filling out the information you can enable the account and you should be able to make calls. But don't do this yet.
Advanced Settings
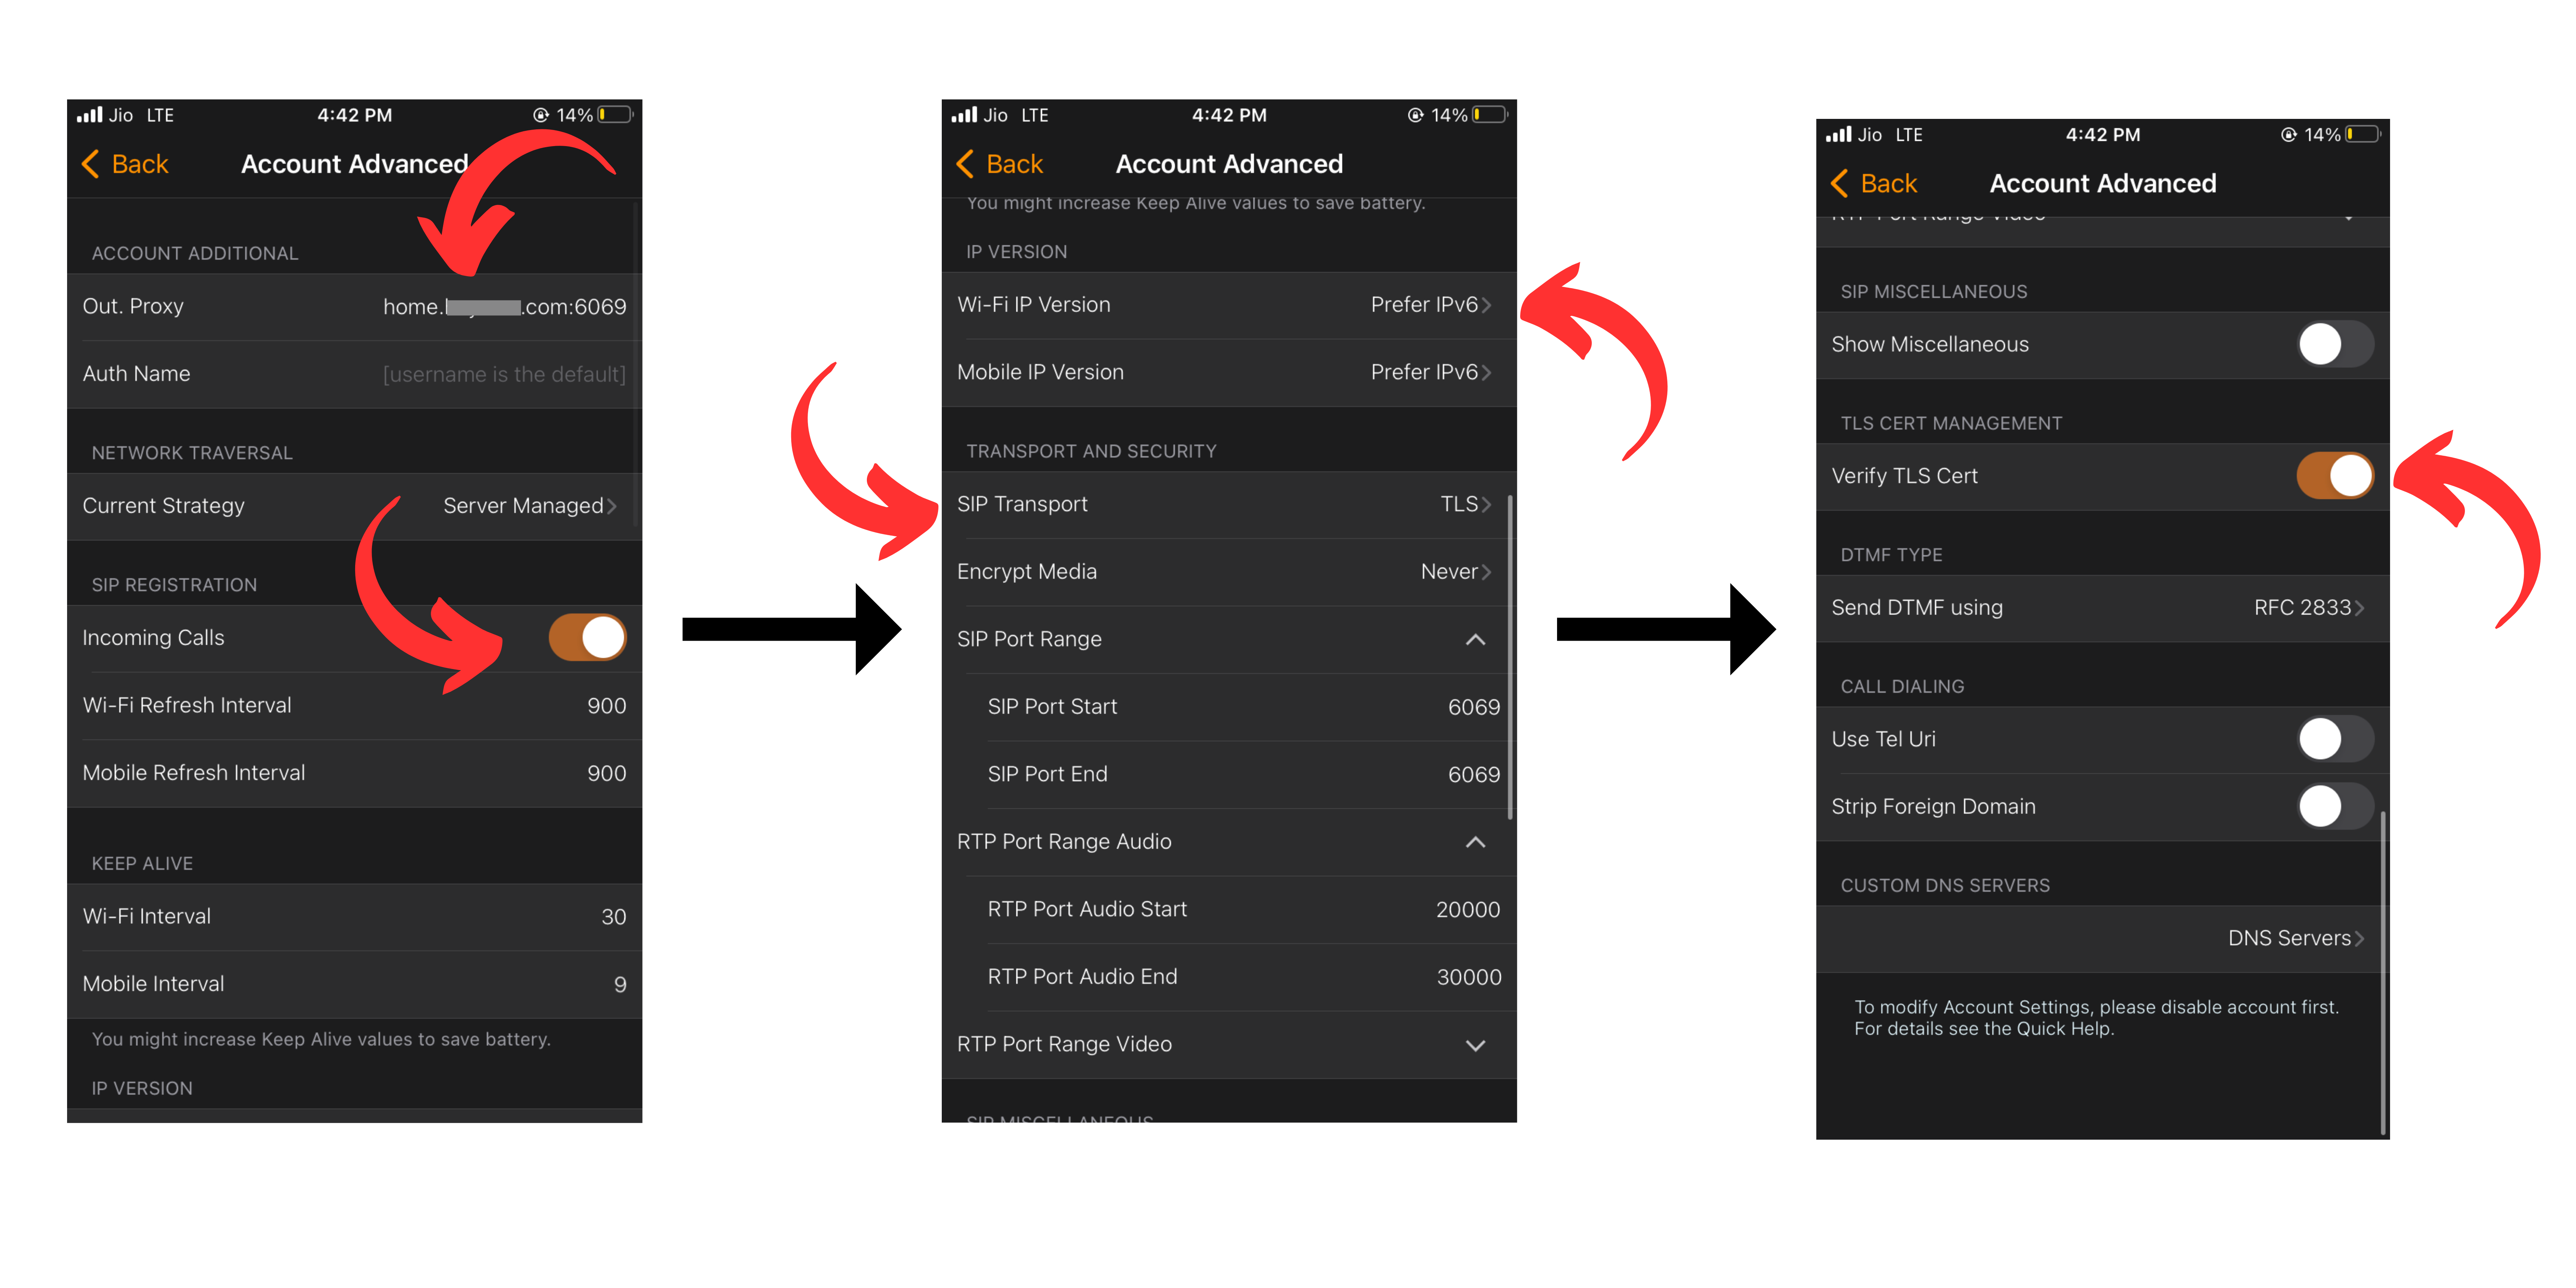
-
Outbound Proxy: This is the IP address or FQDN of the PBX. If you're using the PBX's FQDN you should make sure that the PBX's certificate is valid and that the FQDN resolves to the correct IP address along with the port number, we're using port 6069 which is the default port set by difuse for SIP over TLS but you can change it to whatever you want.
-
Incoming Calls: This option is important if you want to receive calls on the extension. You should turn it on for receiving calls.
-
IP Version: We highly recommend that you use IPv6 for the IP version as it saves a lot of headache when it comes to NAT traversal among other things, but if you don't have IPv6 connectivity you can use IPv4. Difuse out of the box supports the ability to use both IPv4 and IPv6 at the same time.
-
SIP Transport: This is the protocol that will be used for SIP communication, we highly recommend that you use TLS as it is the most secure and it is less likely to be censored by ISPs. If you don't have TLS connectivity you can use TCP or UDP.
-
Encrypt Media: We've set this option to "never" as there seems to be a bug in Bria that causes it to be able to make calls but not receive them if this option is set to "always".
-
Verify TLS Certificate: This option should be turned on if you're using TLS as the SIP transport, you can turn it off if your PBX's certificate is self-signed but we highly recommend that you use a valid certificate.
MicroSIP
MicroSIP is a free SIP client for Windows. It is developed by MicroSIP.
Setup
We're going to assume that you have already created a SIP extension in the PBX and also downloaded and installed MicroSIP.
Adding the extension
Adding the extension is very trivial with MicroSIP, just open the program and click on Add Account.
The above is what adding an account should look like, let's go over all the settings:
-
Account Name: The name of the account, this is just for you to identify the account.
-
SIP Server: The IP address or FQDN of the PBX along with the port of the protocol you're using, we highly recommend to sticking with TLS as it's the most secure as well as the most resistant to censorship and the default TLS port is 6069, this is the port you should use unless you've changed it on Difuse.
-
SIP Proxy: This will be the same as the SIP Server.
-
Username: The extension itself.
-
Domain: The domain of the PBX, this is the same as the SIP Server.
-
Login: The extension itself.
-
Password: The password of the extension.
-
Display Name: The name or number that will be displayed on the phone when you call someone.
-
Media Encryption: We recommend setting this to Optional SRTP.
-
Transport: We recommend setting this to TLS, you can also set it to TCP/UDP if you want to, but we don't recommend it.
-
NAT Traversal: We recommend turning on the ICE checkbox.
Blink
Blink is a free (as in freedom) SIP client for Linux, Windows, and macOS. It is developed by AG Projects. It's mostly used on Linux, but it's also available for Windows and macOS. (Although we recommend MicroSIP for Windows)
Setup
We're going to assume that you have already created a SIP extension in the PBX and also downloaded and installed Blink.
Adding the extension
Open Blink and click on the Accounts tab. Click on the + button to add a new account. The SIP URI will be something like sip:<extension>@domain.com. Let's go over all the other settings:
- Display Name: The name that will be displayed on the phone when you call someone.
- Password: The password of the extension.
-
Outbound Proxy: The IP address or FQDN of the PBX along with the port of the protocol you're using, we highly recommend to sticking with TLS as it's the most secure as well as the most resistant to censorship and the default TLS port is 6069, this is the port you should use unless you've changed it on Difuse.
-
Auth Username: The extension itself.
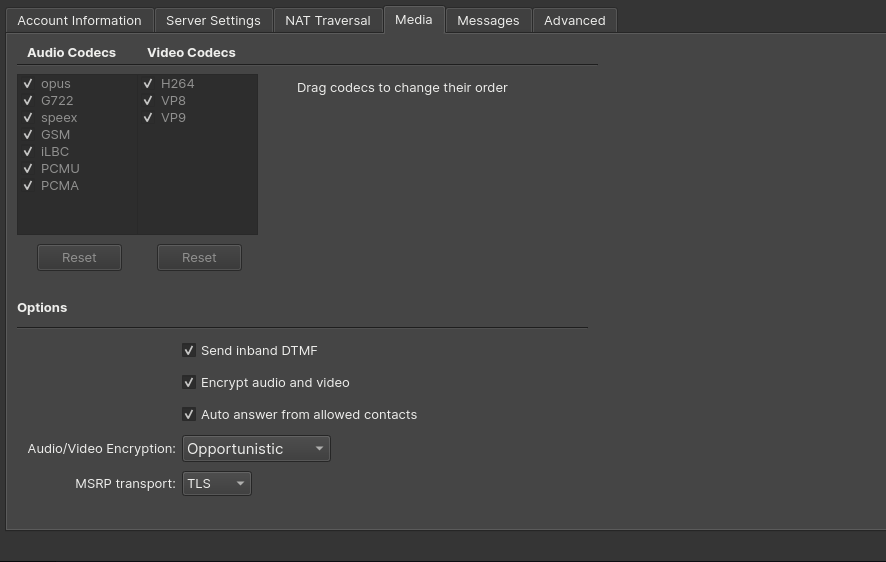
- Codec: All the codecs are supported by Difuse, but we recommend using Opus as it's the most modern and efficient codec.
- Audio Encryption - We recommend setting this to Opportunistic, but if you want to be sure that your calls are encrypted you can set it to Mandatory.
- MSRP Transport: We recommend setting this to TLS.
You can click on the re-register button to make sure that everything is working correctly.
- TLS Settings (Peer Name) - This is the FQDN of the PBX, if you're using an IP address you can leave this blank.
PBX - Trunks
SIP trunks transmit voice and video data over IP networks and offer a cost-effective alternative to traditional telephone lines. Interoperability with other communication systems is important and can be affected by protocol, codec, and feature compatibility. To ensure successful communication, work with a provider that offers compatibility testing and support.
The device has been tested with most Asterisk based Analogue Gateways and proprietary systems like Avaya, Cisco etc. In short, the device works with any gateway that is supported by Asterisk itself.
Now for purposes of demonstration we’re going to do a few things:
- Set up the LTE trunk and attach an extension to it for receiving calls as well make a test call to the outside world using it.
- Set up a simple trunk for use with Difuse.
LTE Trunk
Setting up the LTE trunk is done by clicking on the Edit LTE Trunk button in the Trunks page.
Now we’ve given 9 as our dialout prefix and Extension/1000 as our default action, the default action can pretty much be anything (IVRs or Queues or just Extensions) for simplicity we’ve chosen the extension 1000 to redirect all the calls to.
Now from our Softphone which is registered with our PBX we can make a call by dialing 9<number>, so if the number you want to dial is 9072188777 you would dial 99072188777.
SIP Trunk
Setting up a regular trunk is a little more complicated in comparison to the LTE trunk but still pretty easy as there are not many options. You can click on the green Create New Trunk button to start creating a new trunk.
The above given is the configuration for a barebones SIP trunk (also running asterisk).
Now let's go through the form and see what each field does:
Name
The name is just an identifier for you to keep track of.
Host
The host is the IP address of the device that you’re going to be connecting to, in our case it’s 10.254.248.2 The port is bog standard 5060 but it may be different in your case be sure to check on that in case of troubleshooting.
Dialout Prefix
this is what you would use to dial the outside world from your PBX similar to the one in the LTE Trunk. In our case it’s 8, so if we want to dial outside using the Office trunk we would use the number 8<number>.
Default Action
This is what the device will do when a call is received on this specific trunk, you can set it to anything from IVR to Queues to Extensions. This depends entirely on your usecase.
Gateway Authentication
If you enable Gateway Authentication, you need to fill in the details which will be provided to you by the SIP provider or the gateway configuration.
Codecs
Codecs are used to encode and decode the audio data, the device supports a wide variety of codecs, but for the sake of simplicity we’ve gone with the most common one.
Now coming to the configuration on the gateway (10.254.248.2), it would look something like this, in case of sip.conf and pjsip.conf respectively:
;sip.conf

[sip-difuse]
type=peer
insecure = port,invite
qualify=yes
host=10.254.248.1 (you can specify your-device-ip-address)
port=6067
context=sip-difuse
;pjsip.conf

;pjsip.conf

[transport-udp]
type=transport
protocol=udp
bind=0.0.0.0

[sip-difuse]
type=endpoint
transport=transport-udp
insecure=port,invite
qualify=yes
host=10.254.248.1
port=5060
context=sip-difuse
In the extensions.conf you would have something like this:
;extensions.conf

[sip-difuse]
exten => _050XXXXXXXXX,1,Dial(DAHDI/${EXTEN})
exten => _050XXXXXXXXX,n,Hangup()
In our example we’re using the context name sip-difuse you can define your own, now in practice what should happen is when a call is initiated with the dialout prefix 8 as in our example it should go to this trunk, our device truncates the prefix before sending it to the other gateway so on the other side if you dial 8050123456789, it will only see 050123456789.
PBX - Call Routing
Call routing directs incoming calls to the right person, department, or extension within an organization, while outbound routing directs outgoing calls to the appropriate external number or network. Both types of routing help businesses manage their calls efficiently and improve the caller experience.
To demonstrate we’ll be doing a few things:
- Create an inbound route to route a call from one number to an extension
- Create an outbound route that will take numbers having a specific pattern to a specific gateway
We have implemented our own version of Asterisk’s Pattern matching algorithm, please follow this excellent guide on setting up the right pattern for your route.
Inbound Routing
Lets say you have a PRI or SIP trunk with the following pilot and DID numbers respectively
Pilot Number: 042142000 DID Number: 042142000 - 042142099 (100 Numbers)
If you want to route the calls to the number 042142050 to the extension 1001 you’d create an inbound route like this:
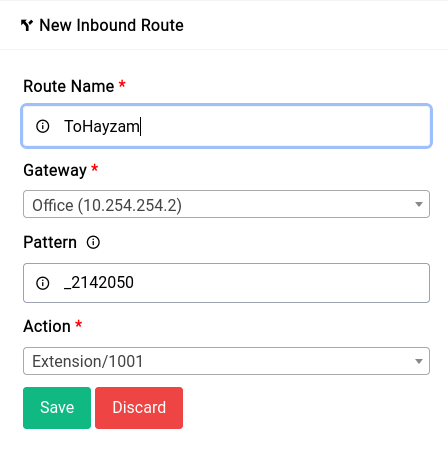
You an notice in the pattern we’ve given _2142050, the default action can be pretty much anything from IVRs to Queues to extensions.
Outbound Routing
Outbound call routing involves selecting the most appropriate outbound route for a call, based on factors such as cost, quality, and availability. This is typically done using a routing table or algorithm that determines the best route for each call.
For our example, we’re going to setup a route that will route all calls that starts with the pattern _20XX to go through the Office gateway that we have created earlier.
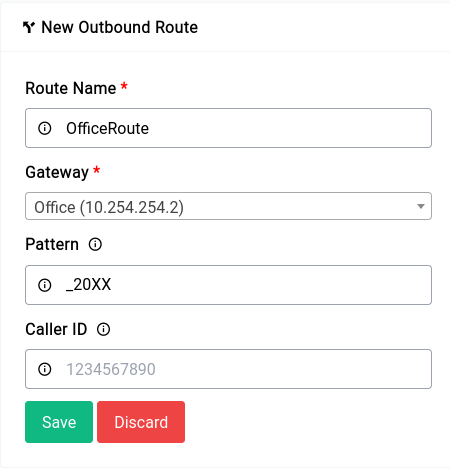
Normally, the Caller ID of the calling extension is passed through, but if you specify a Caller ID in this field, it will override the default Caller ID. Additionally, when creating the extension, you have the option to specify an outbound CID. If you have set an outbound CID, it will be used in the case of a Telecom-provided DID.
PBX - IVR
IVR (Interactive Voice Response) is an automated telephony system that uses voice prompts and touch-tone keypad inputs to interact with callers, providing information and routing calls to the appropriate department or agent.
The building blocks of the IVR are the sounds, you can upload sounds here and use it in your IVR menus.
If you’re looking to generate high quality TTS, you can check out solutions like this
Now we’re going to do a few things:
- Upload a bunch of different sounds for use with our IVR
- Creating an IVR with the uploaded Sounds
- Attached the newly created IVR to the LTE trunk.
Uploading Sounds
To upload sounds you can switch to the Sounds tab in the IVR page drag and drop the MP3 files that you’d like to use in your IVR menus.
Example TTS in Text:
Greeting: Hello, Welcome to our Office!
Prompt: Press 1 For Sales and Press 2 For Support.
Timeout: You have been timed out.
Invalid: That option is invalid.
Out of Constraint: Sorry, we're not operational today.
You should only upload MP3 files, the device will take care of all the conversions for asterisk automatically.
You need not upload the sounds one by one, you can do them all together like this:
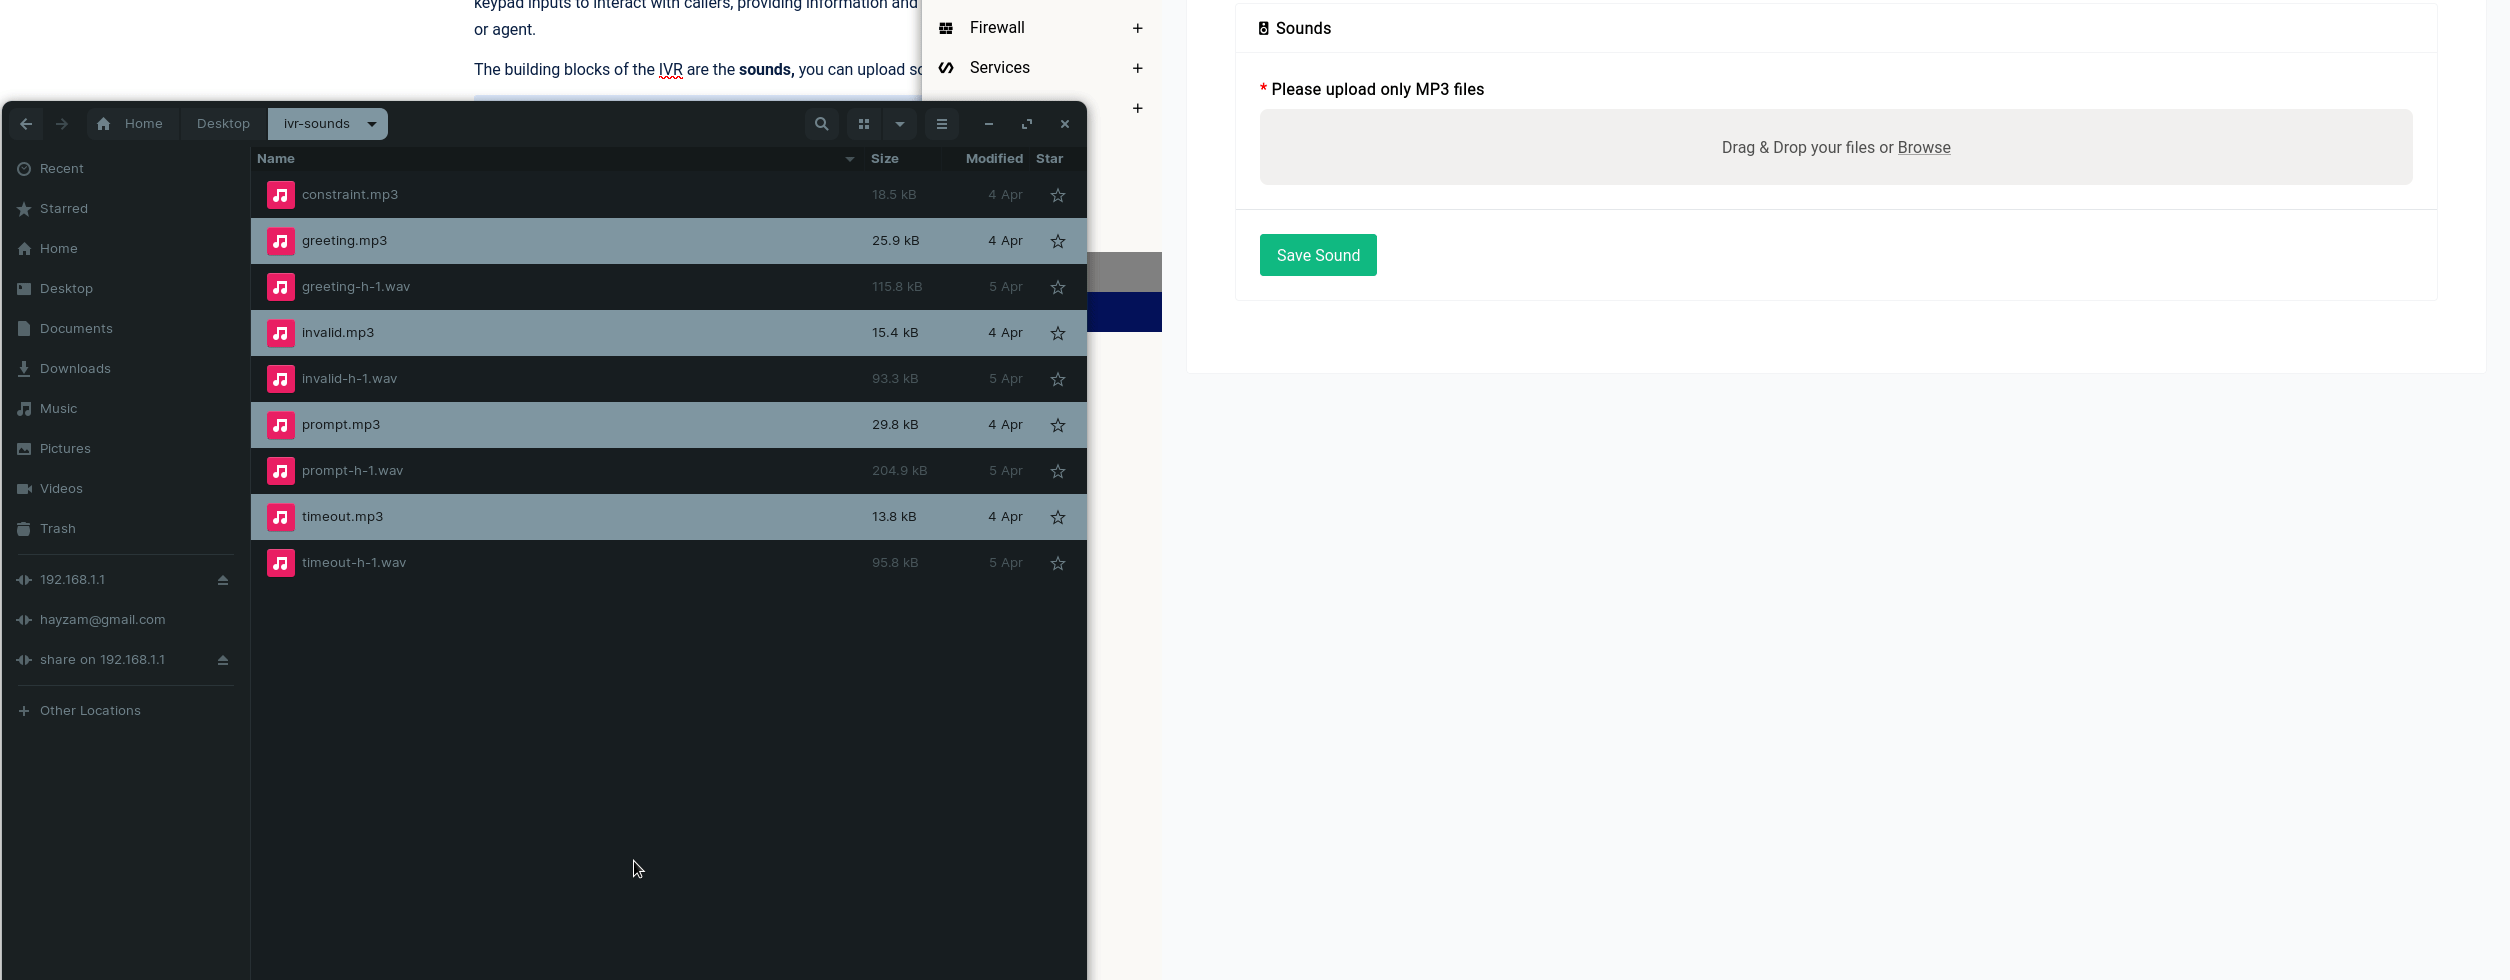
Once the sounds are uploaded you can click on the Save Sound button and the newly uploaded sounds should show up in a table.
The sounds are now ready to be used in an IVR menu.
Creating an IVR
To create an IVR menu, you can go into the Plans tab and click on the Create New Plan button. You should be greeted with the following form:
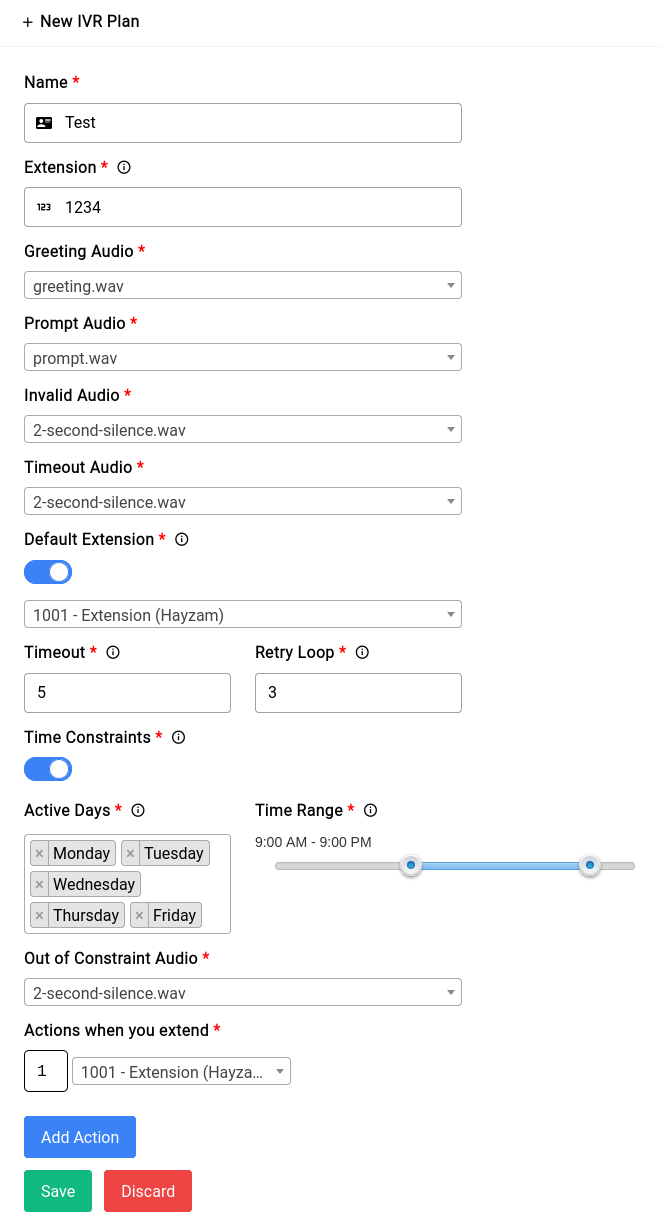
We’ve already filled in almost all details now let’s go over what these are.
Name
The name is just one that you can use to identify the IVR with.
Extension
This is for you to call during testing among other things (you could forward to this number from another gateway if you’d like when a call arrives there)
Audio(s)
The Audio suffixed options can all be populated with a sound file that you uploaded. It’s imperative that you use meaningful filenames so you know what is what.
Default Extension
For our default extension we’ve specified one which is Extension/1000, this is so that if a call gets timed out for some reason (due to user inactivity perhaps) the call will still get through to an agent on our side. The timeout and retry loops as the nomenclature suggests times the user out if they didn’t submit an option to the IVR and retry loop is the number of times the IVR should play itself over again for the user to be able to submit an option.
Time Constraints
We’ve selected time constraints and you have the option not to, time constraints are basically the time periods in which the calls received by the device should get through, we’ve selected Mondays through Fridays from 9 AM to 9 PM for testing purposes. Now the out of constraint audio option is the audio that plays when the call that is placed is outside of your operational time.
Actions
This section allows you to specify what key entries will do what, now in our case we’ve only specified one action which is when the number 1 is entered by the caller, it should route the call to Hayzam who is on extension 1001.
Once the IVR is setup, it should look something like this in the table:
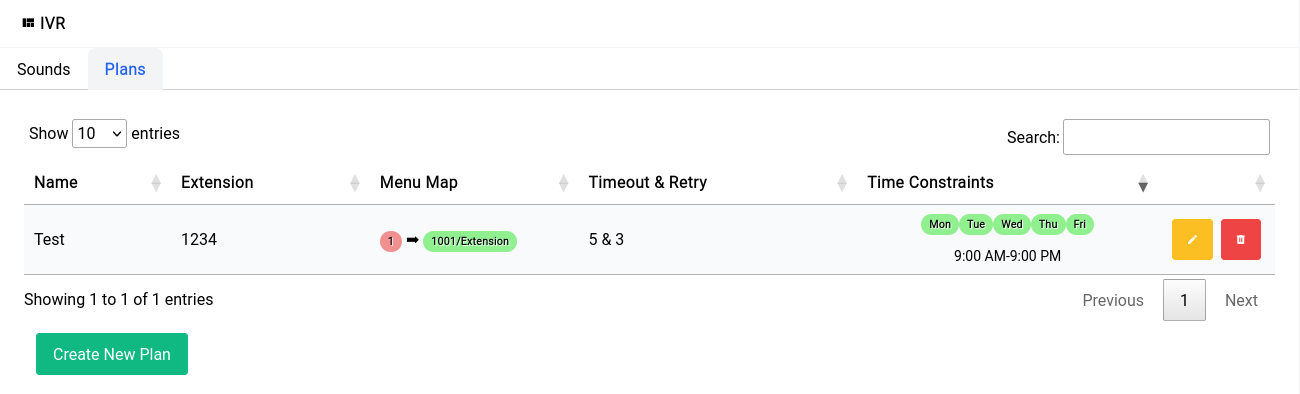
PBX - Queues
Queues allow incoming calls to be distributed to a group of agents or extensions based on predefined rules.
To create a new Queue all you have to do is click on the Create New Queue button in the Queues page, and the following form will pop up:
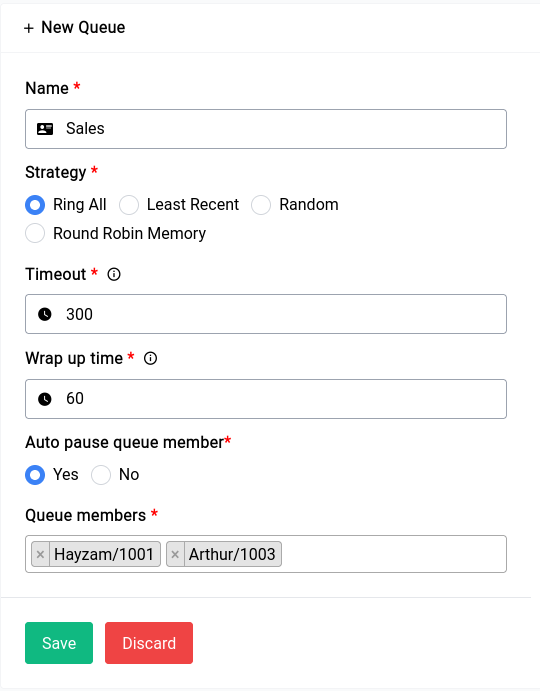
Let's go over the fields in the form:
Name
Name is just an identifier for the Queue.
Strategy
There are 4 different strategies you can choose from, we have chosen Ring All, here’s a brief description of all of them:
- Ring All: This is the default strategy, where all available agents are rung until someone answers the call.
- Least Recent: This strategy rings the agent who was least recently called by the queue.
- Random: This strategy as the name suggests will select a random member and pass down the call to them.
- Round Robin Memory: This strategy uses round-robin with memory, which remembers where the queue left off during the last ring pass.
Timeout
This lets you set the amount of time (in seconds) a caller should be placed in the queue before being dropped, in this case we’ve selected 300.
Wrap Up Time
Thsis refers to the amount of time (in seconds) an agent needs to complete after the end of a call before they can receive another call, in this case we’ve selected 60.
Auto Pause
This option is a setting that determines whether to automatically pause an agent in a queue if they don't answer a call, it’s usually set to yes.
Now in the queue members you can add as many as you like, if you notice these members come from the extensions page.
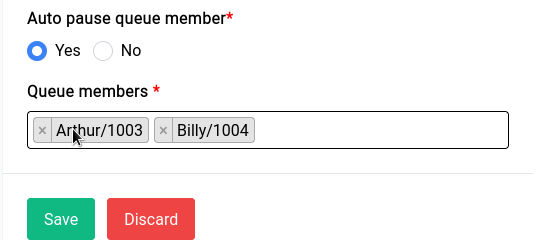
PBX - SMS
You need an LTE module along with a functional SIM card with enough balance to make any of the things in this section work.
Receiving SMS
Any SMS that is received while the device is turned on and the SIM card is initialized will show up in the table on top:
If the message is longer than 30 characters the text is truncated in the table but if you click on the green eye icon you can see the full message.

Sending SMS
You need enough balance with your carrier to be able to send SMS (sometimes even receive them)
Sending SMS can be done by clicking on the New SMS button and filling out the form.
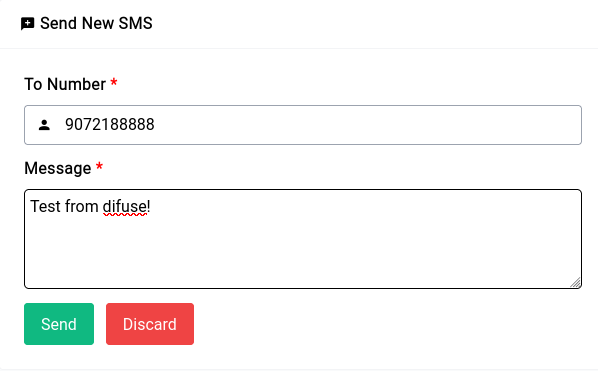
The system used underneath is asterisk, so sometimes even if asterisk considers the SMS to be sent, your provider might have dropped it without giving a notice, in that case the device will still consider the SMS sent but in actuality it would’ve never been sent.
You can also use the API to send and receive SMS.
PBX - Call Detail Records
The CDR in the GUI is automatically populated from data that comes from the asterisk database, if there’s recording enabled for an extension the download button will show up here.
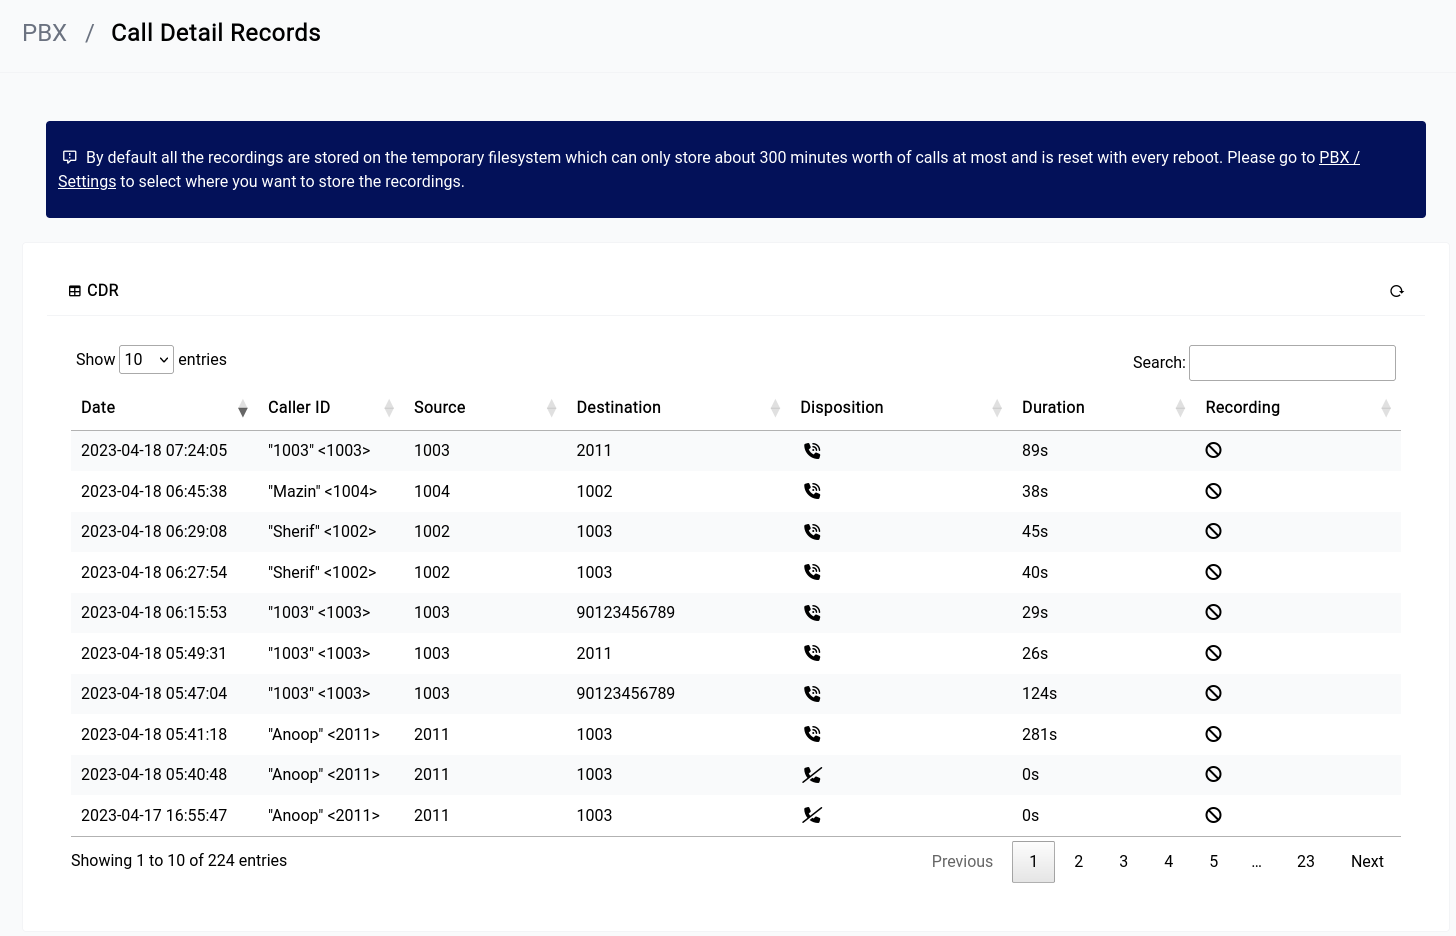
As the alert message suggests it’s not a good idea to keep using the temporary file system for voice recordings, you should use a non-volatile storage for that purpose (either the M.2 SSD or an attached USB stick)
PBX - Block List
A blocklist is nothing but a list of phone numbers or caller IDs that are prohibited from making inbound calls to a particular phone system or extension. When a call comes in from a number on the blocklist, the device will simply reject the call automatically, preventing it from ringing through to the intended recipient.
Blocklists are often used to filter out unwanted calls, such as telemarketers, spam callers, and other types of callers that nuisance and-or malicious categories.
The Block List uses simple numbers instead of patterns this was done to make their setup as simple as possible.
Adding a new block list is super simple, all you have to do is click on the Create New Block List button and a form will come up:
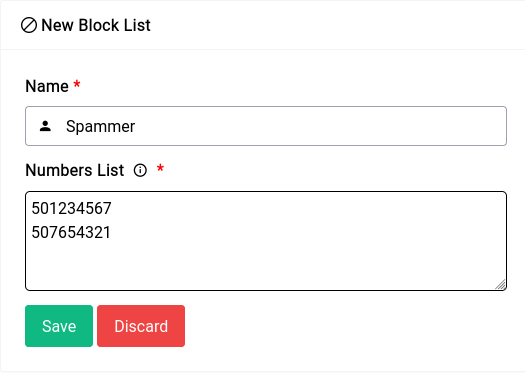
Name
Name is just an identifier for you to identify the list with.
Numbers
The numbers list as you can see has 2 numbers, now if a caller make a call with the caller ID +971501234567 or +971507654321, the calls will automatically be dropped as both those caller IDs contains strings that are to be blocked.
But for instance if they call from 0507654321 or 0501234567, the call will not be dropped as it is technically not in the list.
A better option in cases like that would be to just specify 7654321 or 1234567.
PBX - Settings
This is where all asterisk related settings resides, there are 3 major sections:
- Network
- Security
- Extras
Network
We highly recommend you keep these settings as they’re not really blocked by many ISPs for SIP/TLS SIP traffic neither are they used by script kiddies to target and hack into.
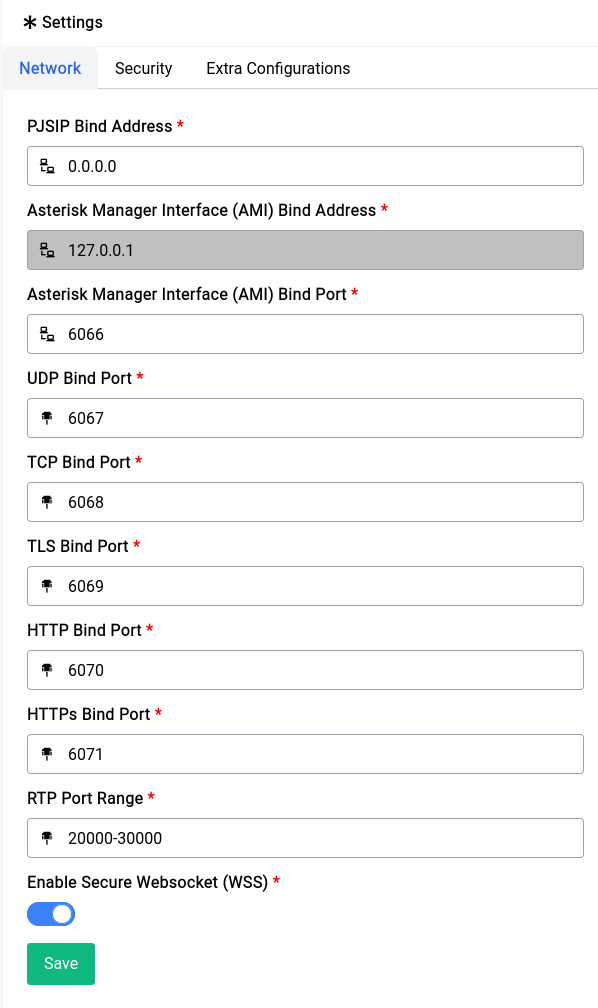
But if you want to change it in a way that makes configuration as simple as possible, use the following values:
| Type | Port |
|---|---|
| UDP | 5060 |
| TLS | 5061 |
Security
In the Security tab you’ll see two options:
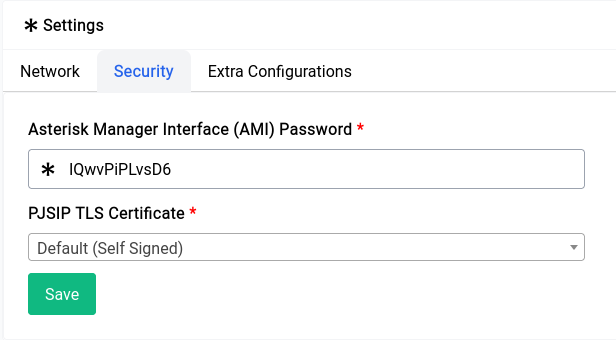
The AMI password is that for the asterisk manager that the device uses to communicate with the asterisk service underneath, it’s recommended to change it especially if you’re planning on keeping the device open to the internet.
The PJSIP TLS Certificate is the certificate that will be used for encryption on calls, as discussed in the ACME Certificates section you can set one up here and asterisk will automatically start using it for calls.
Extras
Voice Recordings
By default all voice recordings are stored on volatile memory (RAM) which will be cleared when the disk space is severely limited or during a restart, this is not ideal as you would constantly lose recordings of calls.
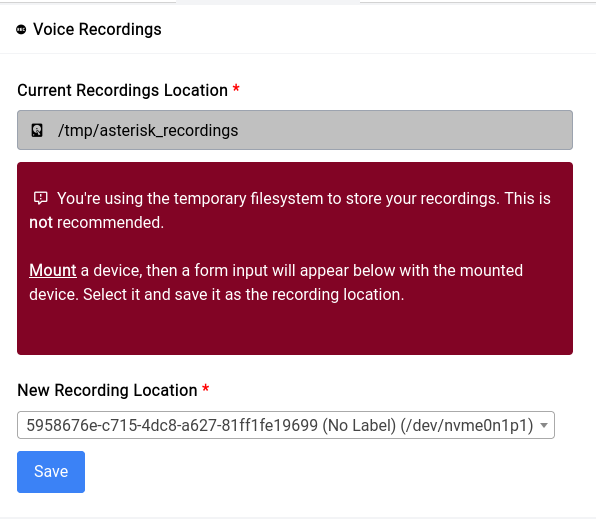
To fix this issue you could mount the M.2 SSD (in case your device has one) or a USB stick and use that to store your recordings. Once you mount the drive it should look something like the above and clicking on save will result in the section looking a lot less scarier.
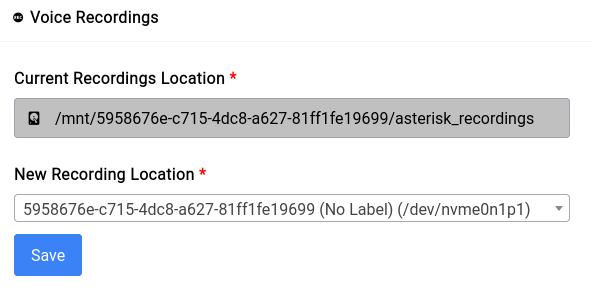
It will automatically create a folder named asterisk_recordings upon save and you don’t have to worry about that.
Additions to Asterisk Configs
The device manipulates all the asterisk configurations in their default locations and editing them directly somehow on your own is a very bad idea. Instead you can use the Extra sections in this page to add all the extra configs that you want to pjsip.conf, extensions.conf and queues.conf respectively:
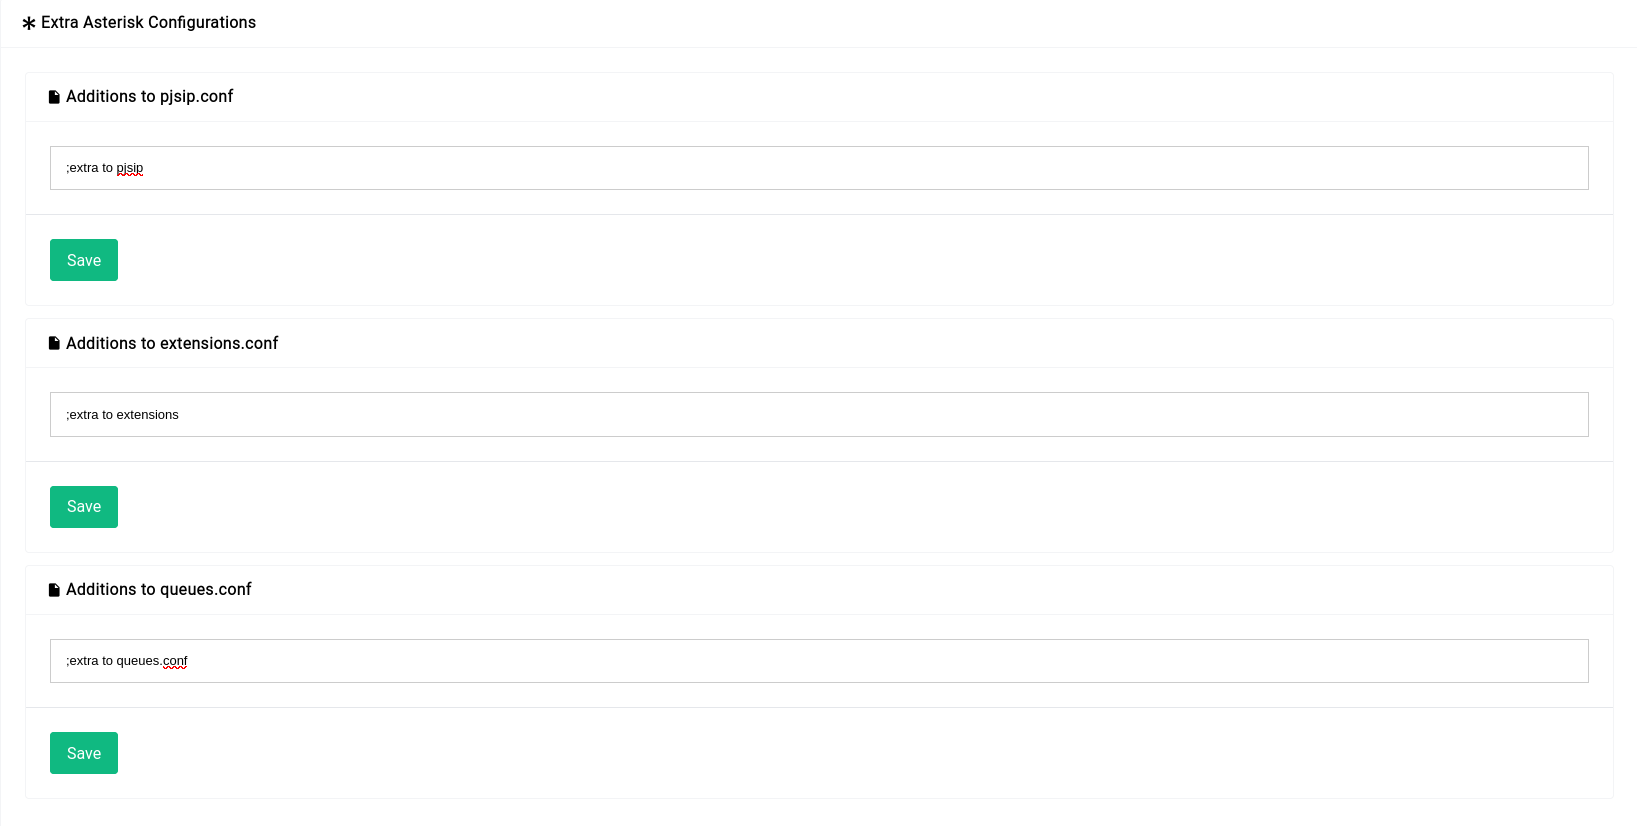
This will be appended to the asterisk configurations.
API
The device offers some API endpoints that you can use for programmatically interacting with it. The below endpoints/lists are in-exhaustive and will be updated as more things get added.
SMS API
If you have an LTE module in your device, you can use the API to send and receive SMS.
We’re going to assume your LAN IP is 192.168.1.1 in the following examples.
| Route | Function |
|---|---|
POST /api/sms/get-all | Get All SMS |
POST /api/sms/get-one | Get Specific SMS using ID |
POST /api/sms/delete-one | Delete specific SMS using ID |
POST /api/sms/send-one | Send an SMS |
The base URL will always be https://192.168.1.1, or whatever your LAN IP is (you can also use hostname). The auth parameter for all endpoints is your admin password.
Getting All SMS
POST /api/sms/get-all
This endpoint expects 2 JSON encoded parameters:
{
  "auth": "changemefast",
  "type": "sent" /* or received */
}
Here’s an example curl request for getting all Sent and Received SMS:
curl -X POST -H "Content-Type: application/json" -d '{"auth":"changemefast", "type":"sent"}' https://192.168.1.1/api/sms/get-all -k
curl -X POST -H "Content-Type: application/json" -d '{"auth":"changemefast", "type":"received"}' https://192.168.1.1/api/sms/get-all -k
Getting One SMS
POST /api/sms/get-one
This endpoint expects 3 JSON encoded parameters:
{
"auth": "changemefast",
"type": "sent", /* or received */
"id": "1" /* ID of the message */
}
Deleting One SMS
POST /api/sms/delete-one
This endpoint expects 3 JSON encoded parameters:
{
"auth": "changemefast",
"type": "sent",
"id": "1"
}
Here’s an example curl request for deleting a sent and received SMS:
curl -X POST -H "Content-Type: application/json" -d '{"auth":"changemefast", "type":"sent", "id": "2"}' https://192.168.1.1/api/sms/delete-one -k
curl -X POST -H "Content-Type: application/json" -d '{"auth":"changemefast", "type":"received", "id": "2"}' https://192.168.1.1/api/sms/delete-one -k
Sending One SMS
POST /api/sms/send-one
This endpoint expects 3 JSON encoded parameters:
{
"auth": "changemefast",
"to": "123456789", /* number to send sms to */
"message": "<escaped message>"
}
Here’s an example curl request for sending an SMS:
curl -X POST -H "Content-Type: application/json" -d '{"auth":"changemefast", "to":"9078155555", "message":"Hello World!"}' https://192.168.1.1/api/sms/send-one -k